
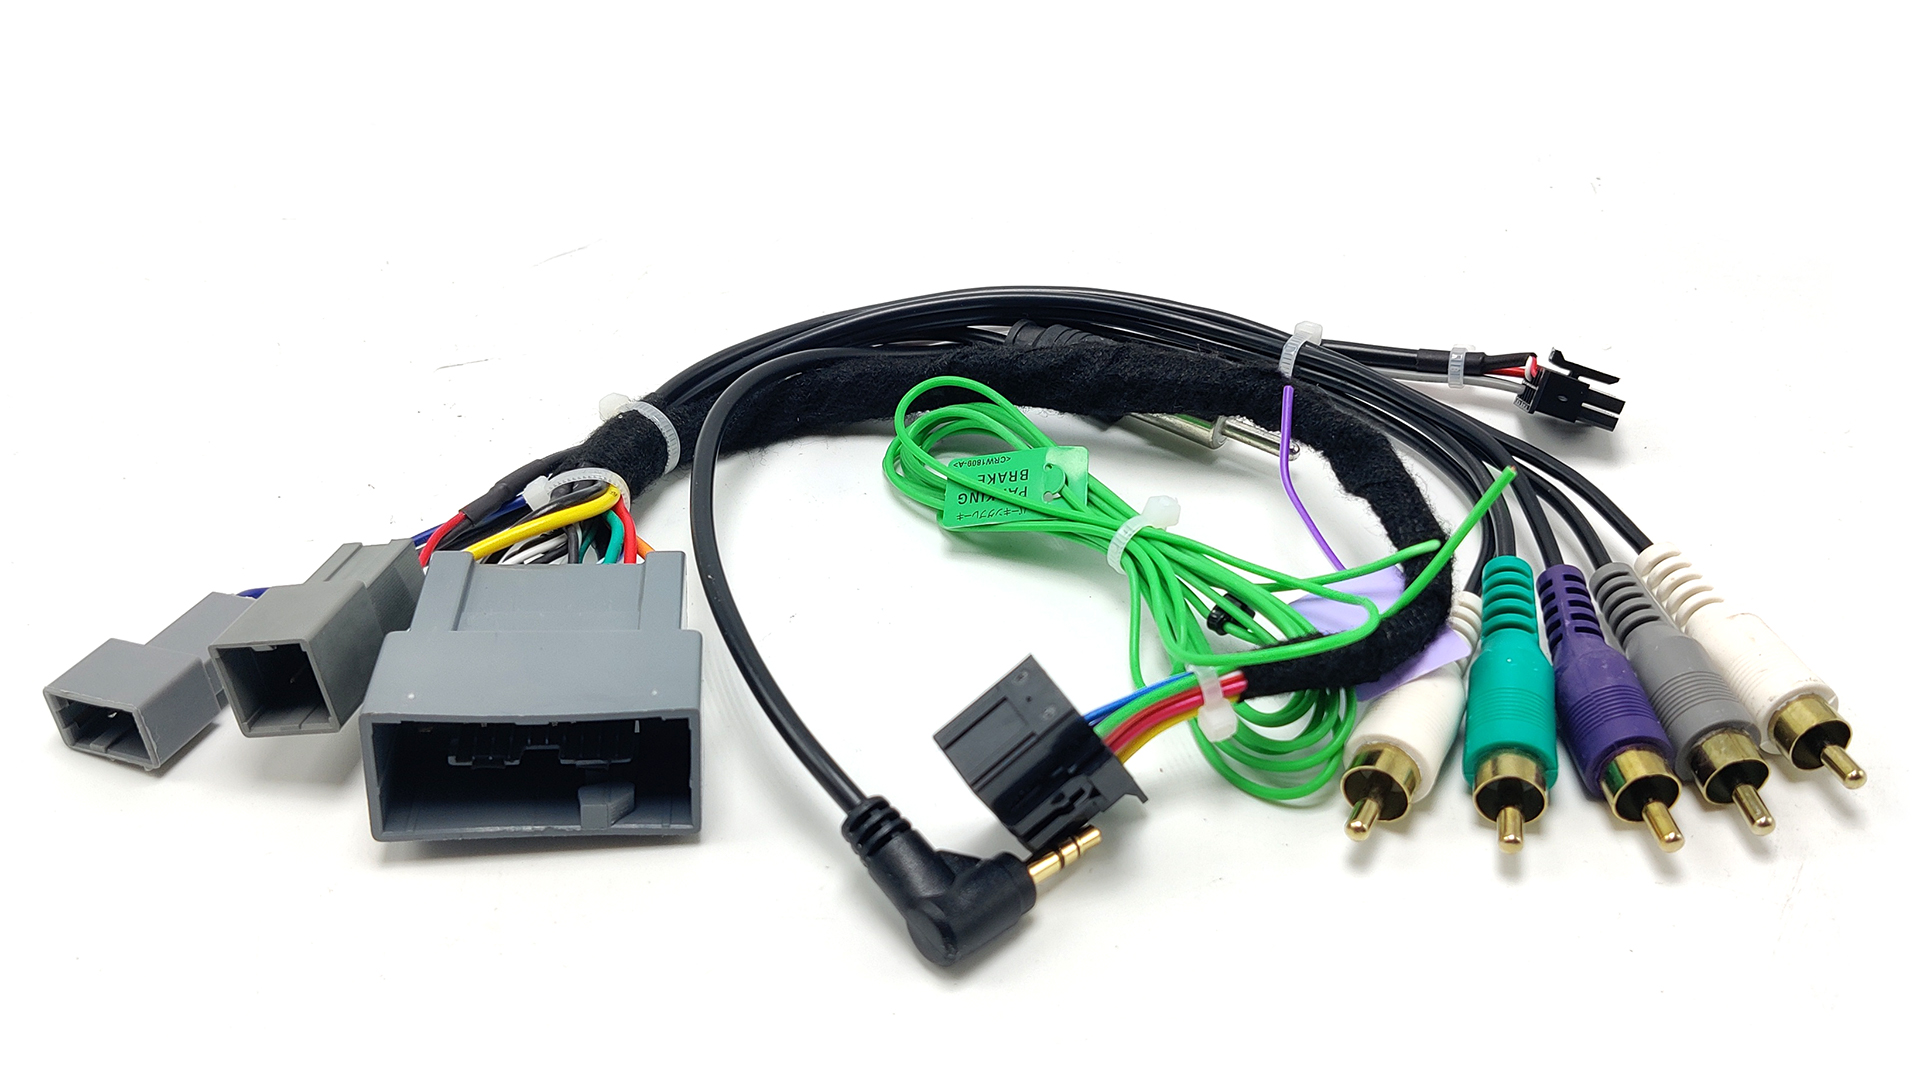
This listing includes all the components recommended to upgrade the stereo in your Acura TSX with navigation.
This listing includes all the components recommended to upgrade the stereo in your Acura TSX with navigation.
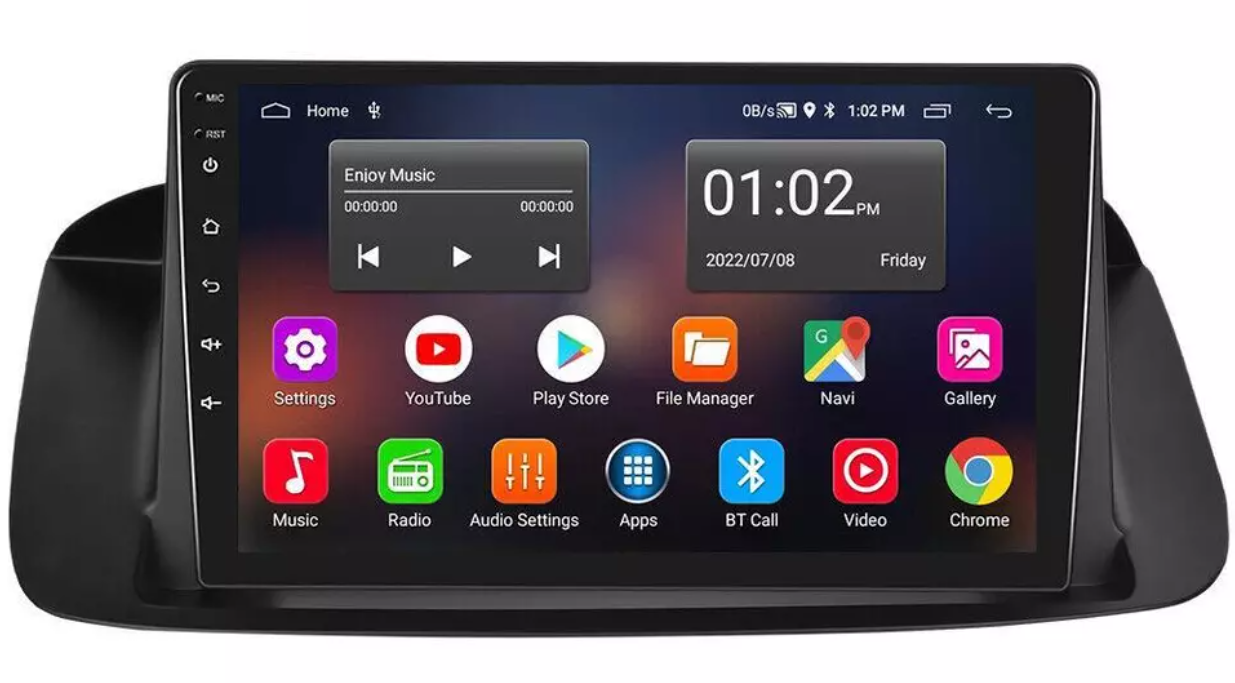
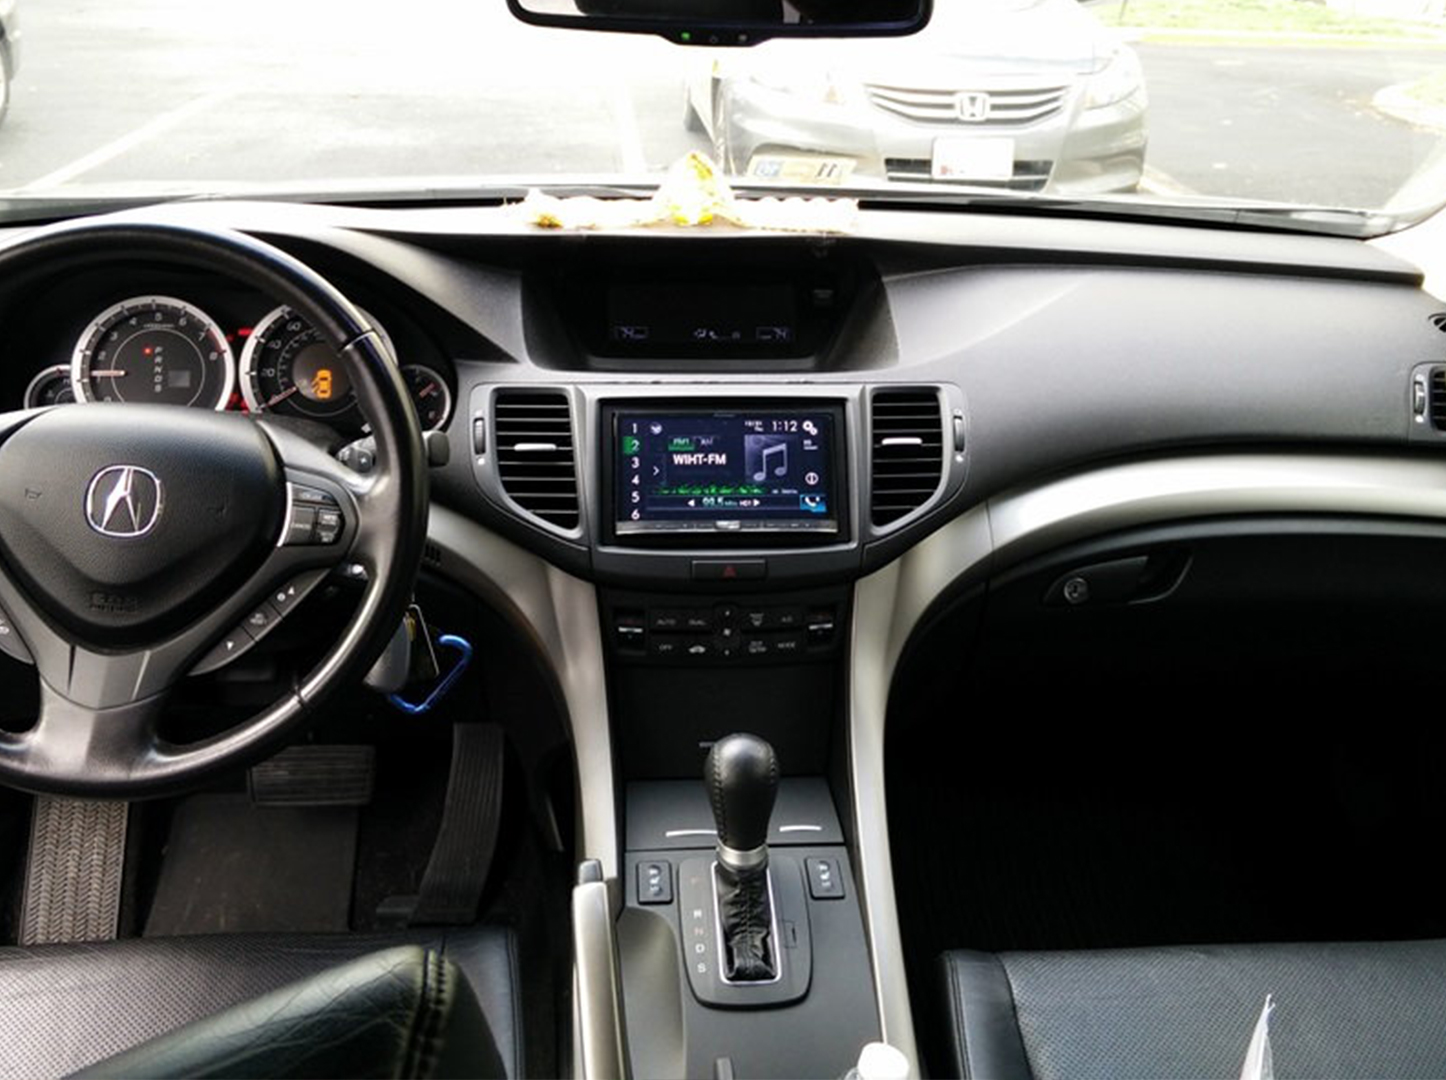
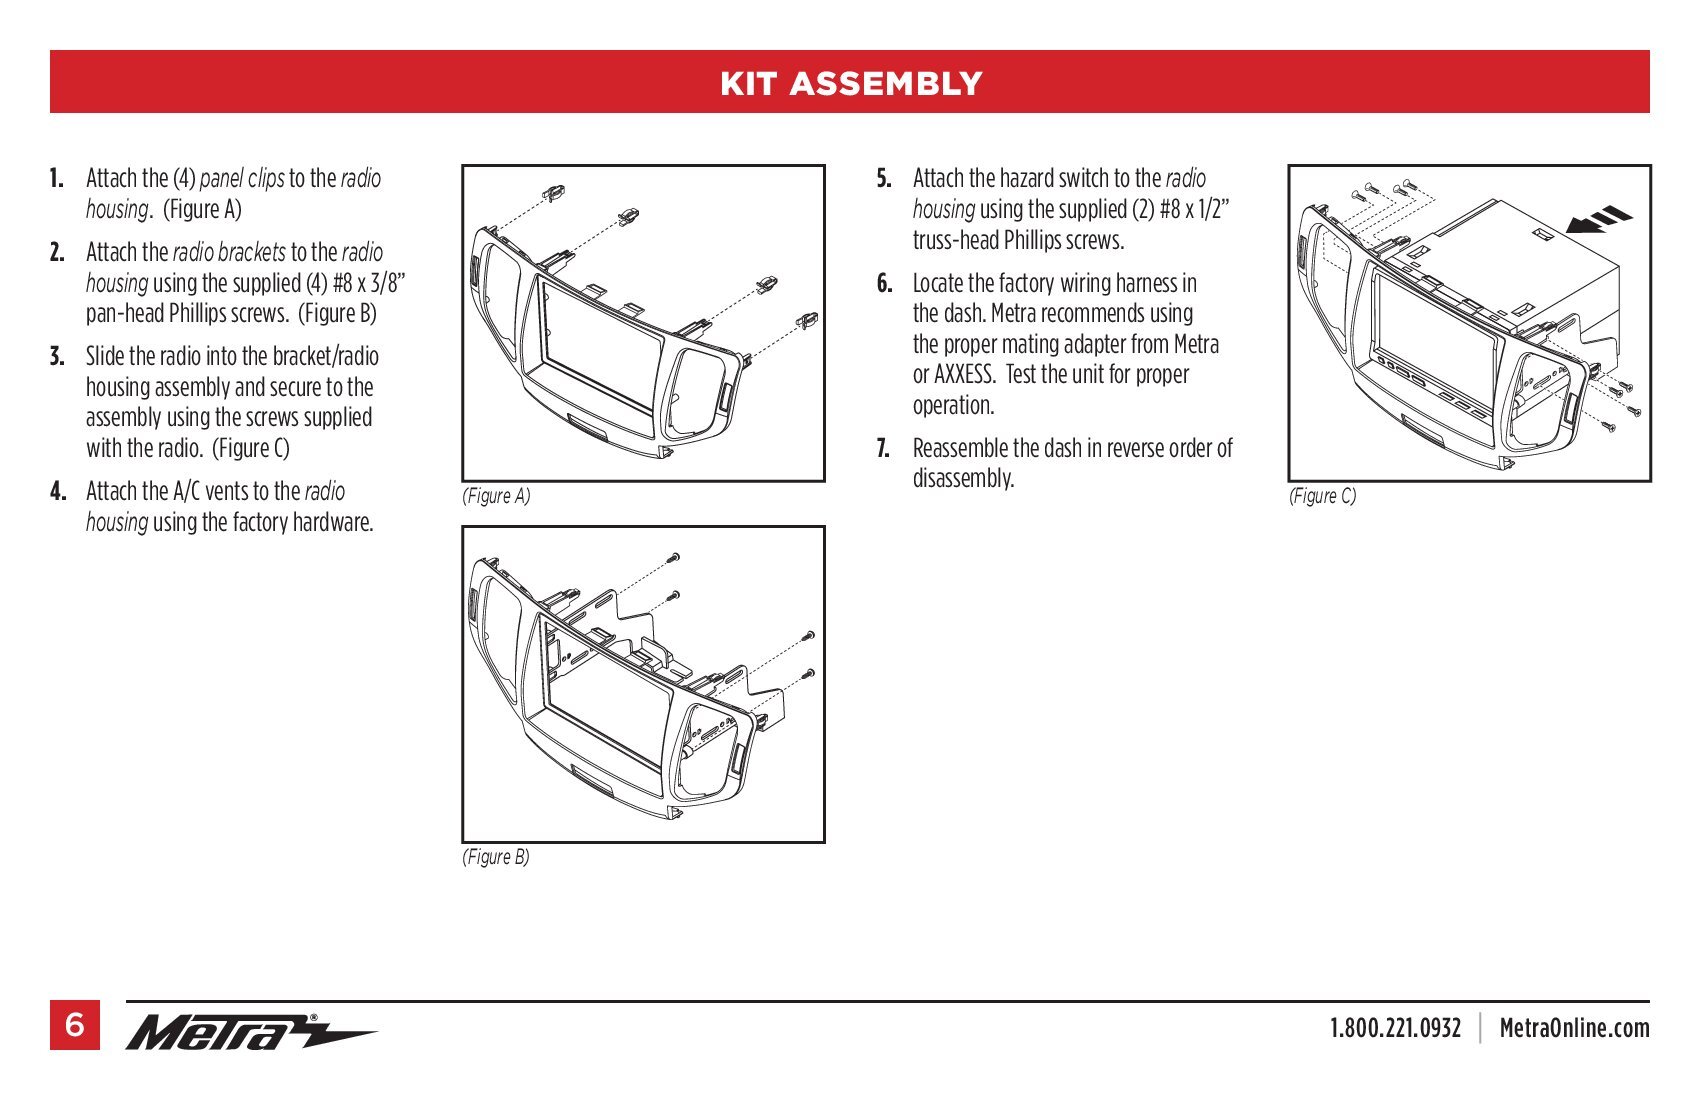
If your TSX has navigation and you want to upgrade the navigation screen to an android touchscreen with apple CarPlay and android auto this package is your best solution. This plug and play upgrade allows you to retain all the factory functionality including the factory navigation and factory backup camera.
The android screen is powered by the circuit that used to power the OEM navigation display so it doesn’t add any additional load to your factory electrical system. The RGBs video from the factory navigation brain is converted and connected to the new android screen. The android screen then feeds stereo audio to the factory audio system via the XM input. The factory audio system is not impacted and all factory functions including the steering wheel controls continue to work the factory radio. The touchscreen does not control the factory navigation and the steering wheel controls do not control the touchscreen they are independent of each other but do work together.
The base configuration of this upgrade has 2GB of RAM and 32GB of storage this is perfect if you only want to use the screen for Apple CarPlay or Android Auto. If you want your android screen to also run applications like Netflix, YouTube or iGo-Navigation it is recommend to instead grab the 4GB of RAM and 64GB of storage.
Included in the package is the android 9″ screen, a plug and play harness and the necessary dash kit. The instructions for installation are in the video. The screen will not come with printed instructions. The kit will come with the necessary wires and installation hardware. An upgraded camera is not included you will need to purchase the camera separately here or from another seller.
If you installed an aftermarket radio in your Acura TSX Base model but the subwoofer isn’t working its because most likely you are missing this harness. This harness plug in behind the radio and gives you an RCA to connect to the subwoofer output of your radio. That signal is then sent from your aftermarket radio to the factory amplifier and finally to your subwoofer. In order for this harness to work you must connect the blue wire on the primary power harness you have to the remote wire of your aftermarket radio so your factory amplifier turns on.
Your Base Acura TSX has a total of 7 speakers that are powered by the factory amplifier. When replacing the factory radio using our complete kit you are able to keep all of the speakers. The front door speakers, tweeters, rear deck speakers and the factory subwoofer will all continue to work. Our harness integrates with the factory amplifier to keep all your speakers working. If your factory amplifier does not work this kit will not work.
Your Tech Package or Navigation equipped TSX has a total of 10 speakers that are powered by the factory amplifier. When replacing the factory radio using our complete kit you are able to keep all the speakers. The way the ELS Amplifier Interface retains the factory amplifier is by feeding left and right audio from the aftermarket radio to the factory amplifier and the factory amplifier up-mixes the audio from stereo to 5.1 surround.
You will lose Sirius XM, AUX Input and the factory handsfree link functionality. The steering wheel controls including volume up, volume down, next, previous and mode will work. The call control buttons are not retained. The navigation control buttons are not retained.
FAQ.
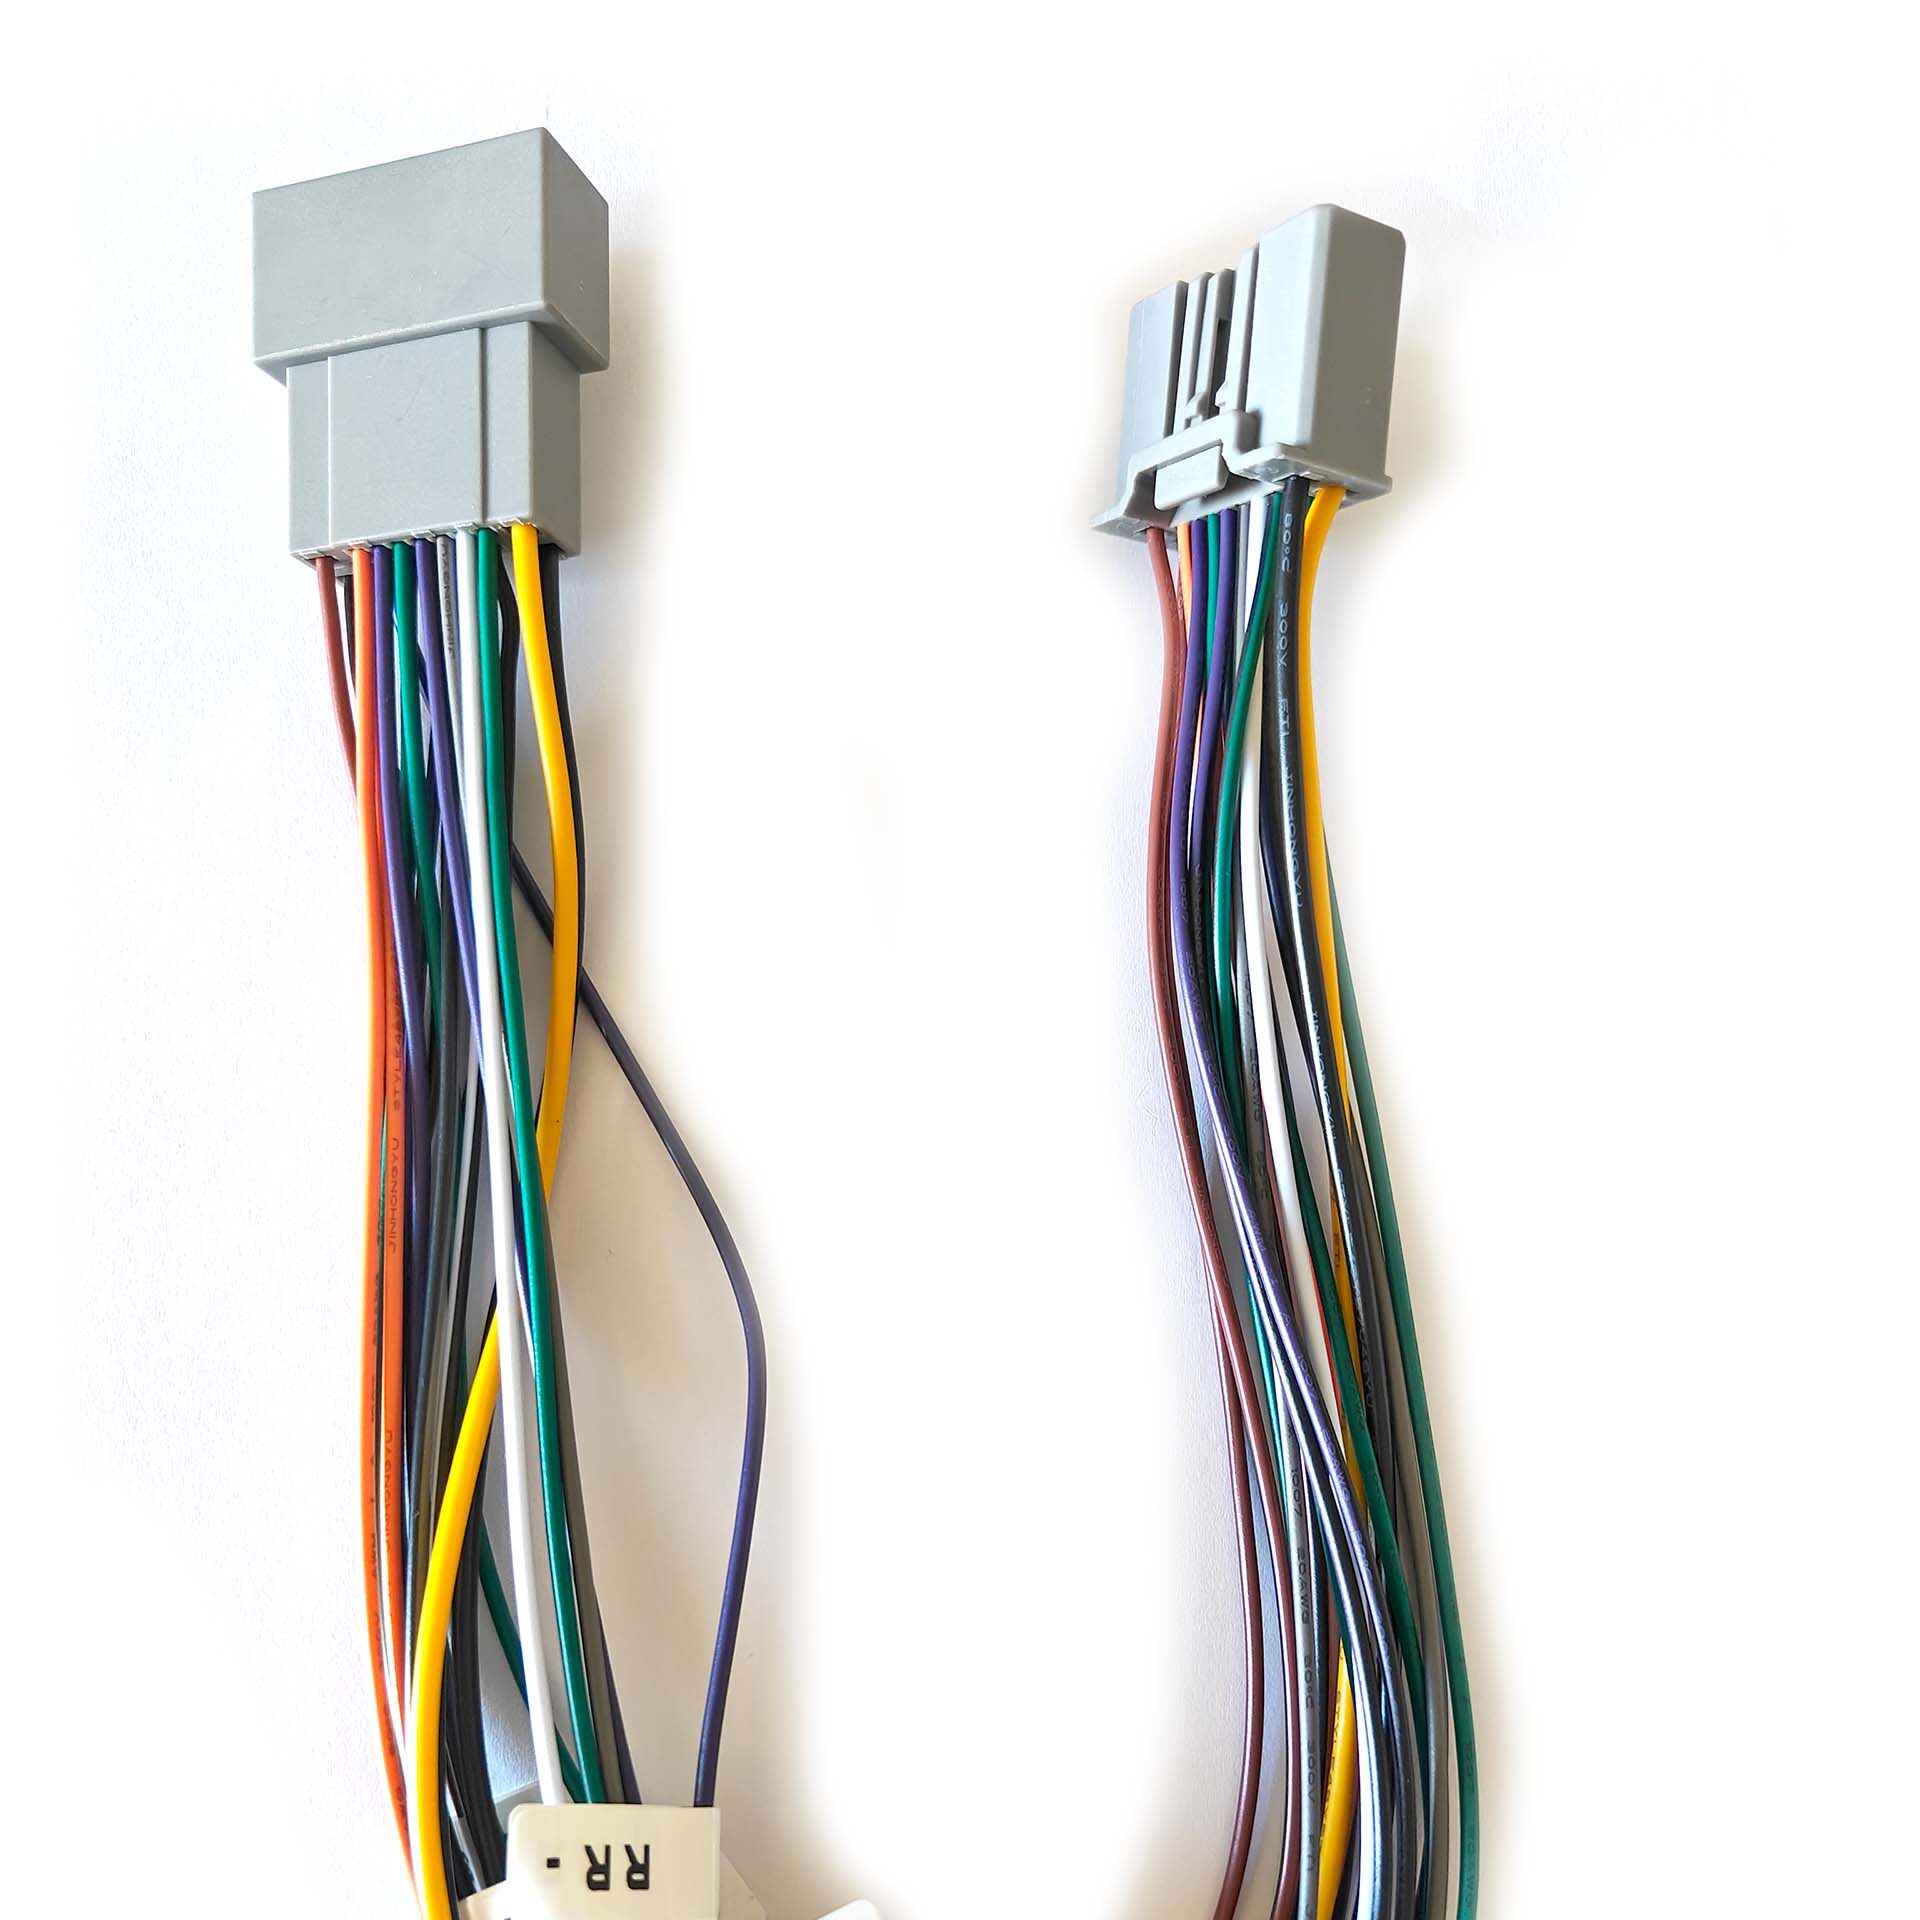
If your 2009 to 2013 Acura TSX, TL, RDX or 2007-2013 MDX has navigation and you want to keep the factory head unit but upgrade the amplifier then this harness will allow you to grab the output from the factory amplifier and feed it to your DSP or other integration interface. The other part of the harness will give you the connection to all the factory speakers(tweeters, dash, front door, rear door, pillar, subwoofer). In the Acura TL and TSX the subwoofer is directly powered by the amplifier. In the Acura MDX and RDX the subwoofer has its own built in amplifier to power the subwoofer. The subwoofer amplifier is inside of the enclosure in the rear so if you plan to upgrade the subwoofer or amplifier you will need to bypass that internal subwoofer amplifier by opening that enclosure and running new wiring.
When adding amplifiers to the ELS or Navigation system Acuras with the factory radio you will need to leave the factory amplifier connected. The factory amplifier and the factory radio use digital communication to adjust the volume. So if you unplug the amplifier completely you won’t be able to use the factory radio’s volume knob to control the volume. This means you must connect the yellow and black wires together and also to the interface or DSP you plan to use. If you plan to keep the factory subwoofer working then you must connect the brown wires at the end of the connectors together. All wires come labeled so you can determine which speakers you want to keep on the factory radio and which you want to amplify.
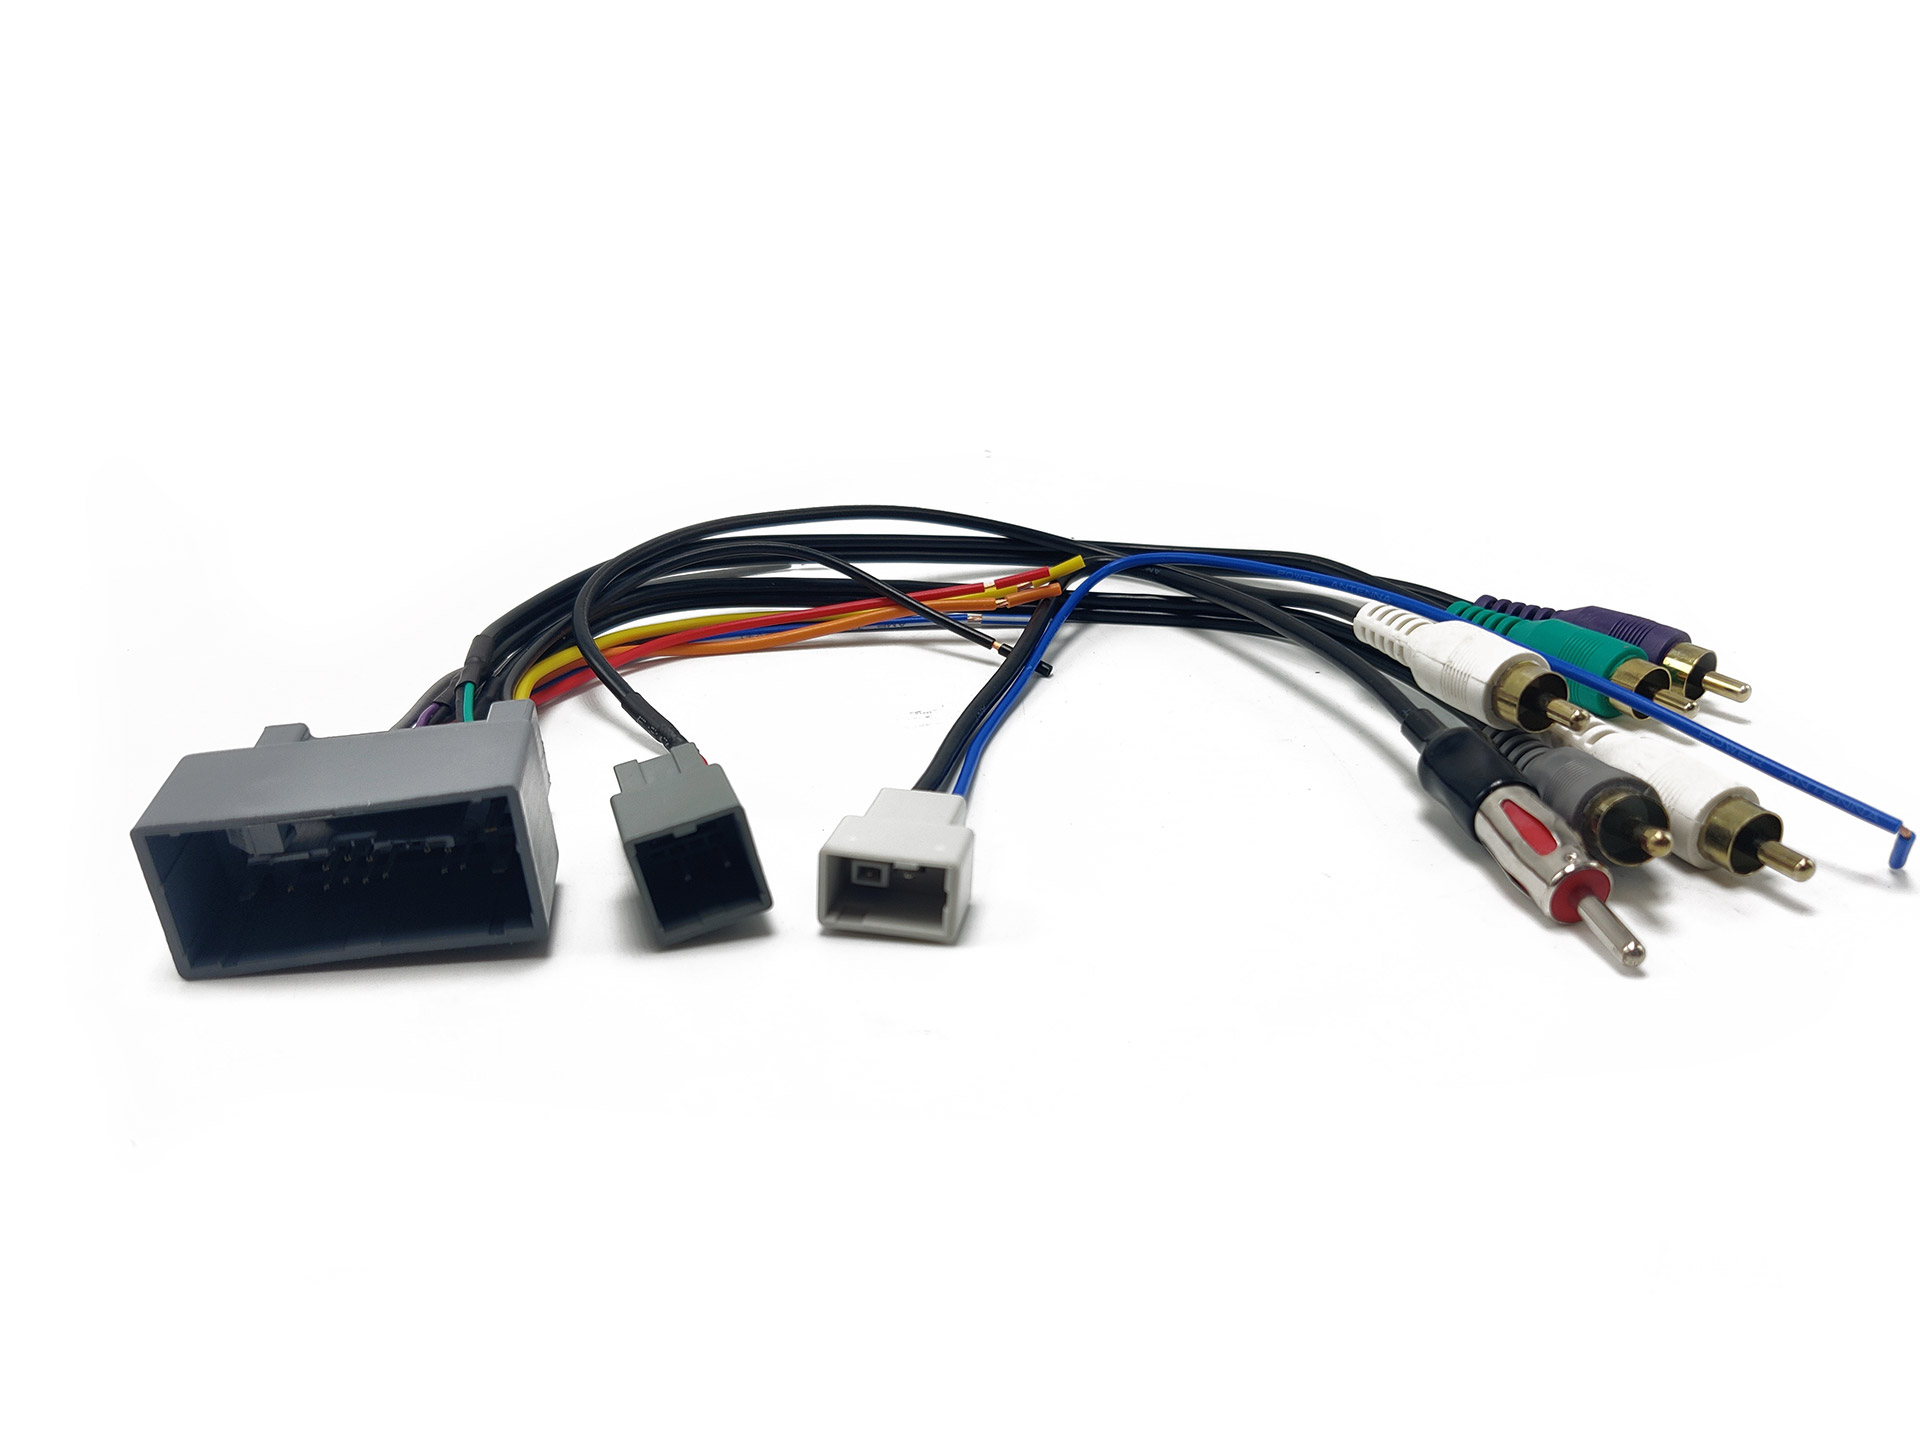
If you are installing an aftermarket radio in your 2009 2010 2011 2012 2013 Acura TSX this combination of harnesses are all you will need. This harness combo allows you to retain your factory amplifier, subwoofer and climate control display. Your steering wheel controls can also be retained with an additional part, the AXSWC. The radio you plan to install will need to have 5 RCA ports on the back label FL, FR, RR, RL,SUB if your radio does not have these outputs you will need a line out converter. Replacing the radio in your Acura TSX will result in the loss of your factory HFL, AUX and Sirius XM radio.
The 24 Pin Grey connector in this combo is used to provide:
– Power
– Ground
– Illumination
– Steering Wheel Control Wires
– Primary Speakers (FL, FR, RL, RR)
– Amplifier Turn on
The 8 Pin Grey connector in this combo is used to:
– Subwoofer
The 2 Pin Grey connector in this combo is used to:
-Factory AM/FM Antenna
Instructions can be found here
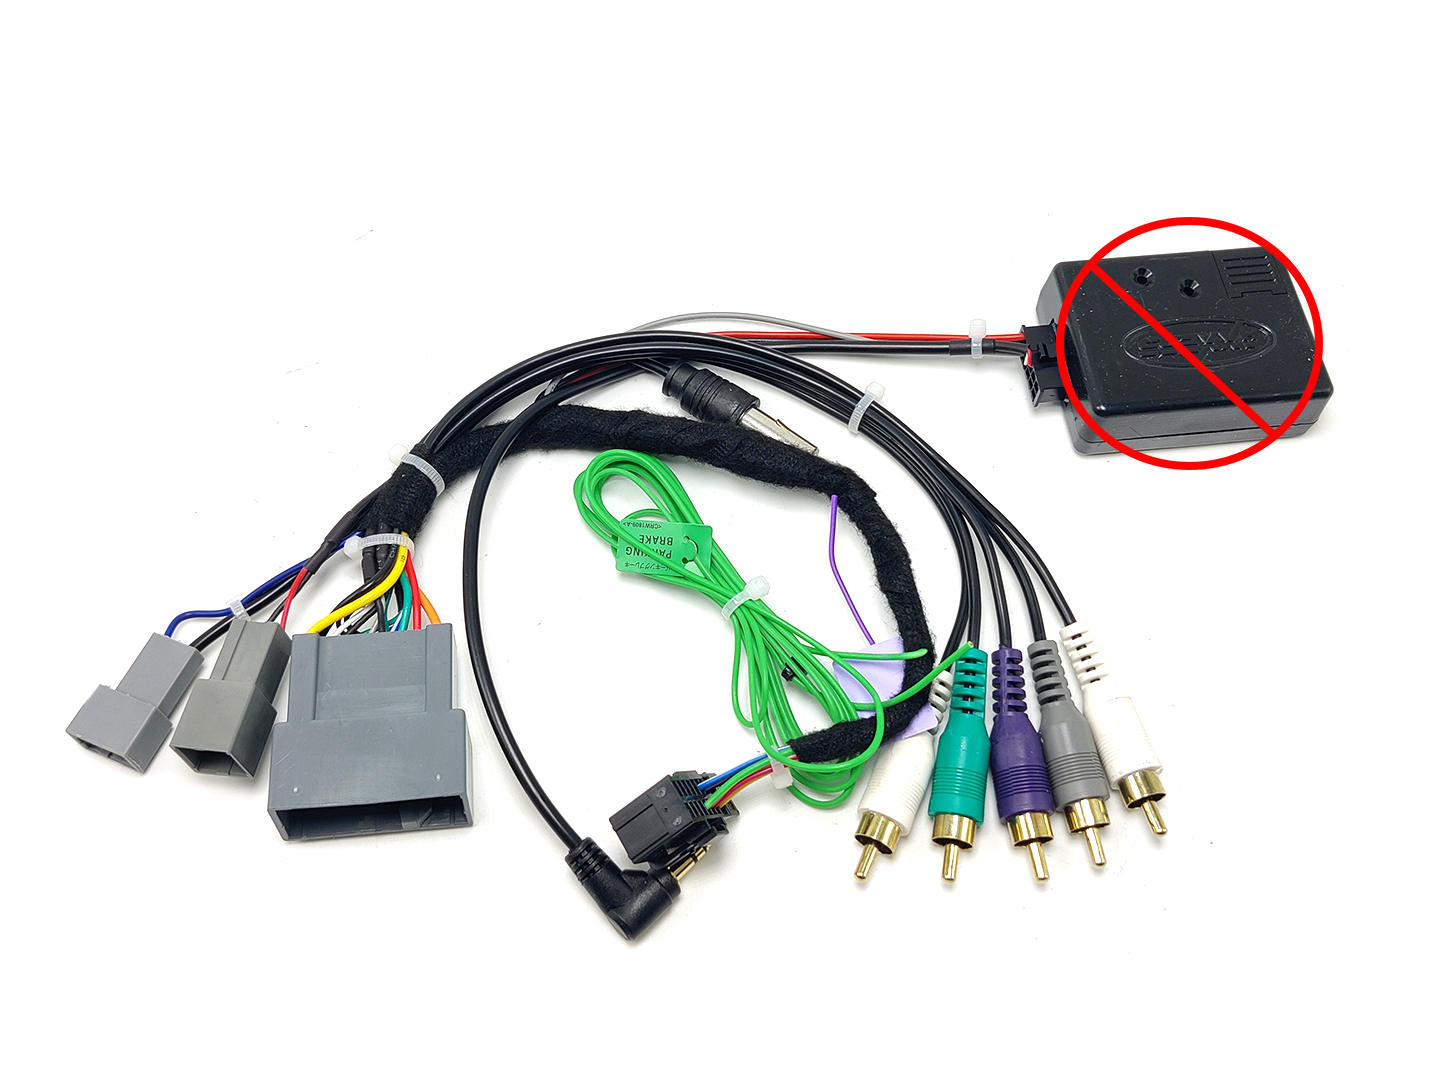
If you are having trouble wiring a new aftermarket radio in your 2nd Generation Acura TSX spanning years 2009 to 2010, 2011 to 2012, or 2013 to 2014 then this custom made wiring harness will solve your issue. Our wiring harness to connects to your aftermarket radio and integrates with the factory amplifier in your Acura TSX to power all of your speakers. This harness is compatible with Acuras that have the premium sound system(base) or the ELS sound system(tech package with navigation). This harness also works on the Acura TSX Wagon.
In the base or premium sound system this harness uses the RCAs to send a low level signal to the factory amplifier. The harness is also wired with the lead to turn on the factory amplifier when you are playing audio. The harness eliminates the need for any wiring splicing or wire cutting. It makes you installation plug and play. If you do wish to keep the steering wheel controls you will need an additional part.
In the tech package with navigation and the ELS audio system our harness uses RCAs along with the ELS amplifier interface to keep your factory amplifier and power all of your speakers. The ELS audio system requires the ELS Amplifier Interface to manipulate the factory amplifier volume. If you do not use the ELS interface you will have power and audio but you will not be able to achieve full volume with your aftermarket radio. This harness makes your installation plug and play and requires no additional wiring.
*DISCLAIMER FOR ACURA TSX WITH NAVIGATION*
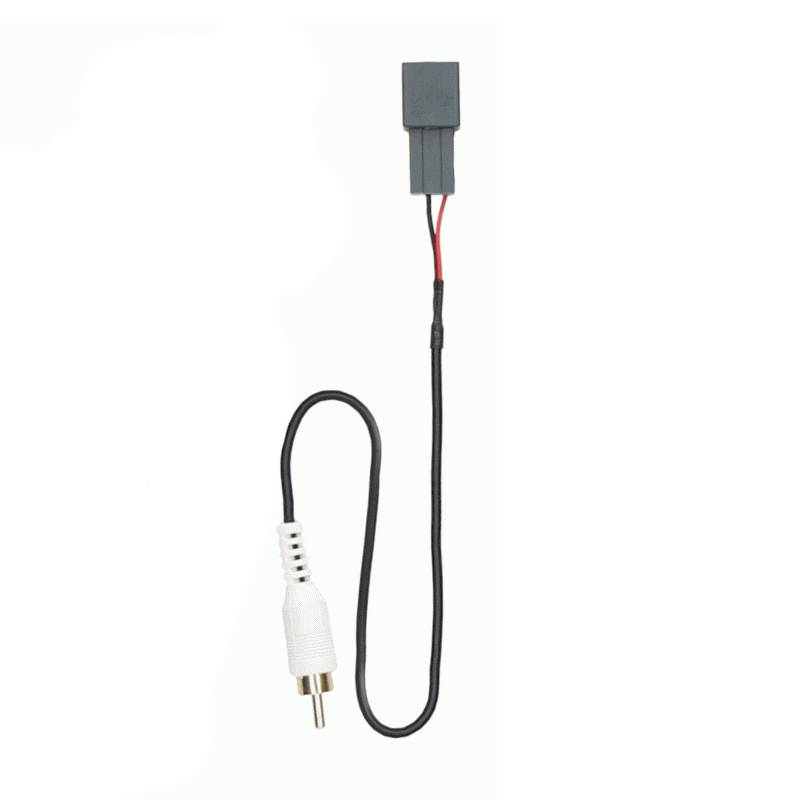
When you install an aftermarket radio in your Acura TSX with navigation you will lose the ability to see the climate control information. You will also lose the factory navigation functionality and the backup camera. We offer the harnesses to convert the navigation display to the audio HVAC display to allow you to see the climate information again but you will need to purchase a used/new AUDIO HVAC Display part number 39710-TL7-305 . If you want to retain the factory backup camera then you will also need to to purchase the camera retention harness. This harness will allow you to view the factory backup camera on your new aftermarket screen. When you keep the factory camera you will need to wiretap the reverse trigger. You will also need to install the ELS Amplifier volume knob in an accessible area to control the volume of your system. Please watch the clips below.
*END DISCLAIMER*
When you replace the factory radio in your Acura TSX you will lose some factory components. Those components include Sirius XM Radio, Factory Hands Free Calling and streaming, Factory Navigation Guidance, Acuralink, USB port, and the factory AUX Port. If you want Satellite radio you will need an extra tuner as you cannot use the factory one. Your new aftermarket radio will have Bluetooth streaming and calling along with USB and AUX.
After placing your order we will create a custom wiring harness for your exact radio installation. The custom harness will allow you to install a new aftermarket radio without the need for any wire splicing or wire tapping. This harness will allow you to have a plug and play installation for your Acura TSX with a supported compatible radio. A parking bypass is highly recommended with your order if your radio brand is Pioneer, Kenwood or Alpine. You can learn more about the bypass and add one to your cart using this link.
Our plug and play harness integrates with the factory amplifier to retain your center speaker (tech only), front door speakers and tweeters, the rear door and rear deck speakers and the factory subwoofer. Included in our harness are the necessary three connectors for your Acura TSX and the radio specific connector that will plug into the back of your radio. Our harness uses RCAs to feed a low level signal from the aftermarket radio to the factory amplifier. We also add the connector for the AXSWC steering wheel control interface so you can retain your factory steering wheel controls if desired. The AXSWC is an additional purchase it is not included. The wiring for the AXSWC is completed so if you do purchase it you can just plug it in. You can find the AXSWC here. The ASXWC allows you to retain volume up, volume down, next, previous and mode on your steering wheel but not the call control buttons with your aftermarket radio.
In order for your aftermarket radio to be compatible with our harness it must have at least 5 RCA outputs including FL, FR, RL, RR, and SUB. Also the brand of the aftermarket radio must appear in the selection menu of this listing. If you are unsure if your radio qualifies please call us at 877-542-2872.
In order to complete your order we may need your radios model number please include it in the billing checkout notes or if you forget please include a valid phone number where me may reach you in case of any questions.
FAQ.
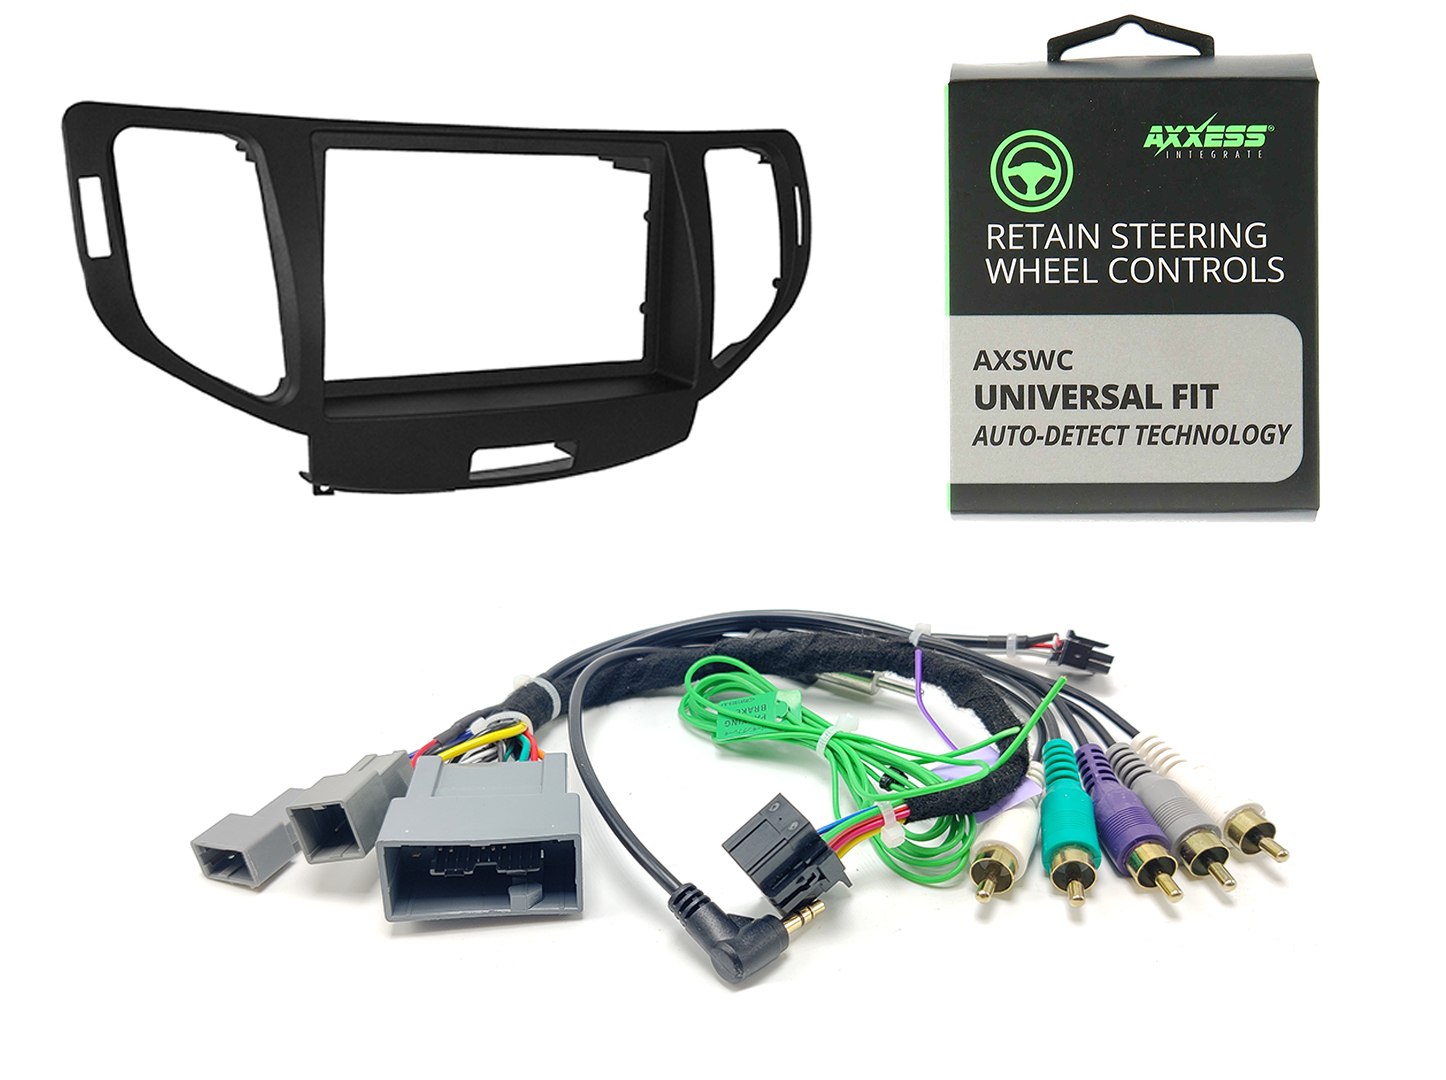
If you want to simplify installing an aftermarket in dash stereo receiver in your 2nd generation Acura TSX covering years 2009 2010 2011 2012 2013, then this radio installation kit is complete with everything you will need to install a new stereo in your Acura TSX. This kit does not include a radio. Our kit includes all the necessary components to install an aftermarket radio in your Acura TSX. These components include a dash kit, a custom made wiring harness, the AXSWC steering wheel control interface and the ELS Amplifier Interface if necessary. Our custom harness allows you to have a plug and play installation with a supported compatible radio, the dash kit allows you to install a new radio in the factory location and the AXSWC allows you to control the aftermarket radio with your factory steering wheel controls. The ELS Amplifier Interface allows you to retain the factory amplifier in the navigation equipped models. The non navigation models do not need this interface.
A parking bypass is highly recommended with your order if your radio brand is Pioneer, Kenwood or Alpine. You can learn more about the bypass and add one to your cart using this link.
Your Base Acura TSX has a total of 7 speakers that are powered by the factory amplifier. When replacing the factory radio using our complete kit you are able to keep all of the speakers. The front door speakers, tweeters, rear deck speakers and the factory subwoofer will all continue to work. Our harness integrates with the factory amplifier to keep all your speakers working. If your factory amplifier does not work this kit will not work.
Your Tech Package or Navigation equipped TSX has a total of 10 speakers that are powered by the factory amplifier. When replacing the factory radio using our complete kit you are able to keep all the speakers. The way the ELS Amplifier Interface retains the factory amplifier is by feeding left and right audio from the aftermarket radio to the factory amplifier and the factory amplifier up-mixes the audio from stereo to 5.1 surround.
You will lose Sirius XM, AUX Input and the factory handsfree link functionality. The steering wheel controls including volume up, volume down, next, previous and mode will work. The call control buttons are not retained. The navigation control buttons are not retained. The components included in this complete install kit are:
In order for your aftermarket radio to be compatible with this harness it must have at least 5 RCA outputs including FL, FR, RL, RR, and SUB. Also the brand of the aftermarket radio must appear in the selection menu of this listing. If you are unsure if your radio qualifies please call us at 877-542-2872
In order to complete your order we may need your radios model number please include it in the billing checkout notes or if you forget please include a valid phone number where me may reach you in case of any questions.
FAQ.
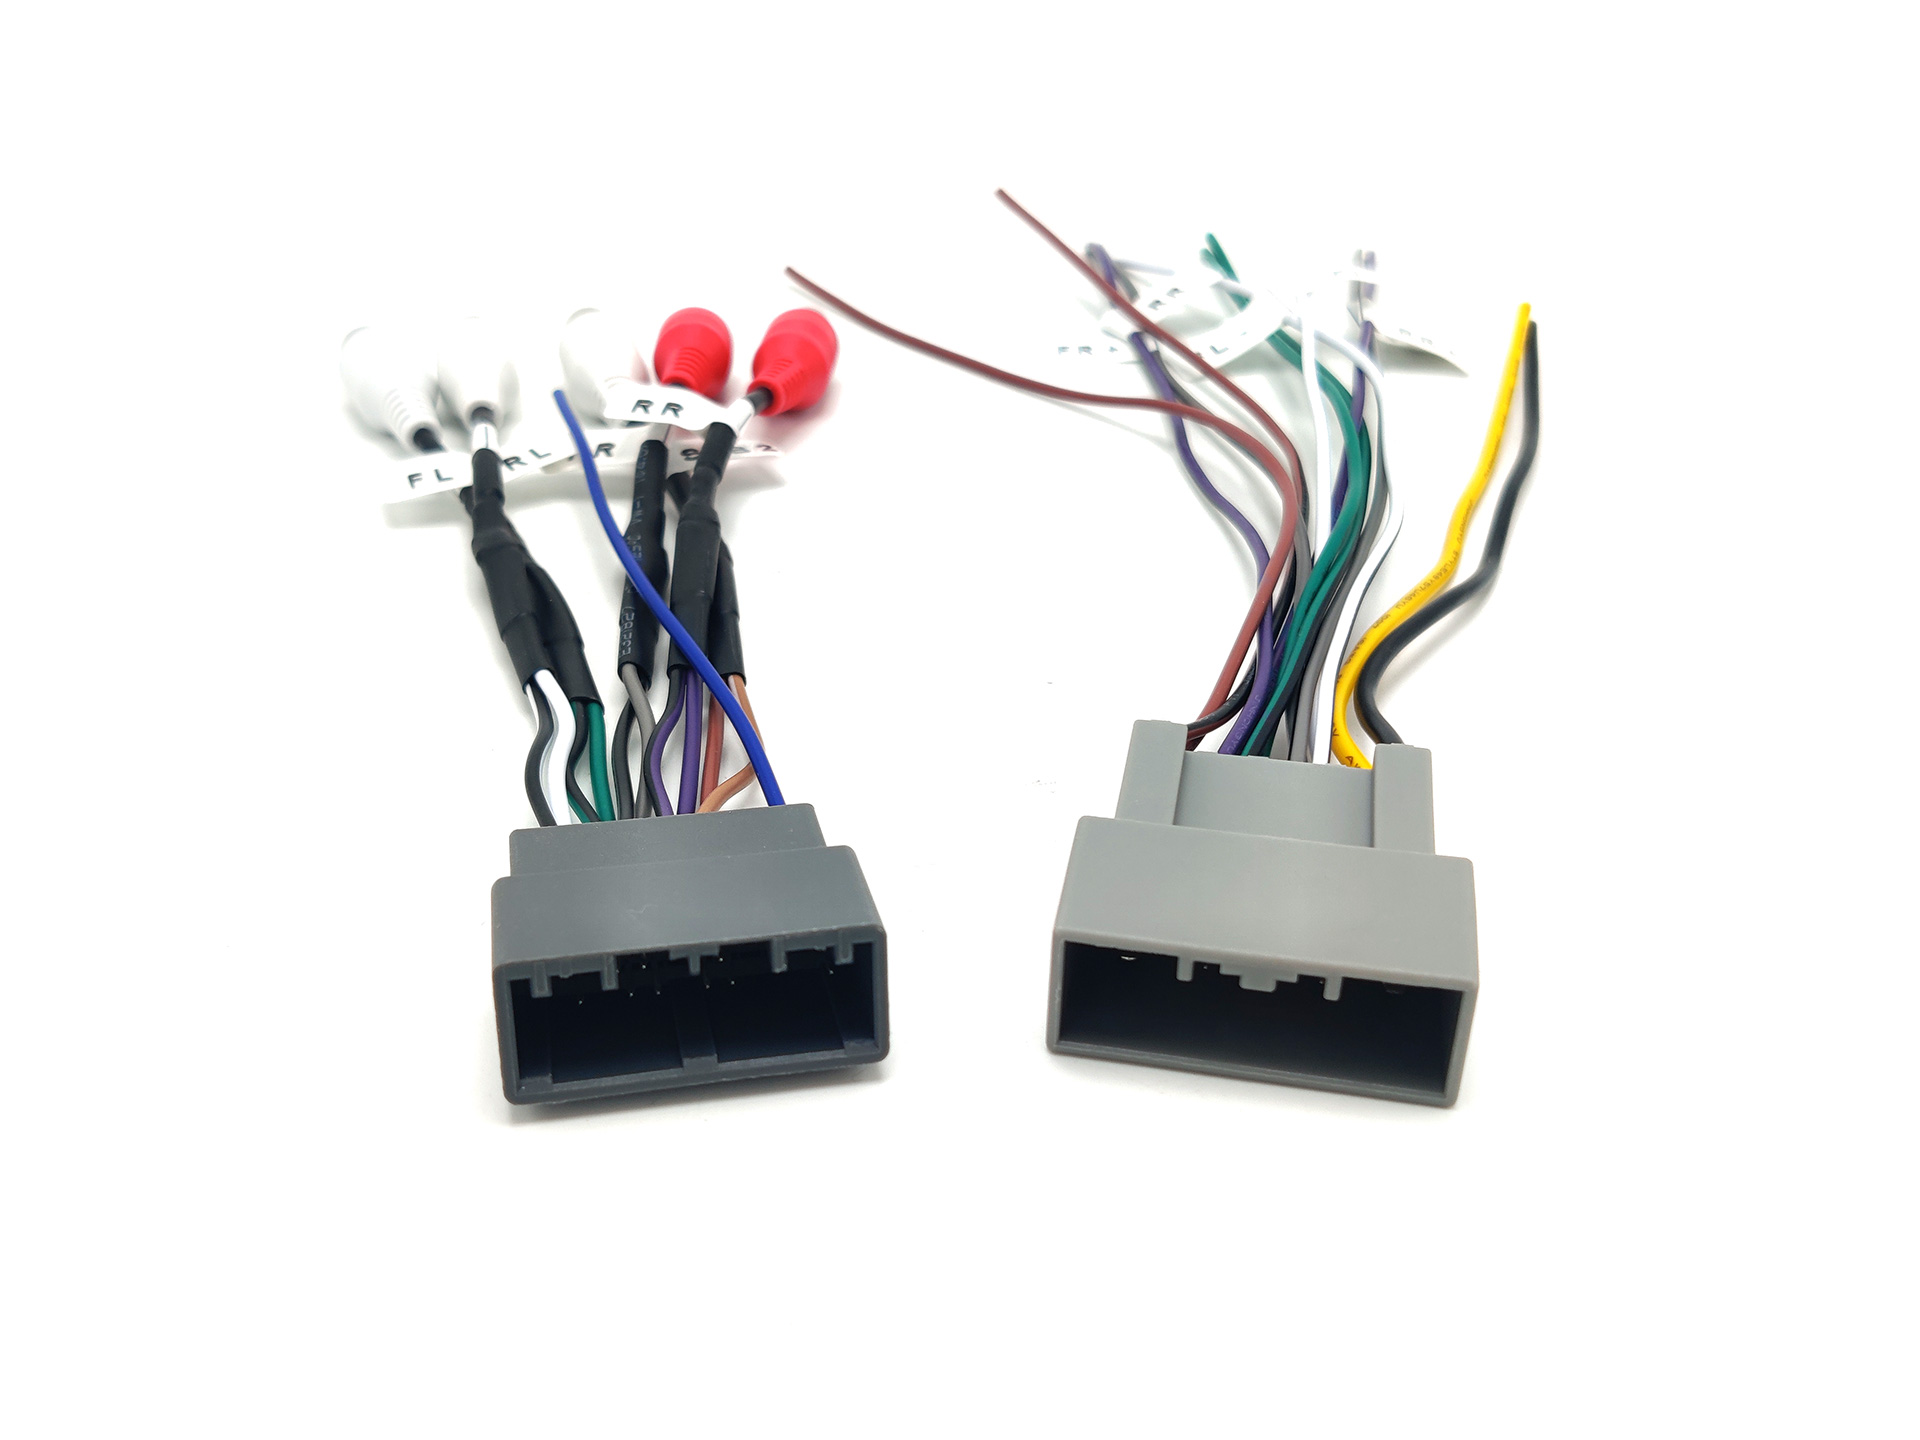
Install a new amplifier in your 2009 2010 2011 2012 2013 Acura TSX without navigation with our amp bypass. The first connector in this bypass receives the signal from the factory radio and provides you with a remote output and 5 RCA outputs The second connector provides you a connection to all of the speakers available in the vehicle.
24 Pin Grey Connector has the following:
18 Pin Grey Connector has the following:
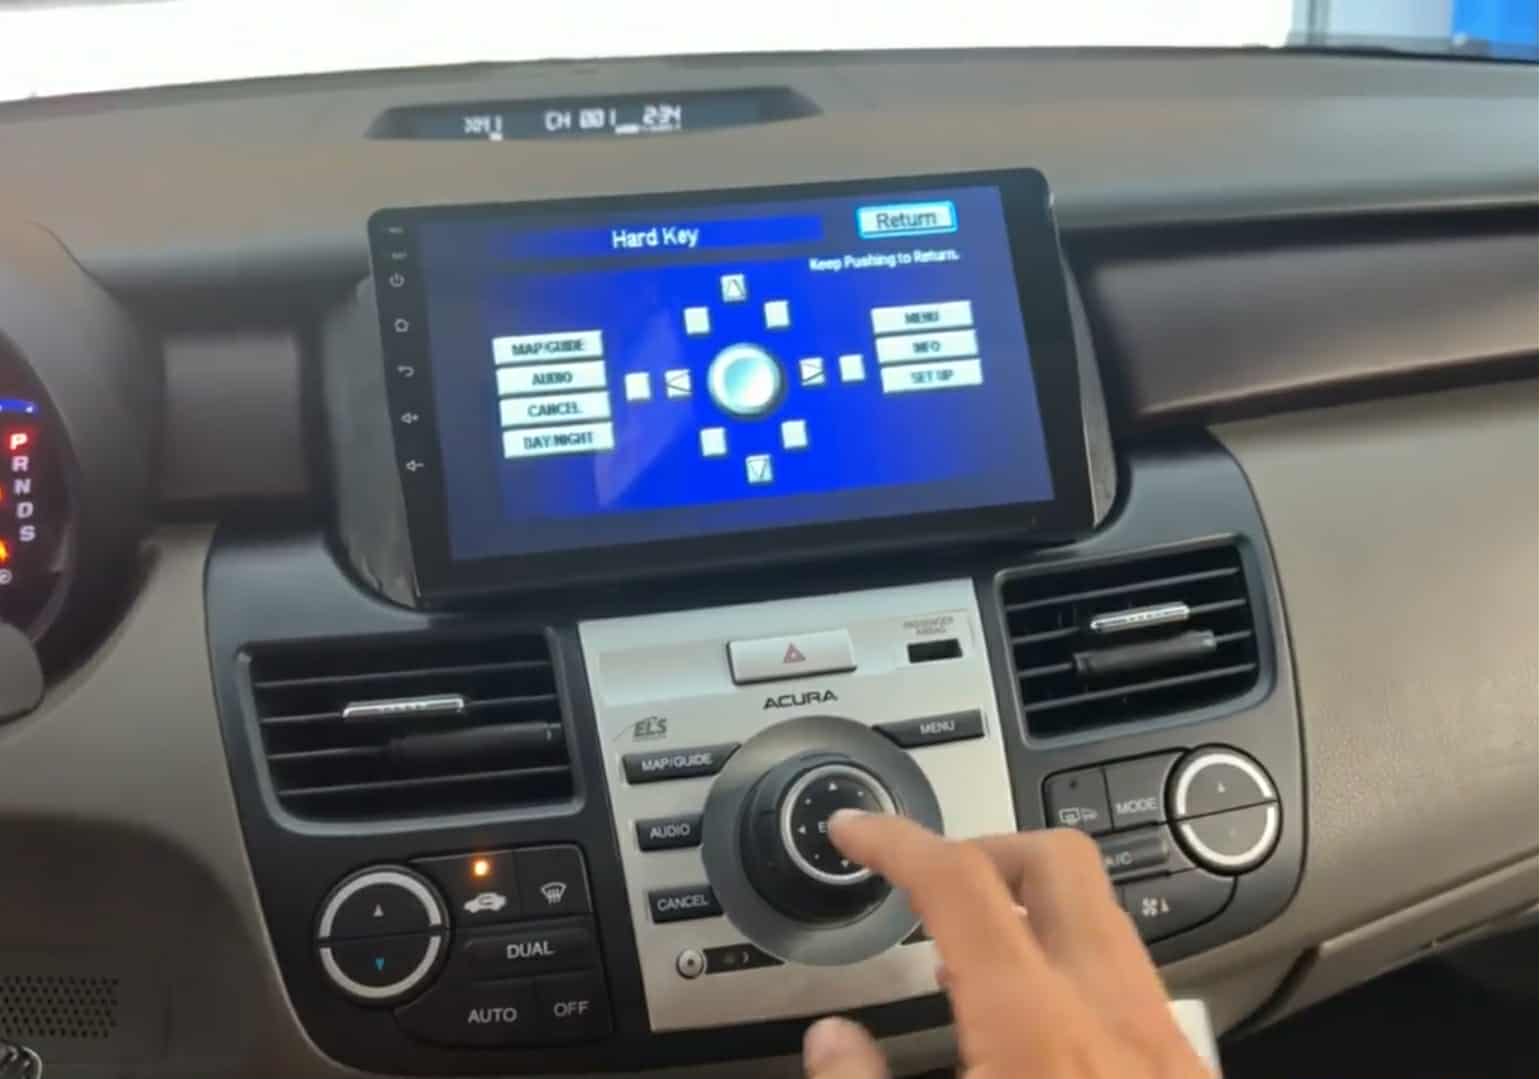
Modernize your infotainment system in your Acura RDX with our navigation display screen upgrade. This upgrade is completely plug and play. The new upgraded navigation display is touchscreen and runs a modern operating system that allows you to enjoy Apple CarPlay, Android Auto and Bluetooth Audio Streaming. The new display also allows you to run native apps like youtube and Netflix while connected to the internet.
Installation of the new screen requires completely disassembly of the vehicles factory infotainment system and is quite lengthy. You don’t have to modify any of the vehicles factory wiring but you will have to snake wires and connect them together at different points shown in the installation video. The new upgraded display screen has the ability to show the factory navigation system but it does require a video converter to be added to your harness. The video converter is optional and you don’t need it unless you want to keep the factory navigation system operational. If you install this new display screen you will lose the ability to adjust the factory equalizer inside the factory radio. You can adjust the equalizer from the new display screen to achieve your sound goals but if you like to adjust the factory subwoofer level from song to song that will no longer be possible.
This screen can be installed in vehicles with or without navigation. If you don’t have navigation you will lose the ability to see the current climate information. You can still control the blower speed and temperature inside the car but you will not be able to see the current settings in vehicles without navigation. If you have navigation you can see from the video below that the climate information continues to work like it did before. If you car is a 2010 2011 or 2012 please email us or call us to place your order as this product has not been fully tested on those vehicles yet. The installation should be similar but some parts are different and we want to ensure you get the desired result when you install this item.
At this time we are not selling just the harnesses or brackets. We are only selling complete packages.
Installing the system requires you to make connections behind the OEM radio and at the factory navigation ROM drive. The factory radio is located right in front of the shifter and you will need to connect wires from the radio to the new display screen. There is plenty of space to run wires behind the OEM radio and display so you can connect everything without issue. The primary power connection for the new display is behind the OEM navigation display. The audio connections for the new display are behind the OEM radio. If you want the steering wheel controls to control the new upgraded display and not the factory radio you will need to connect an additional connector behind the radio and also another wire behind the new display screen. Our recommendation is that you keep the steering wheel controls on the factory radio and only use the audio connector behind the radio. This means you will make one connection behind the radio and one connection behind the screen.
If you are planning on keeping the factory navigation video on the new display screen you will also need the video converter we have available which will raise the price of the product. This is optional and not required but if you do purchase it, it will be wired already you won’t have to make any connections for it. If you want to keep the factory backup camera then you will also need to connect wires at the navigation drive located next to the gas pedal. Follow the instructions shown in the video to make sure all of your connections are correct. Then snake the wire from the navigation drive up the new navigation display.
If your RDX does not have navigation it is referred to as the base model. If you own a base model RDX you can still change the OEM monochrome display with this new touchscreen display but you will lose the ability to see the climate information. Installation is a bit different as all connections are done behind the OEM radio and you will snake the wires from behind the OEM radio up to the new display. With the OEM display removed you won’t be able to see the climate or any of the factory radio information such as radio stations or cd tracks. Instead the OEM radio will just be used as a passthrough for audio. You will leave the factory radio in XM mode and control all audio through the tablet. If you have a base model it makes sense to change the steering wheel controls from the OEM radio to the new tablet by connection the additional harness behind the OEM radio and at the display screen.
We sell a similar product for the Acura TSX and people really like it. This product is great for those who want a new display and the ability to use Apple CarPlay or Android Auto. This is a perfect fit especially if your factory navigation system is already broken and you don’t care about it. This product is not recommend to anyone who wants build any sort of competition system in audio quality or loudness. You are still limited by the factory amplifier when you install this product and while the system sounds good. If you have to add amplifiers to the system you still have to work with the factory radio and that is always a challenge. If you are more interested in sound quality over software features I recommend replacing the OEM stereo and amplifier we will have videos on how to do that coming soon.

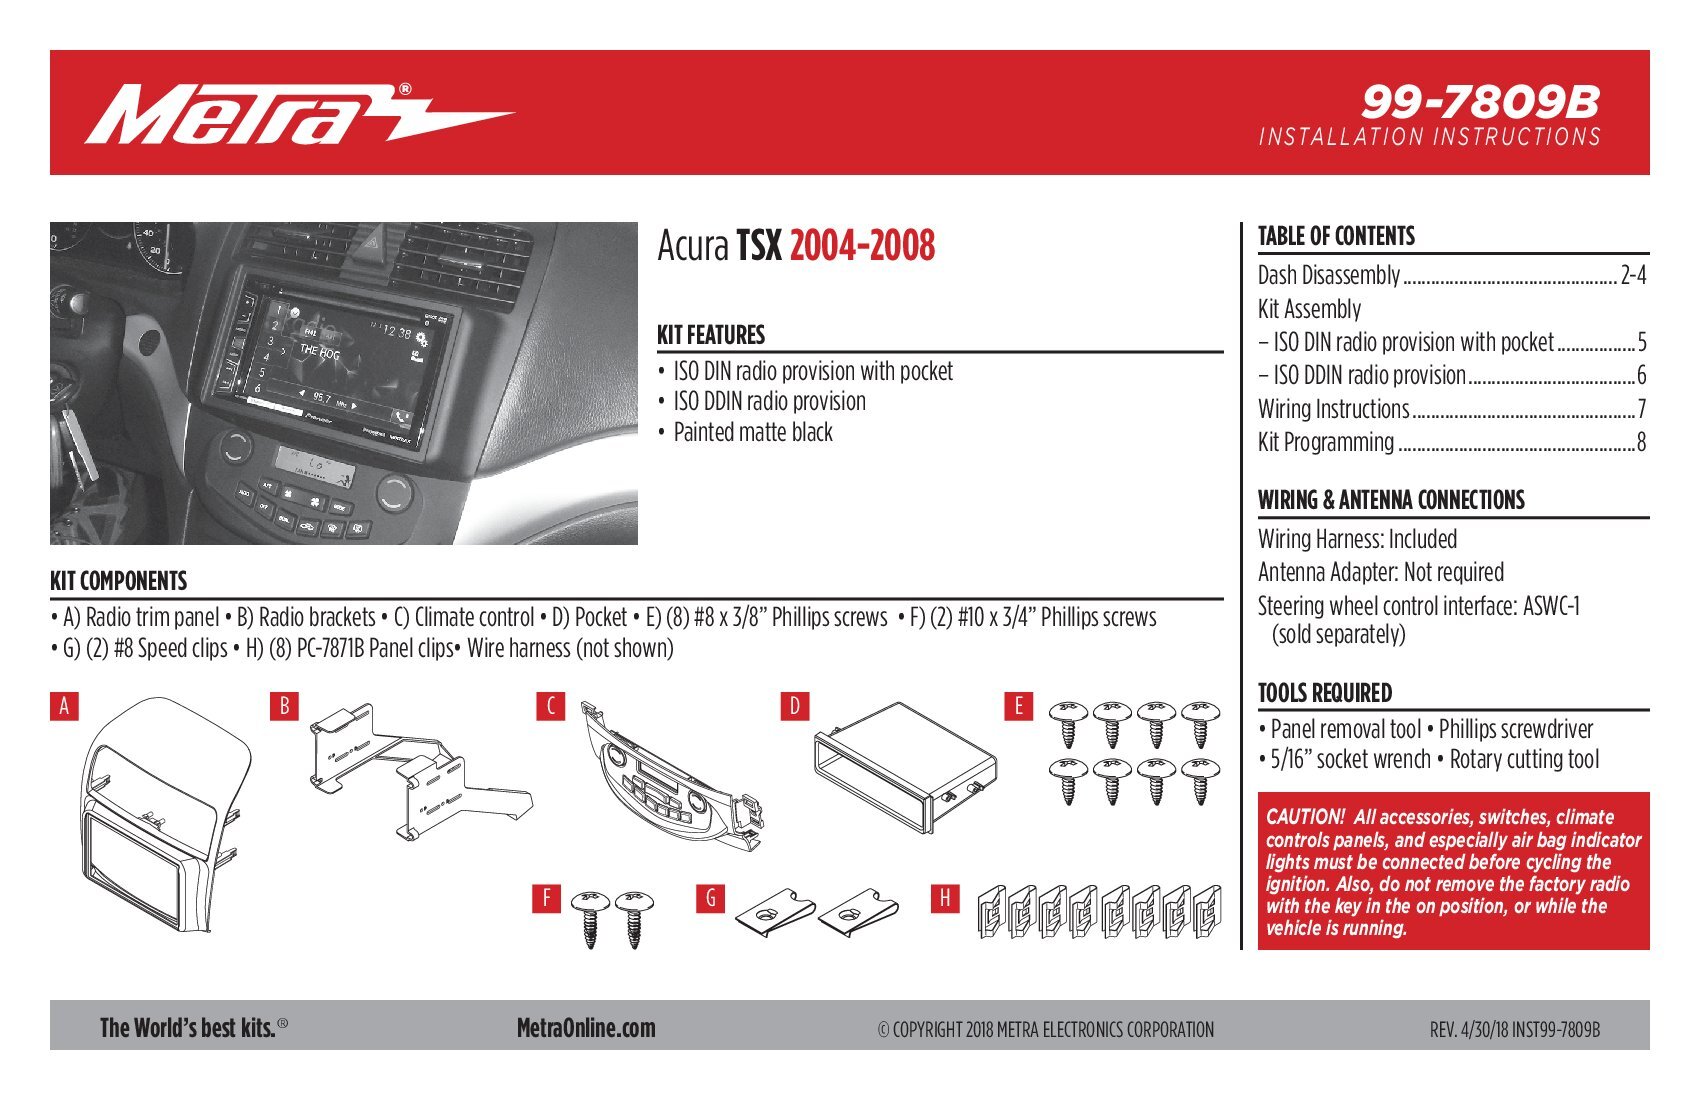
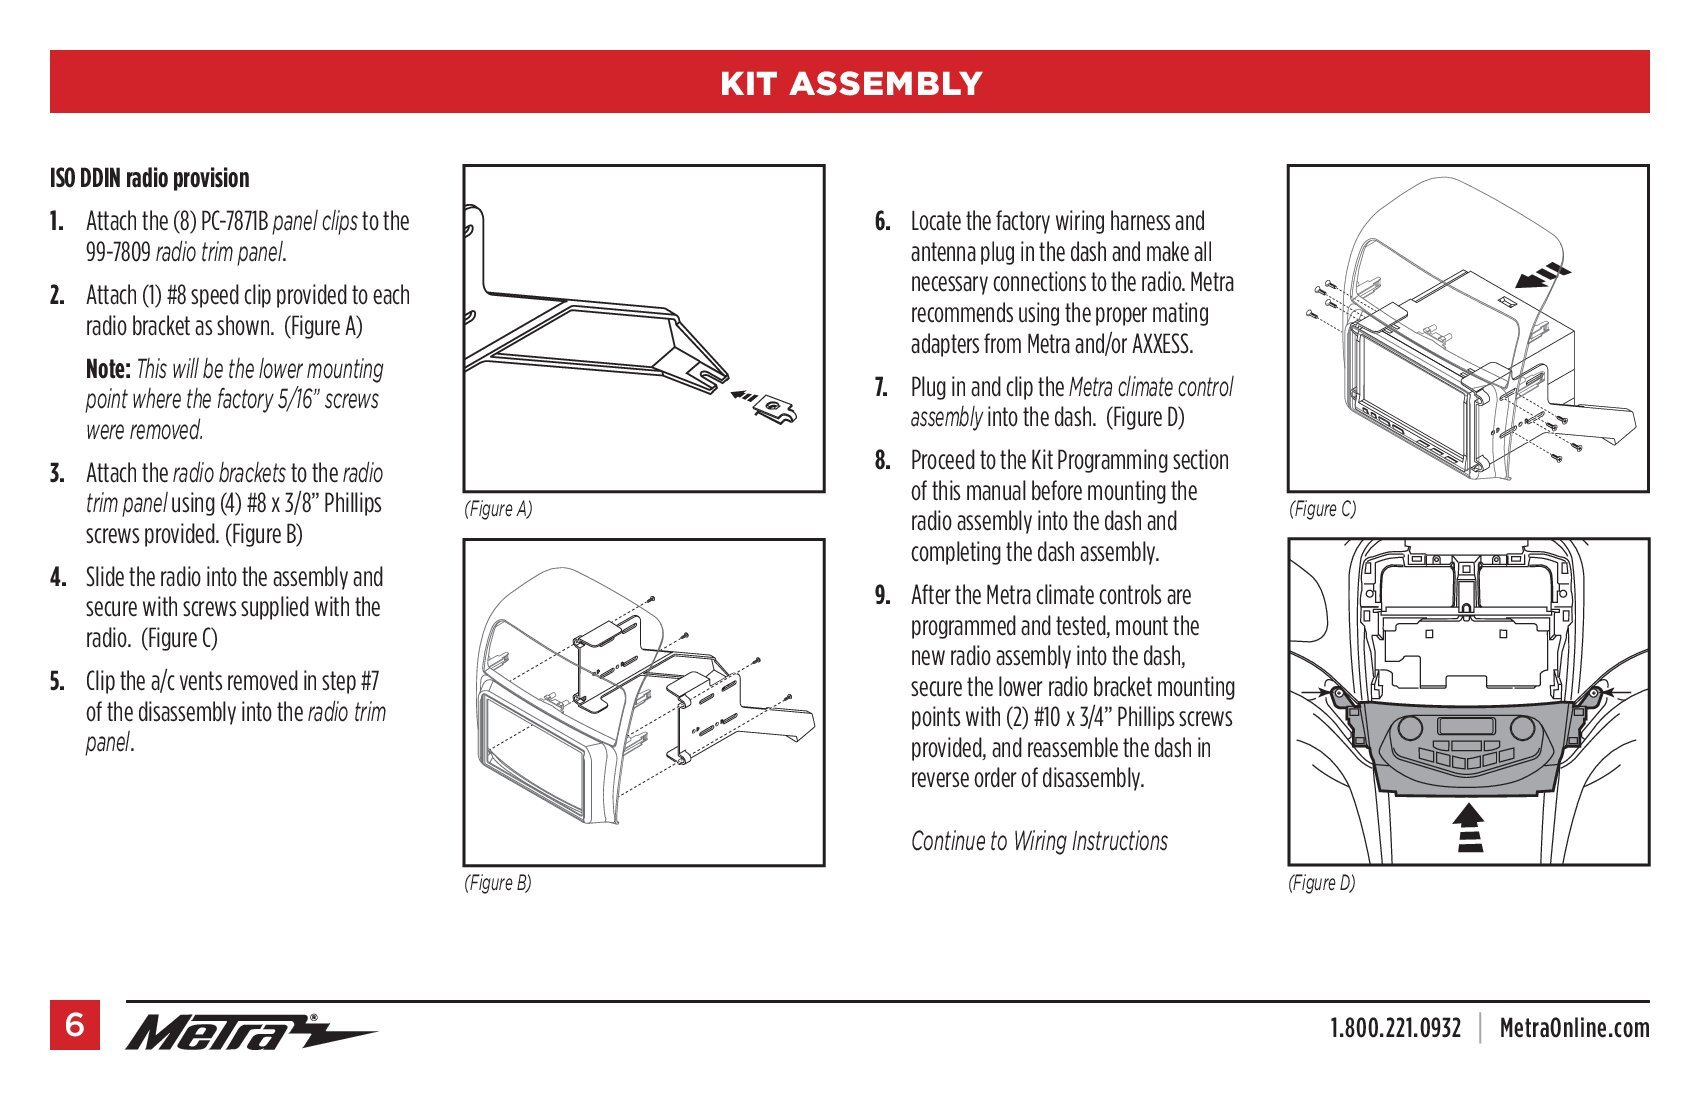
When replacing the radio in your Acura TSX you will need to modify the plastic behind the factory radio to fit the new radio in place. This modification while permanent does not affect the ability to install the factory radio or any factory components. If you replace the radio in your Acura TSX the new aftermarket radio will utilize the factory amplifier to keep all of your speakers including the front door speakers, tweeters, rear deck speakers and rear deck subwoofers. You will also get to keep the steering wheel control buttons including volume up, volume down, next, prev and mode. The Navigation and HFL control buttons will not work. The factory navigation will keep working but you will have no sound from it. The factory backup camera will still work if equipped through the factory navigation. This radio kit is meant to be installed below the factory radio please check the pictures. The factory radio and climate control will remain functional.
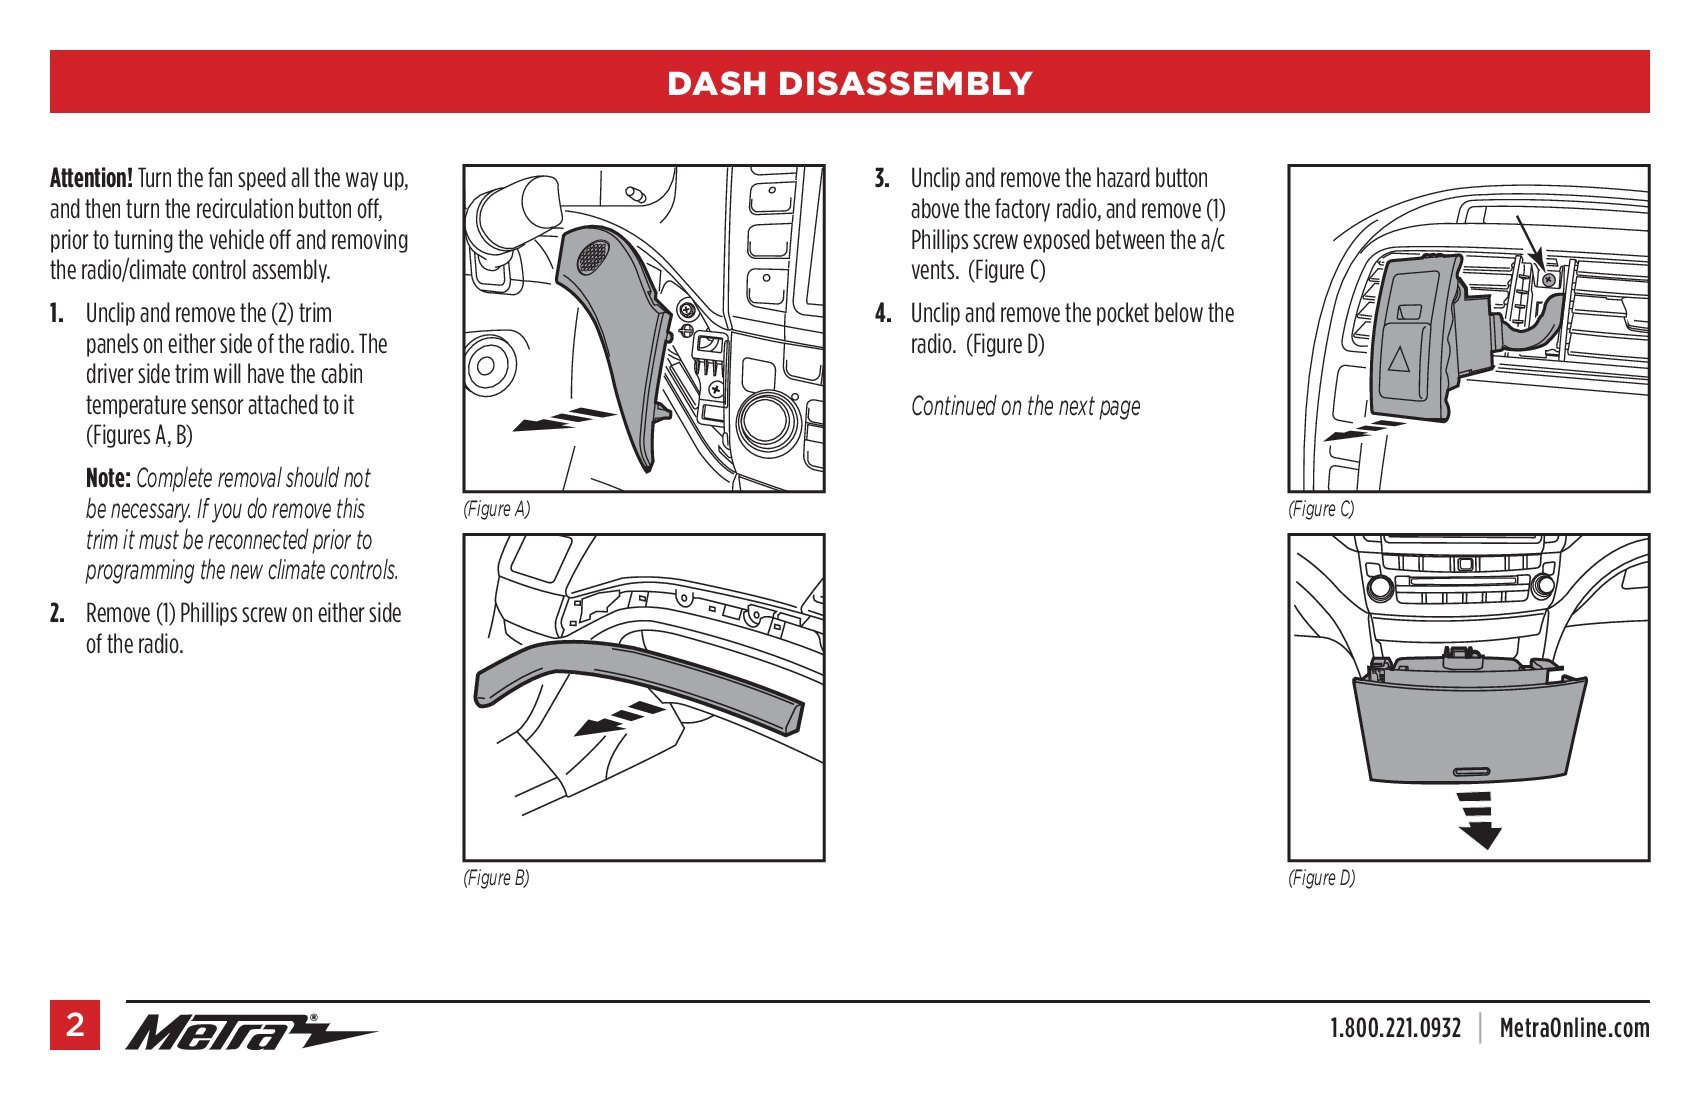
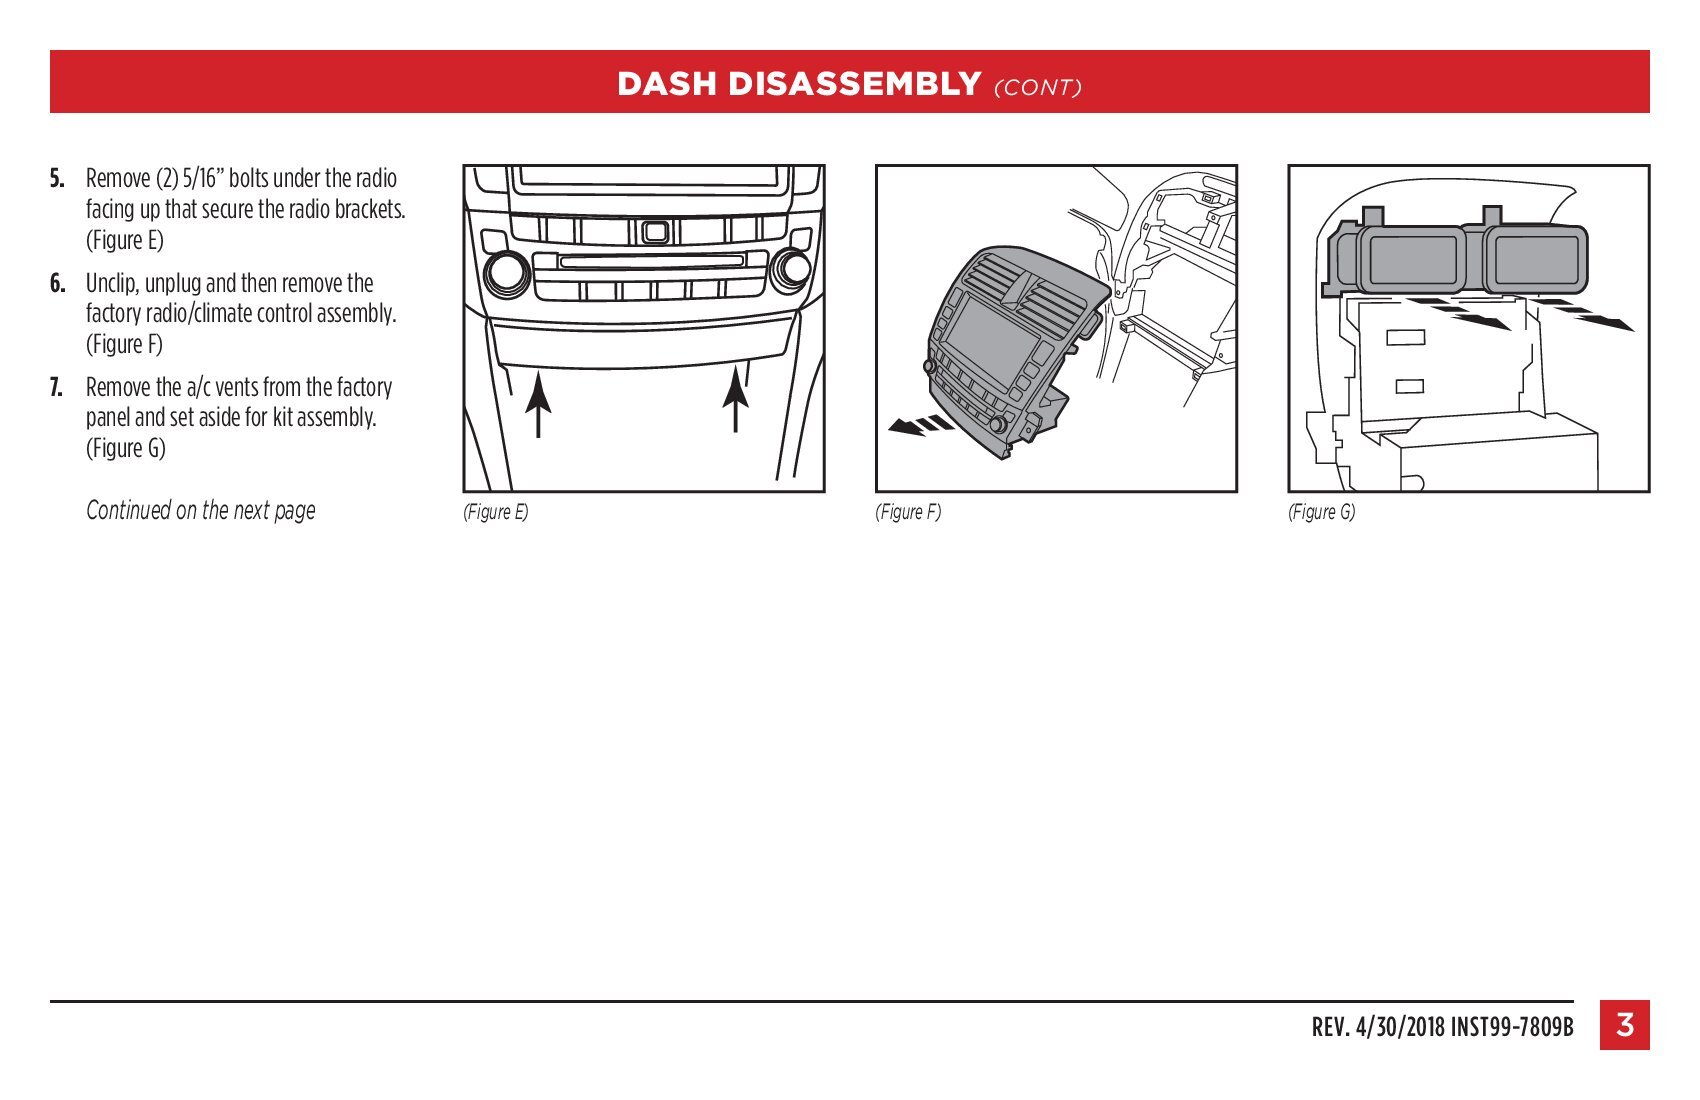
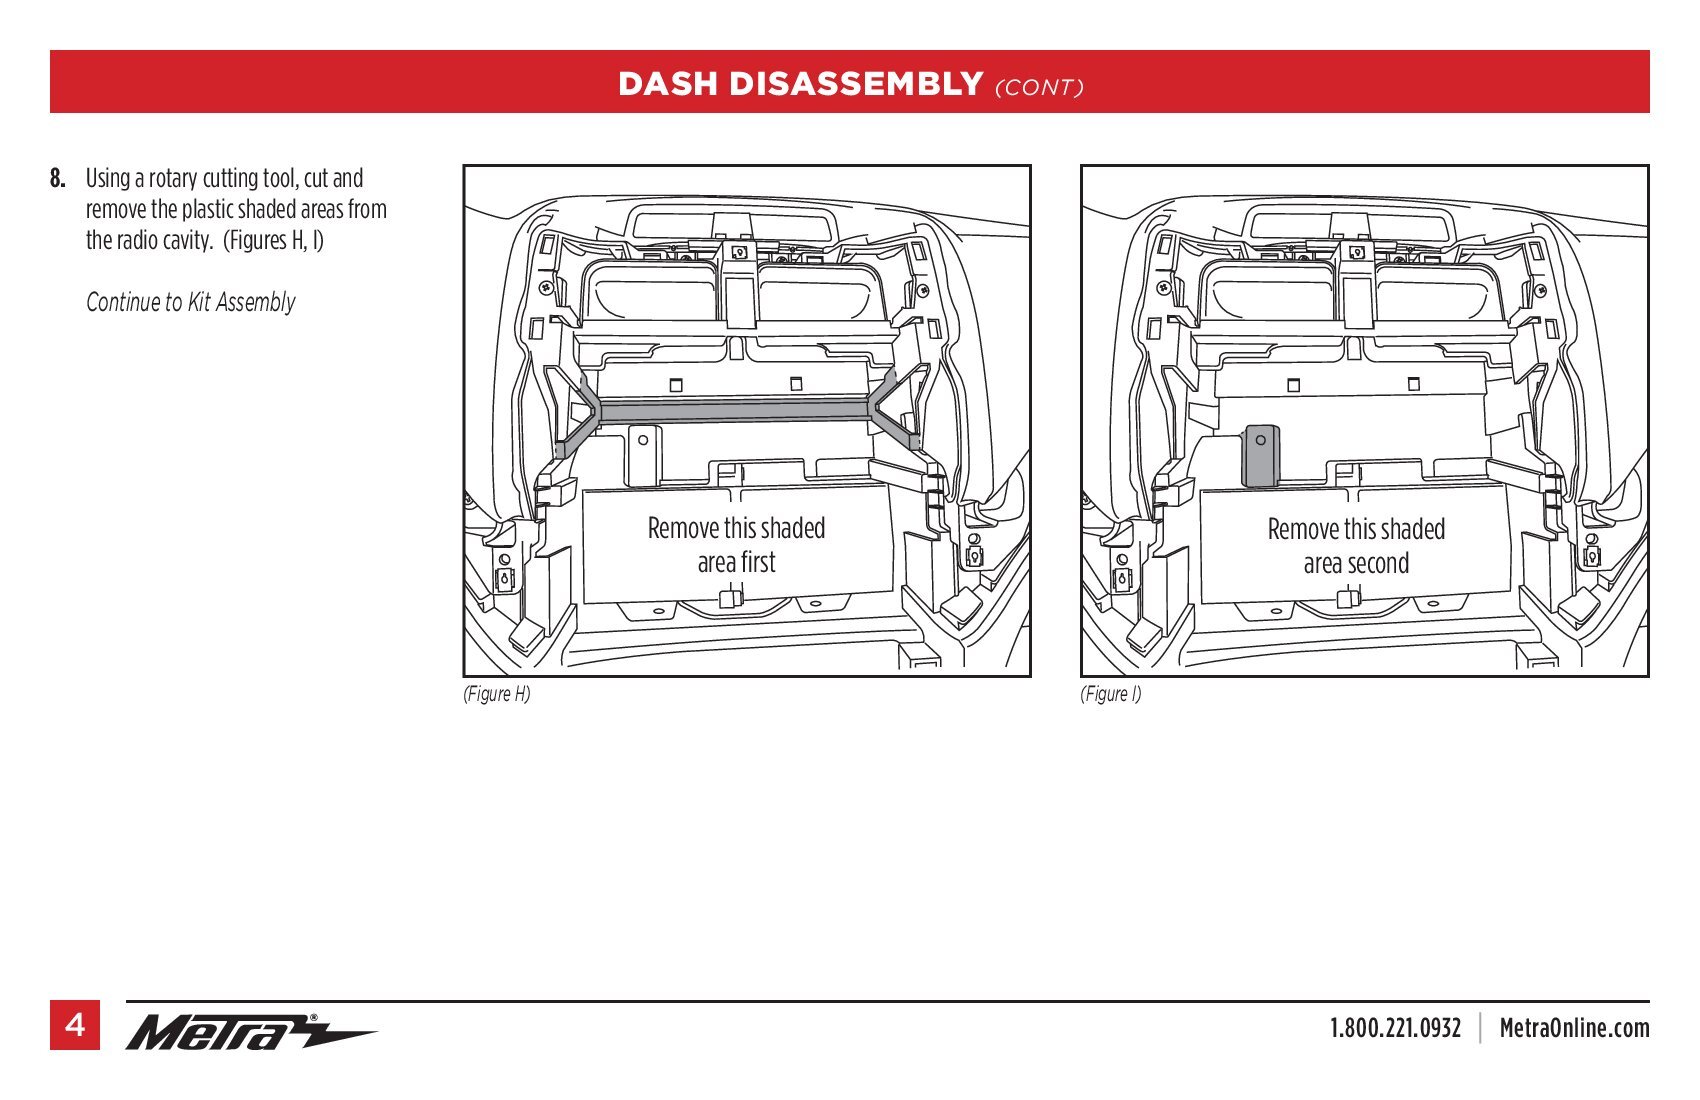
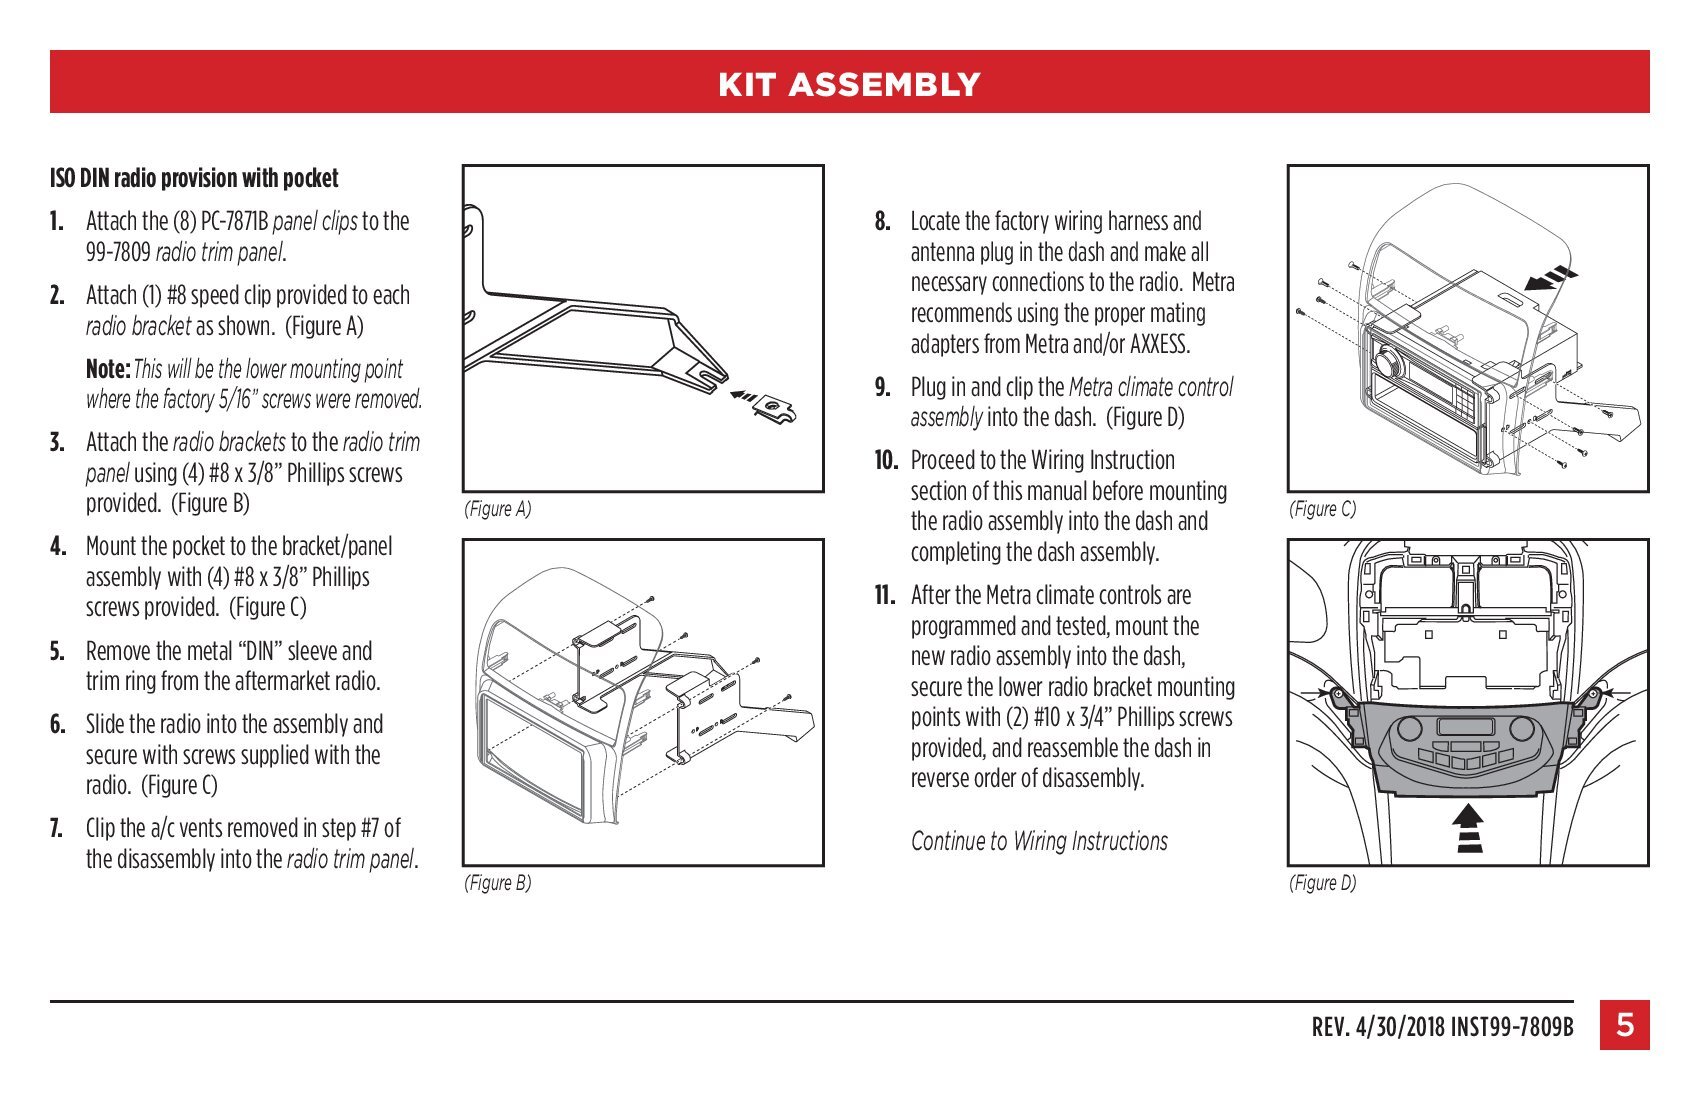
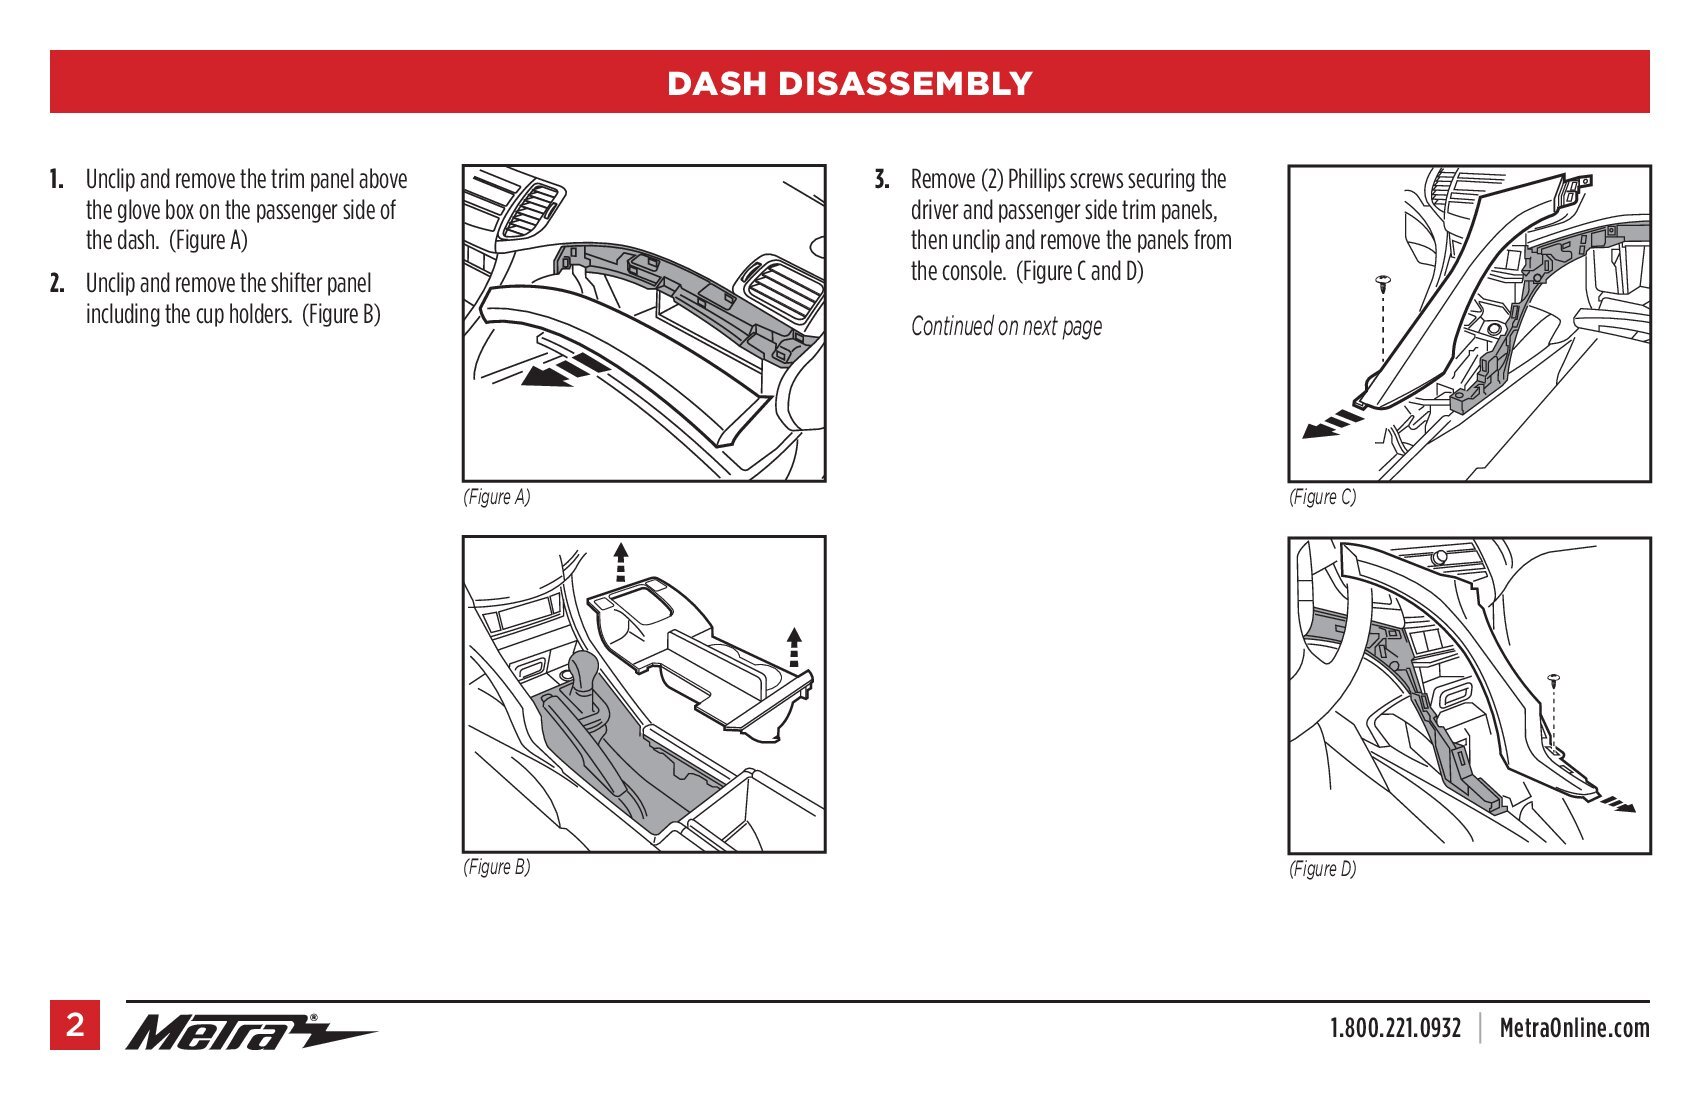
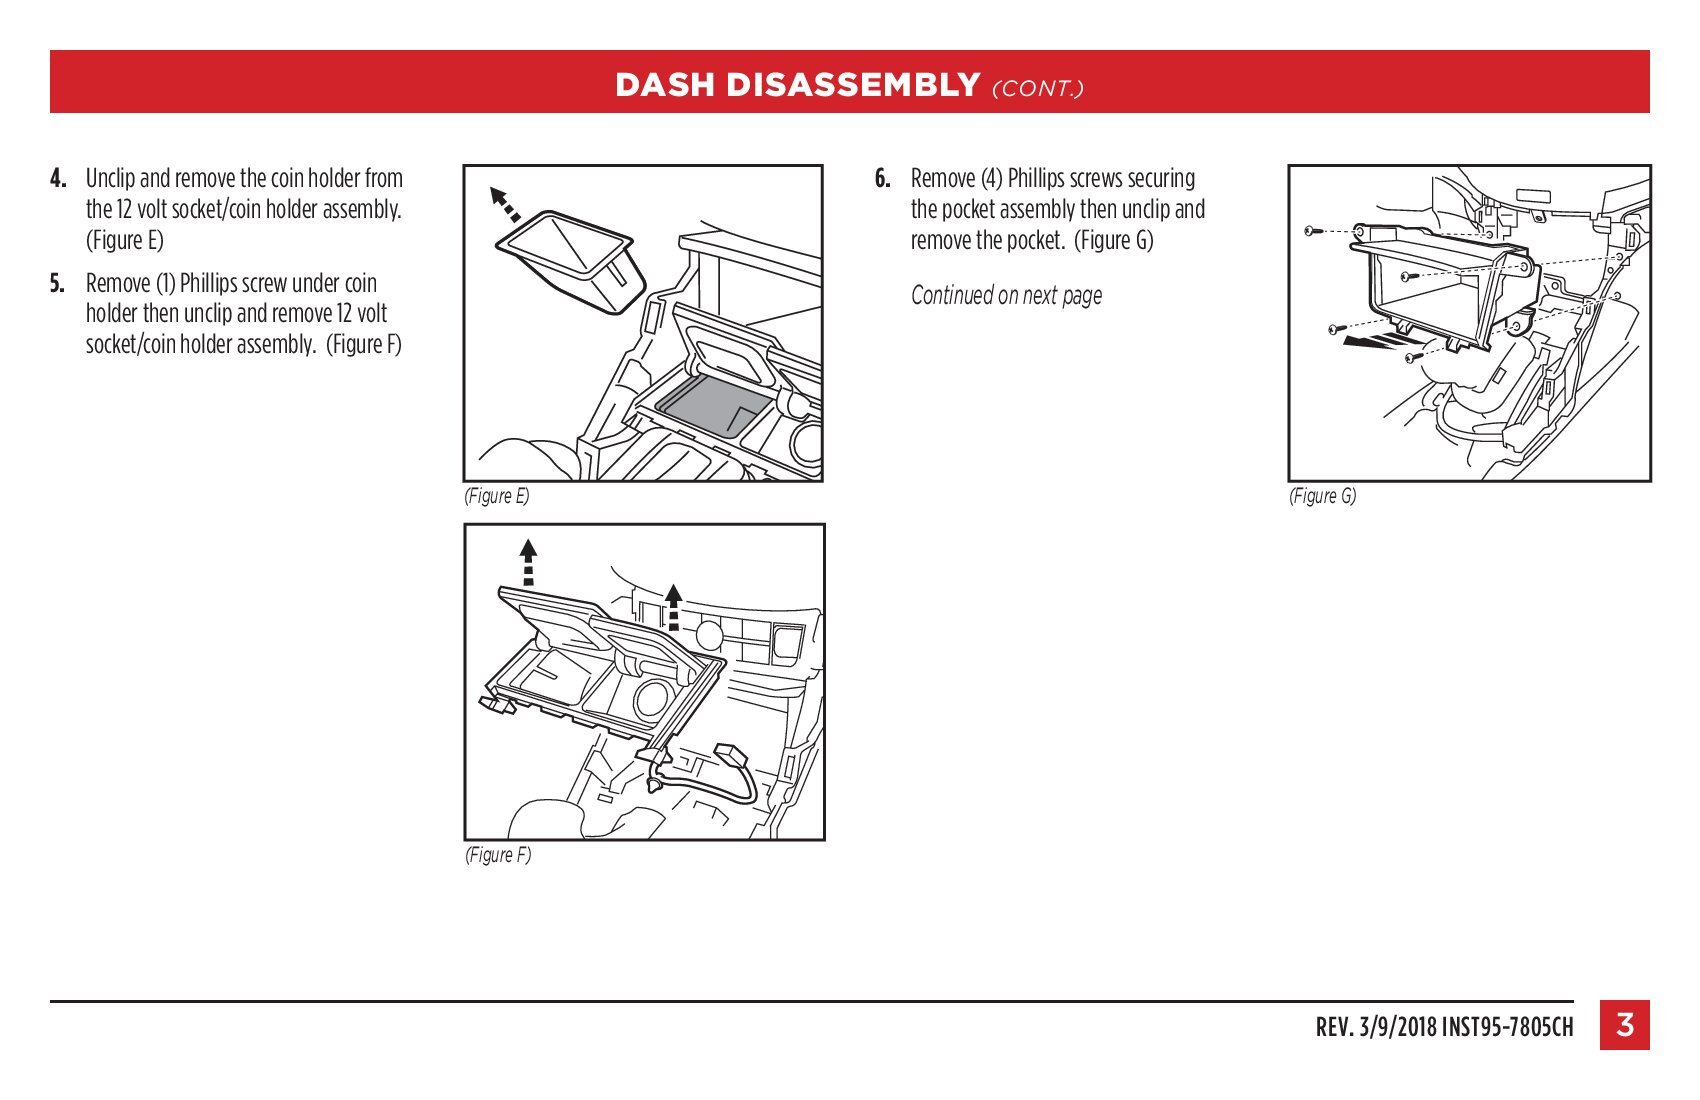
A. driver inner dashboard trim

B. passenger trim

C. center console panel

D. center upper pocket

E. center lower pocket

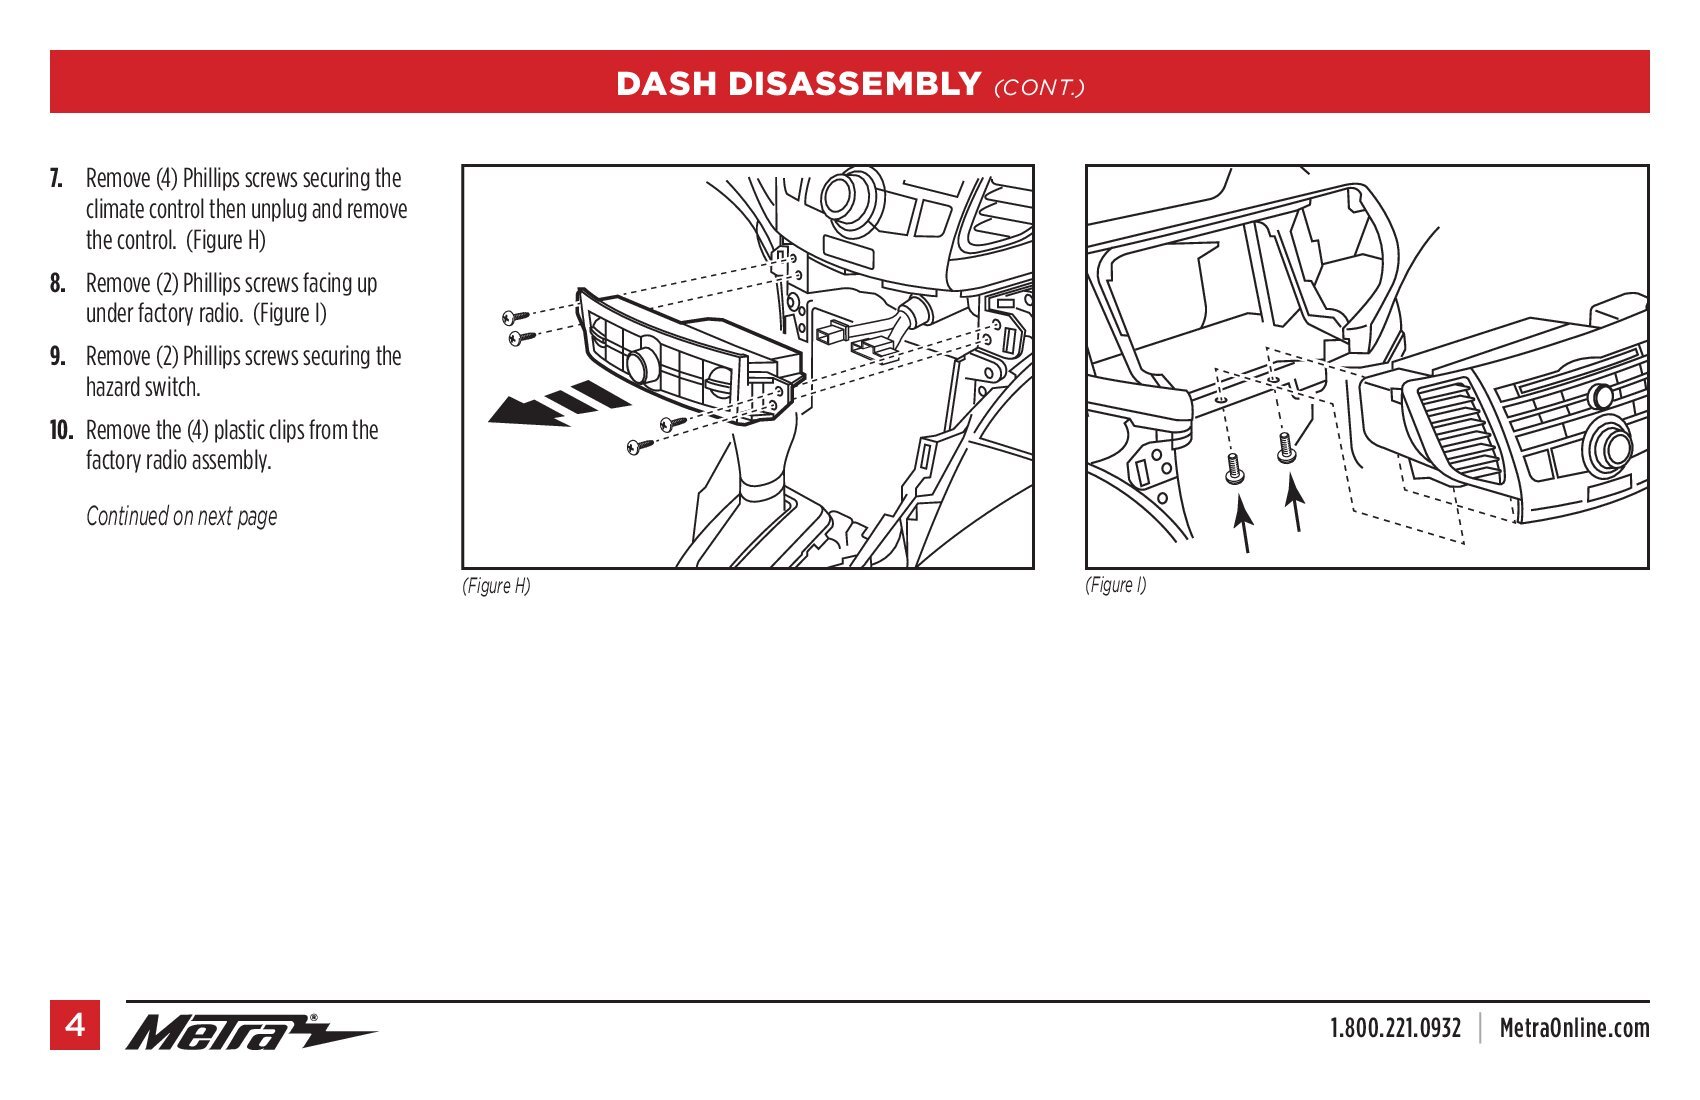
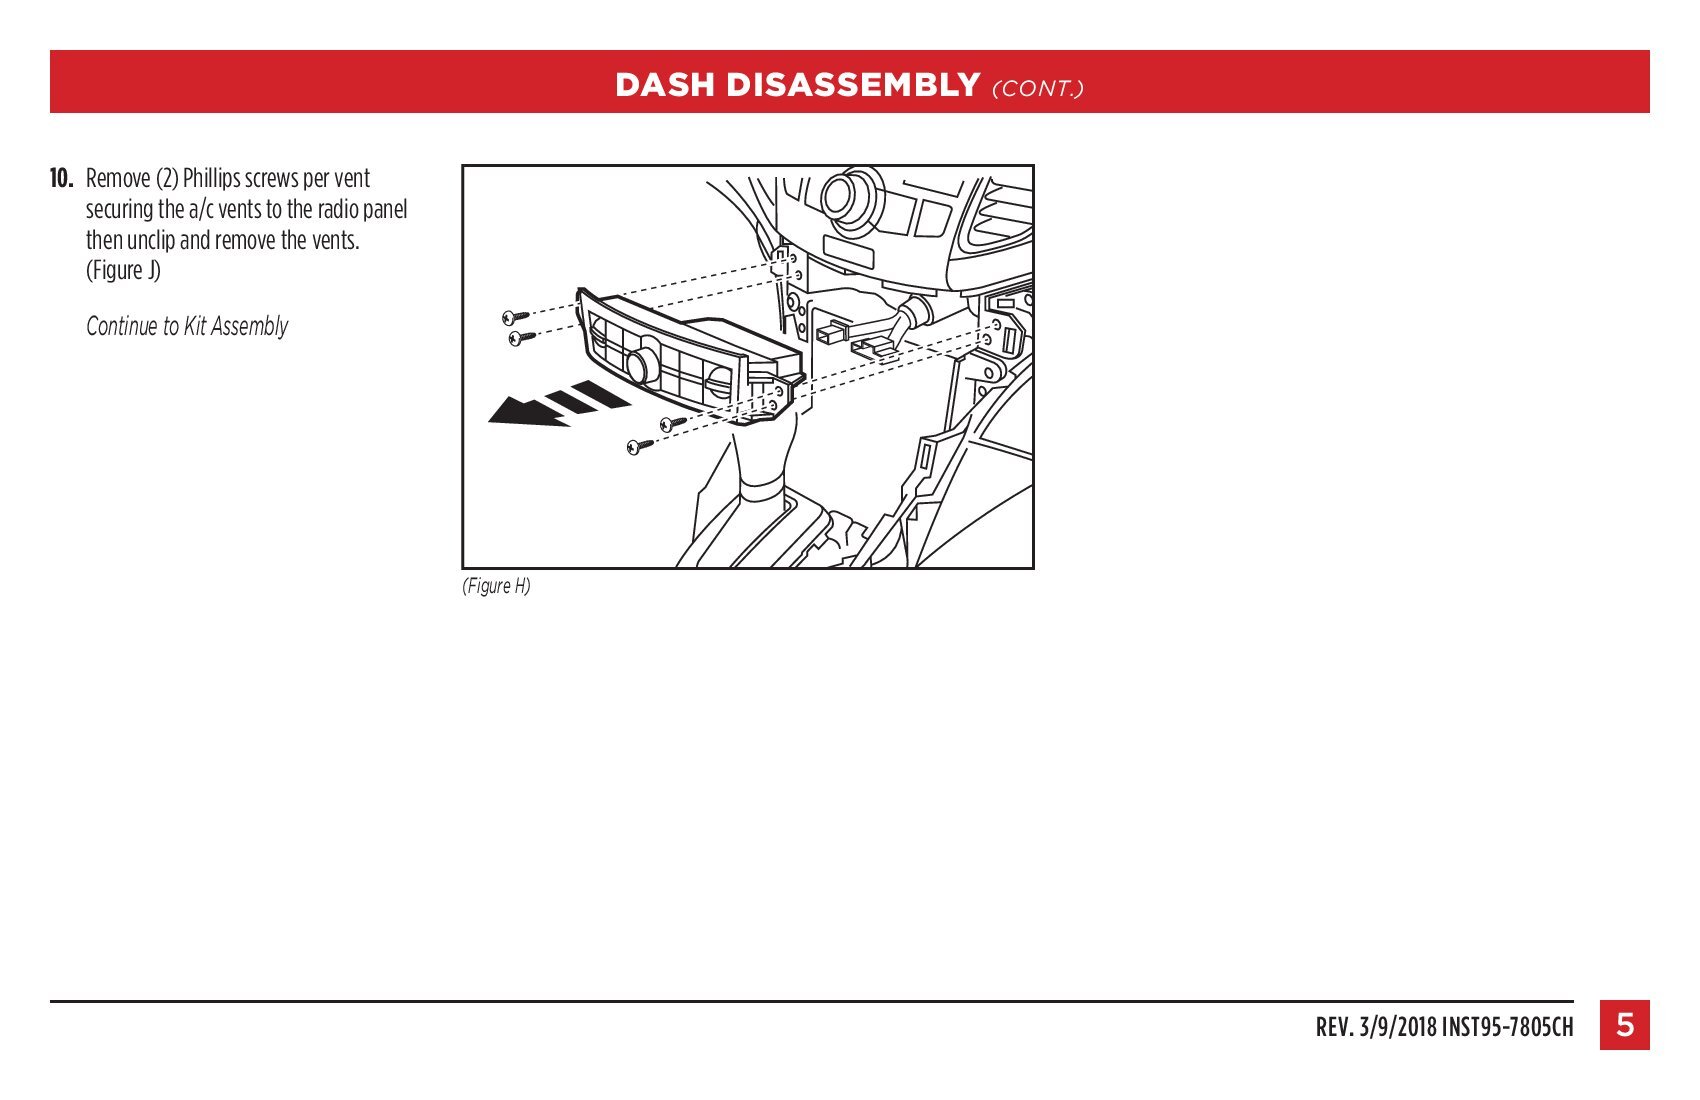
You need to remove the hazard switch as well, this will pop out, is also held in by clips. Remove five 8mm screws from the face and below the radio, and the radio will pop out -note- is also held in with clips.
