Posted on Leave a comment

Acura Speaker Installation Instructions – DIY How To

Here is the pdf version

  1. Open the door all the way to ensure you have enough room to work with and the door won’t hit anything. If you rather follow video instructions checkout our YouTube channel @acurauadiogarage.
  2. Roll up the window and find a comfortable seat.
  3. Remove any items from the door panel storage areas.
  4. Use a pry tool or small flat head screwdriver to expose screws hidden behind covers and removal panels. Screws are often hidden behind the door handle or arm rest.
  5. Depending on the Acura you will also have screws on the edges of the door panel to check for any hidden screws or screws with covers on them.
  6. After locating all the screws in your Acura remove them and begin prying the door panel from the bottom with a pry tool.
  7. The pry tool goes between the door panel and the metal of the door. The door panel is held on with plastic clips that are pressed into the metal of the door when they release they will make a loud noise. The noise is normal, you have not broken anything.If your door panel does not release easily you might have missed a screw.
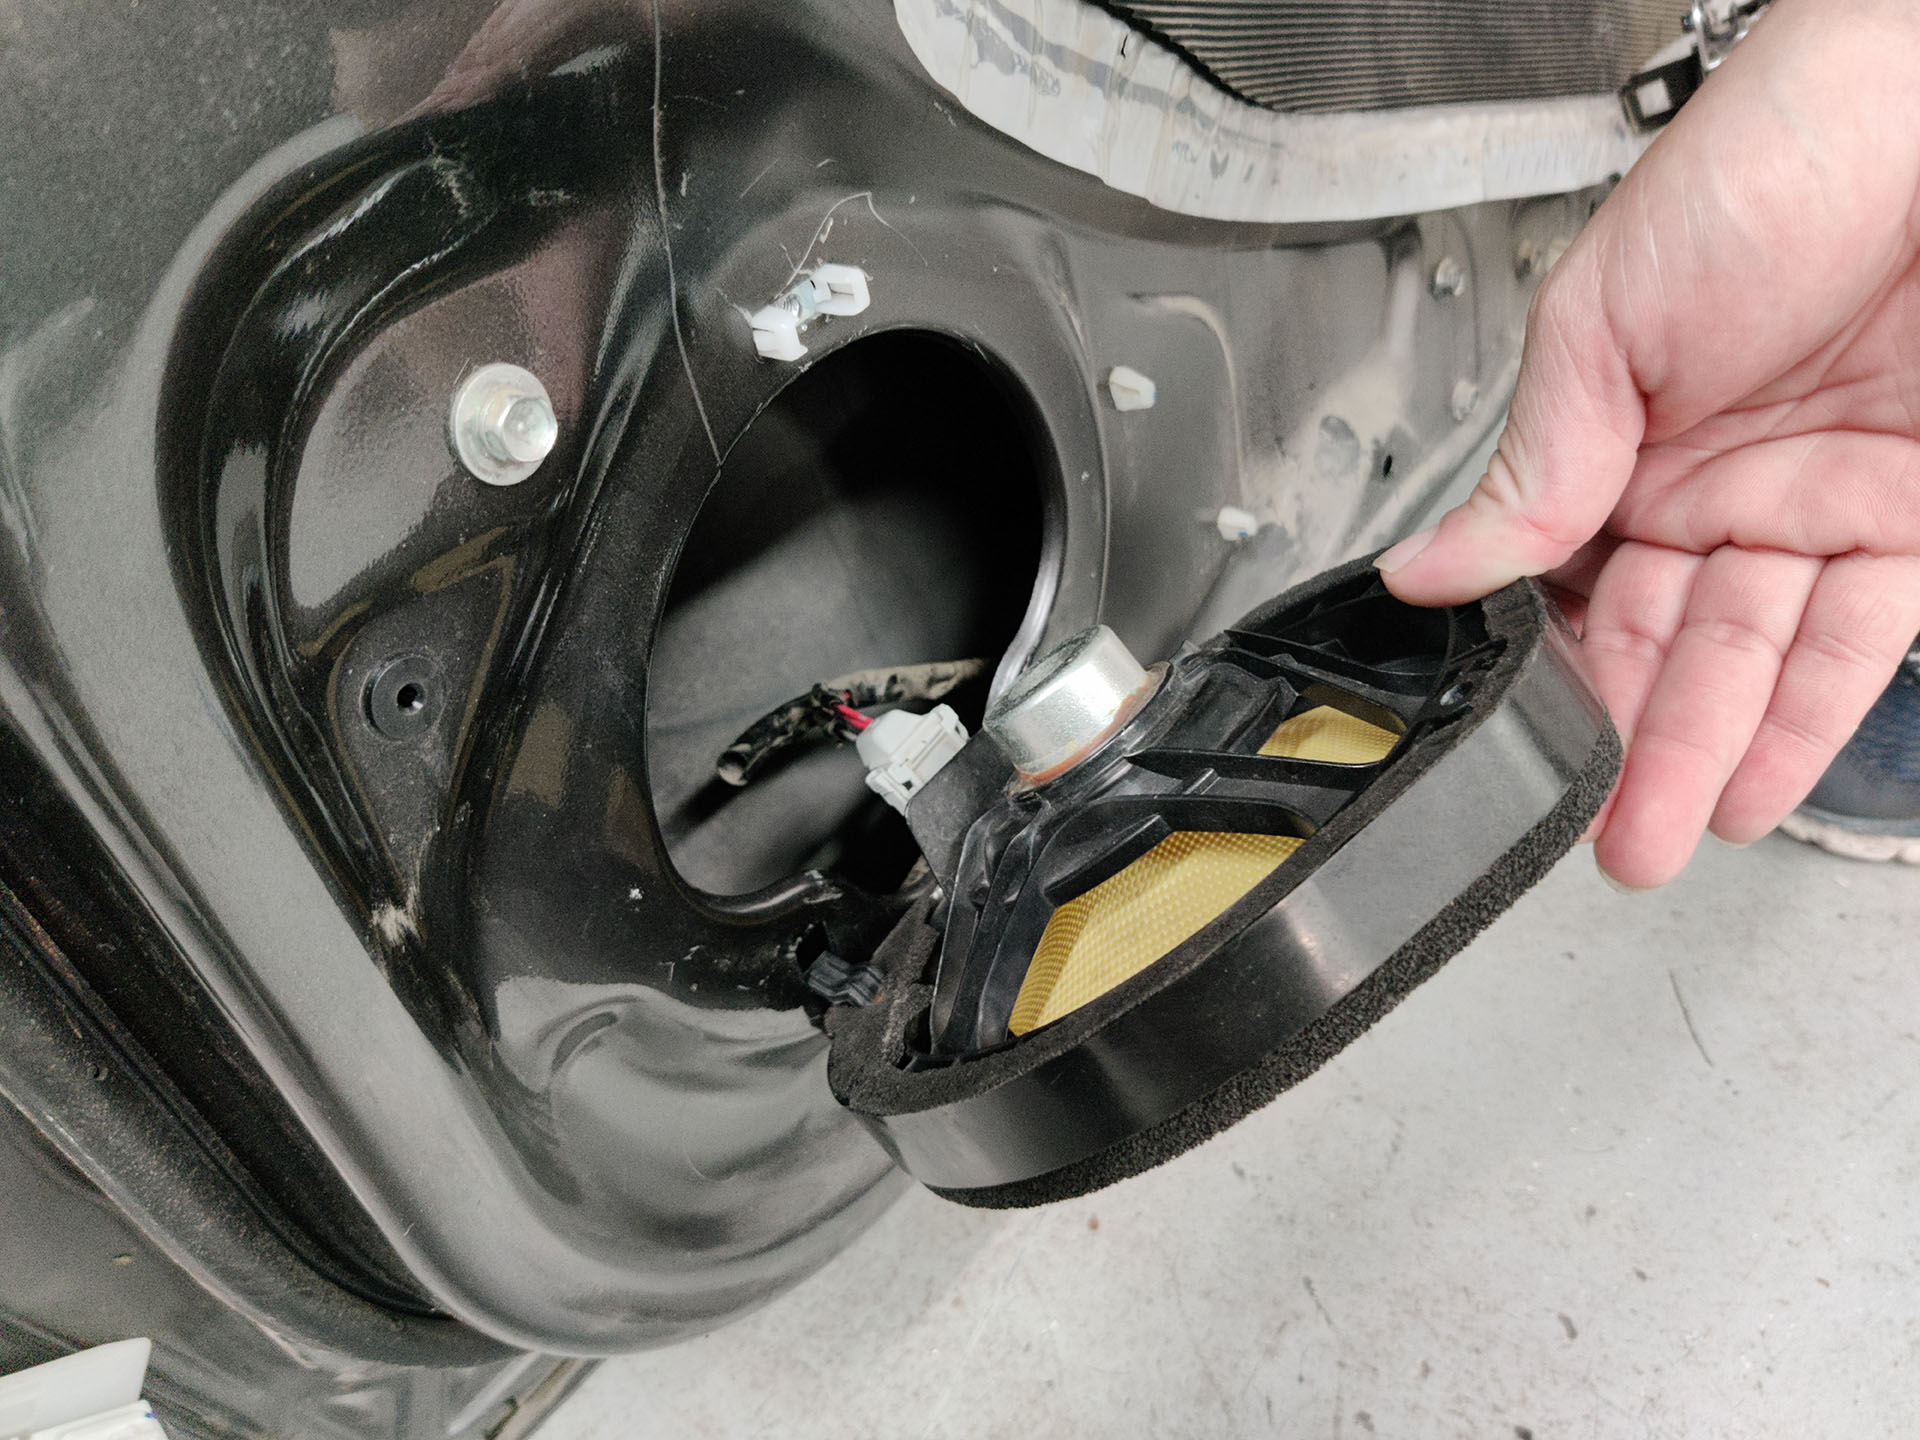
  8. Stand up and lift the door panel towards your head no not yank or pull it harshly. Attached to the door panels are different cables you will need to remove. You might need a buddy to hold the panel while you disconnect
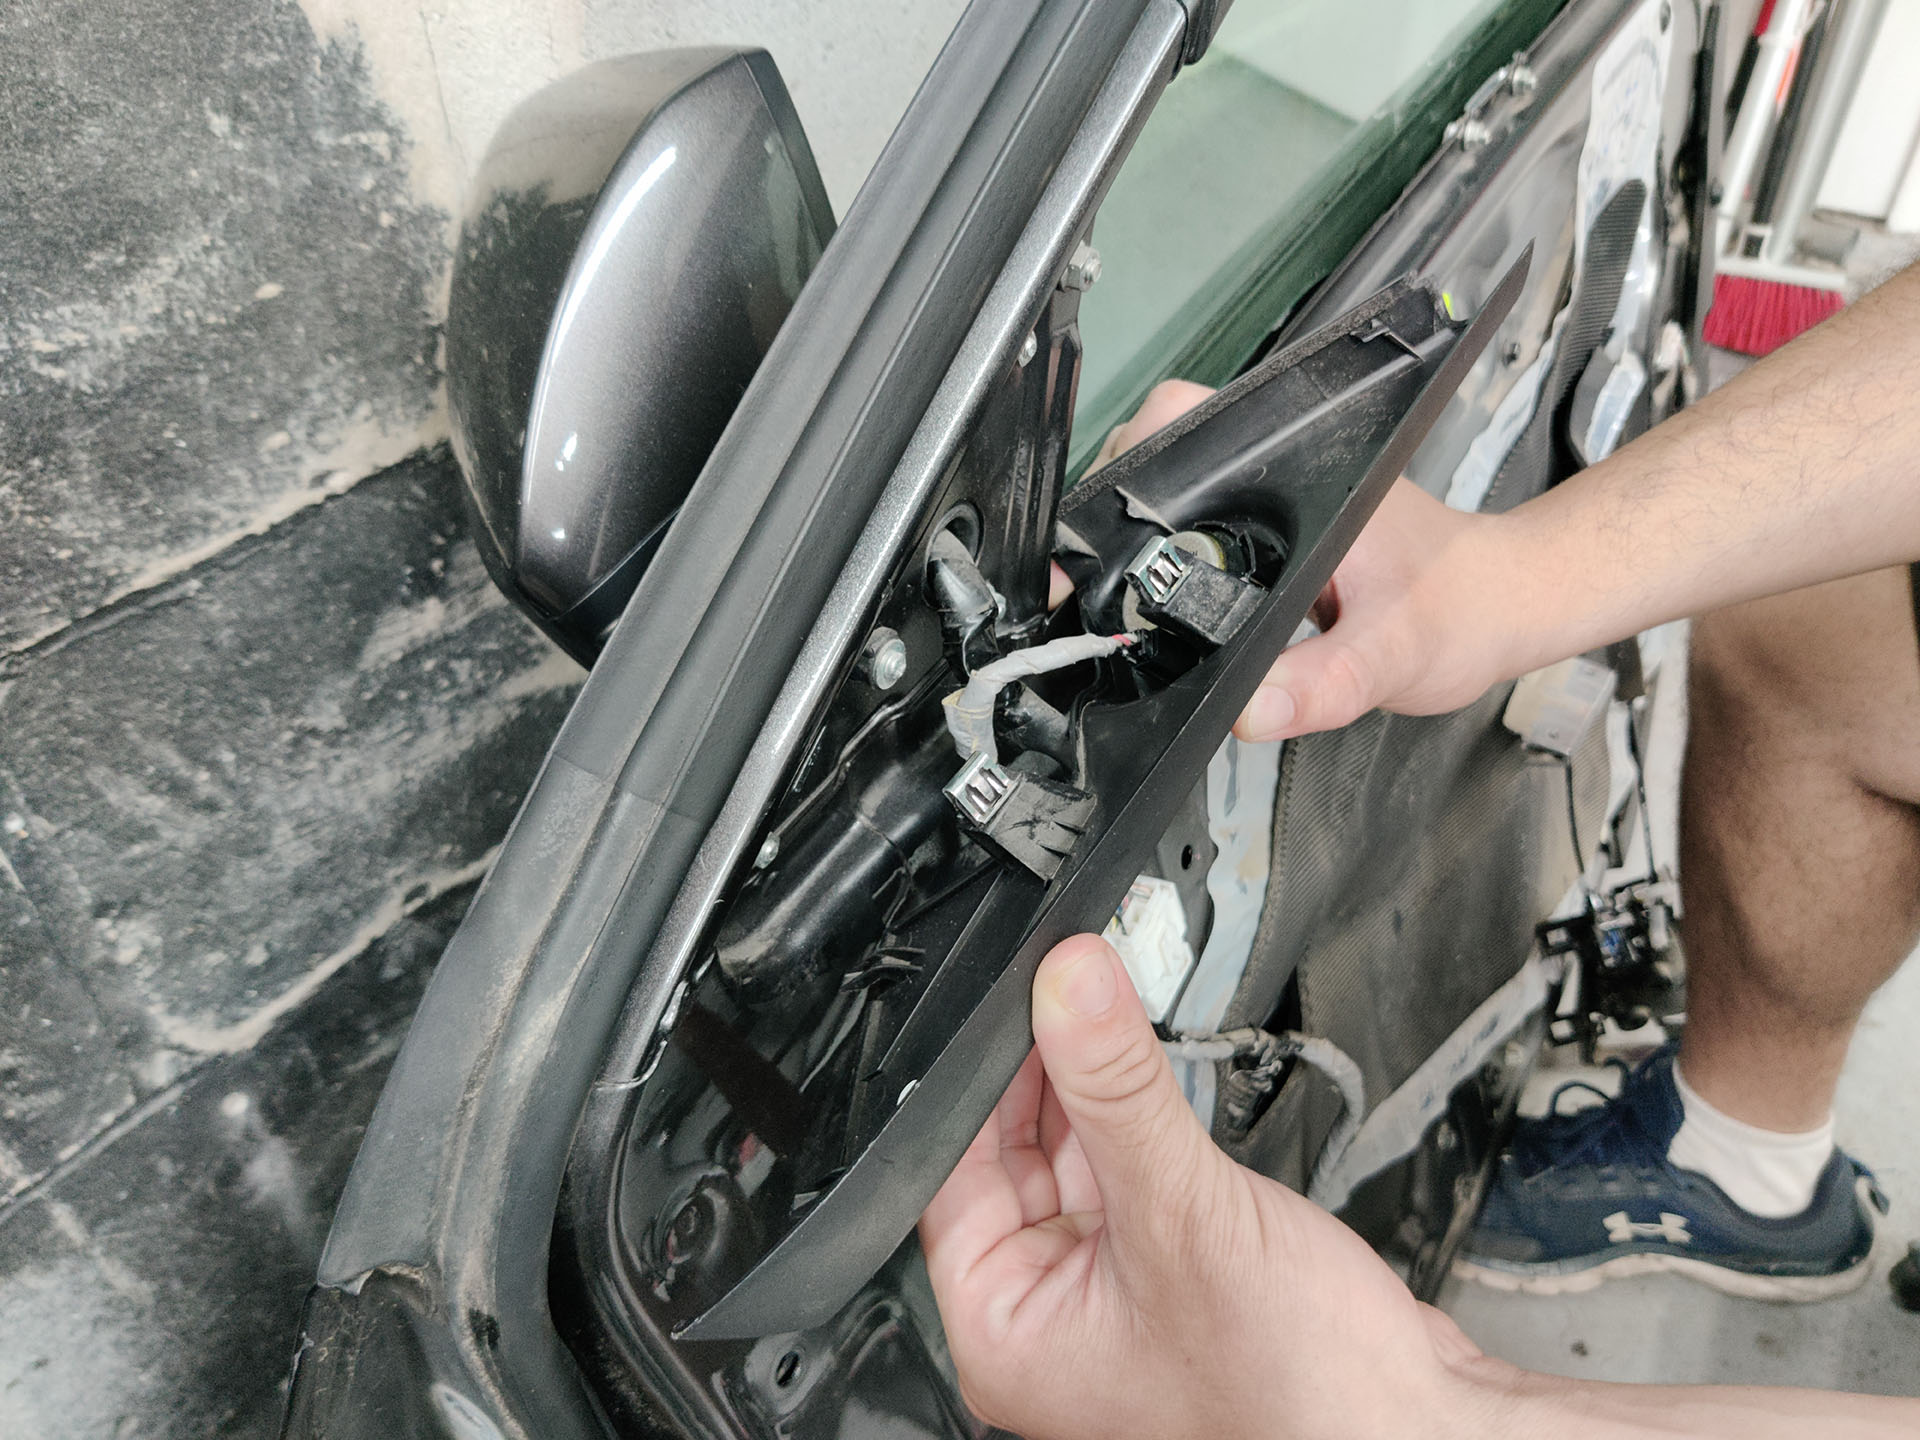
  9. Disconnect the door latch and lock cables from the door panel. These cables are made of metal so be careful as they will easily break the plastic they are attached to. On most Acura’s made after 2009 you can unclip the entire door handle from the door panel. On older Acuras you will need to unclip the cables from the door panel.
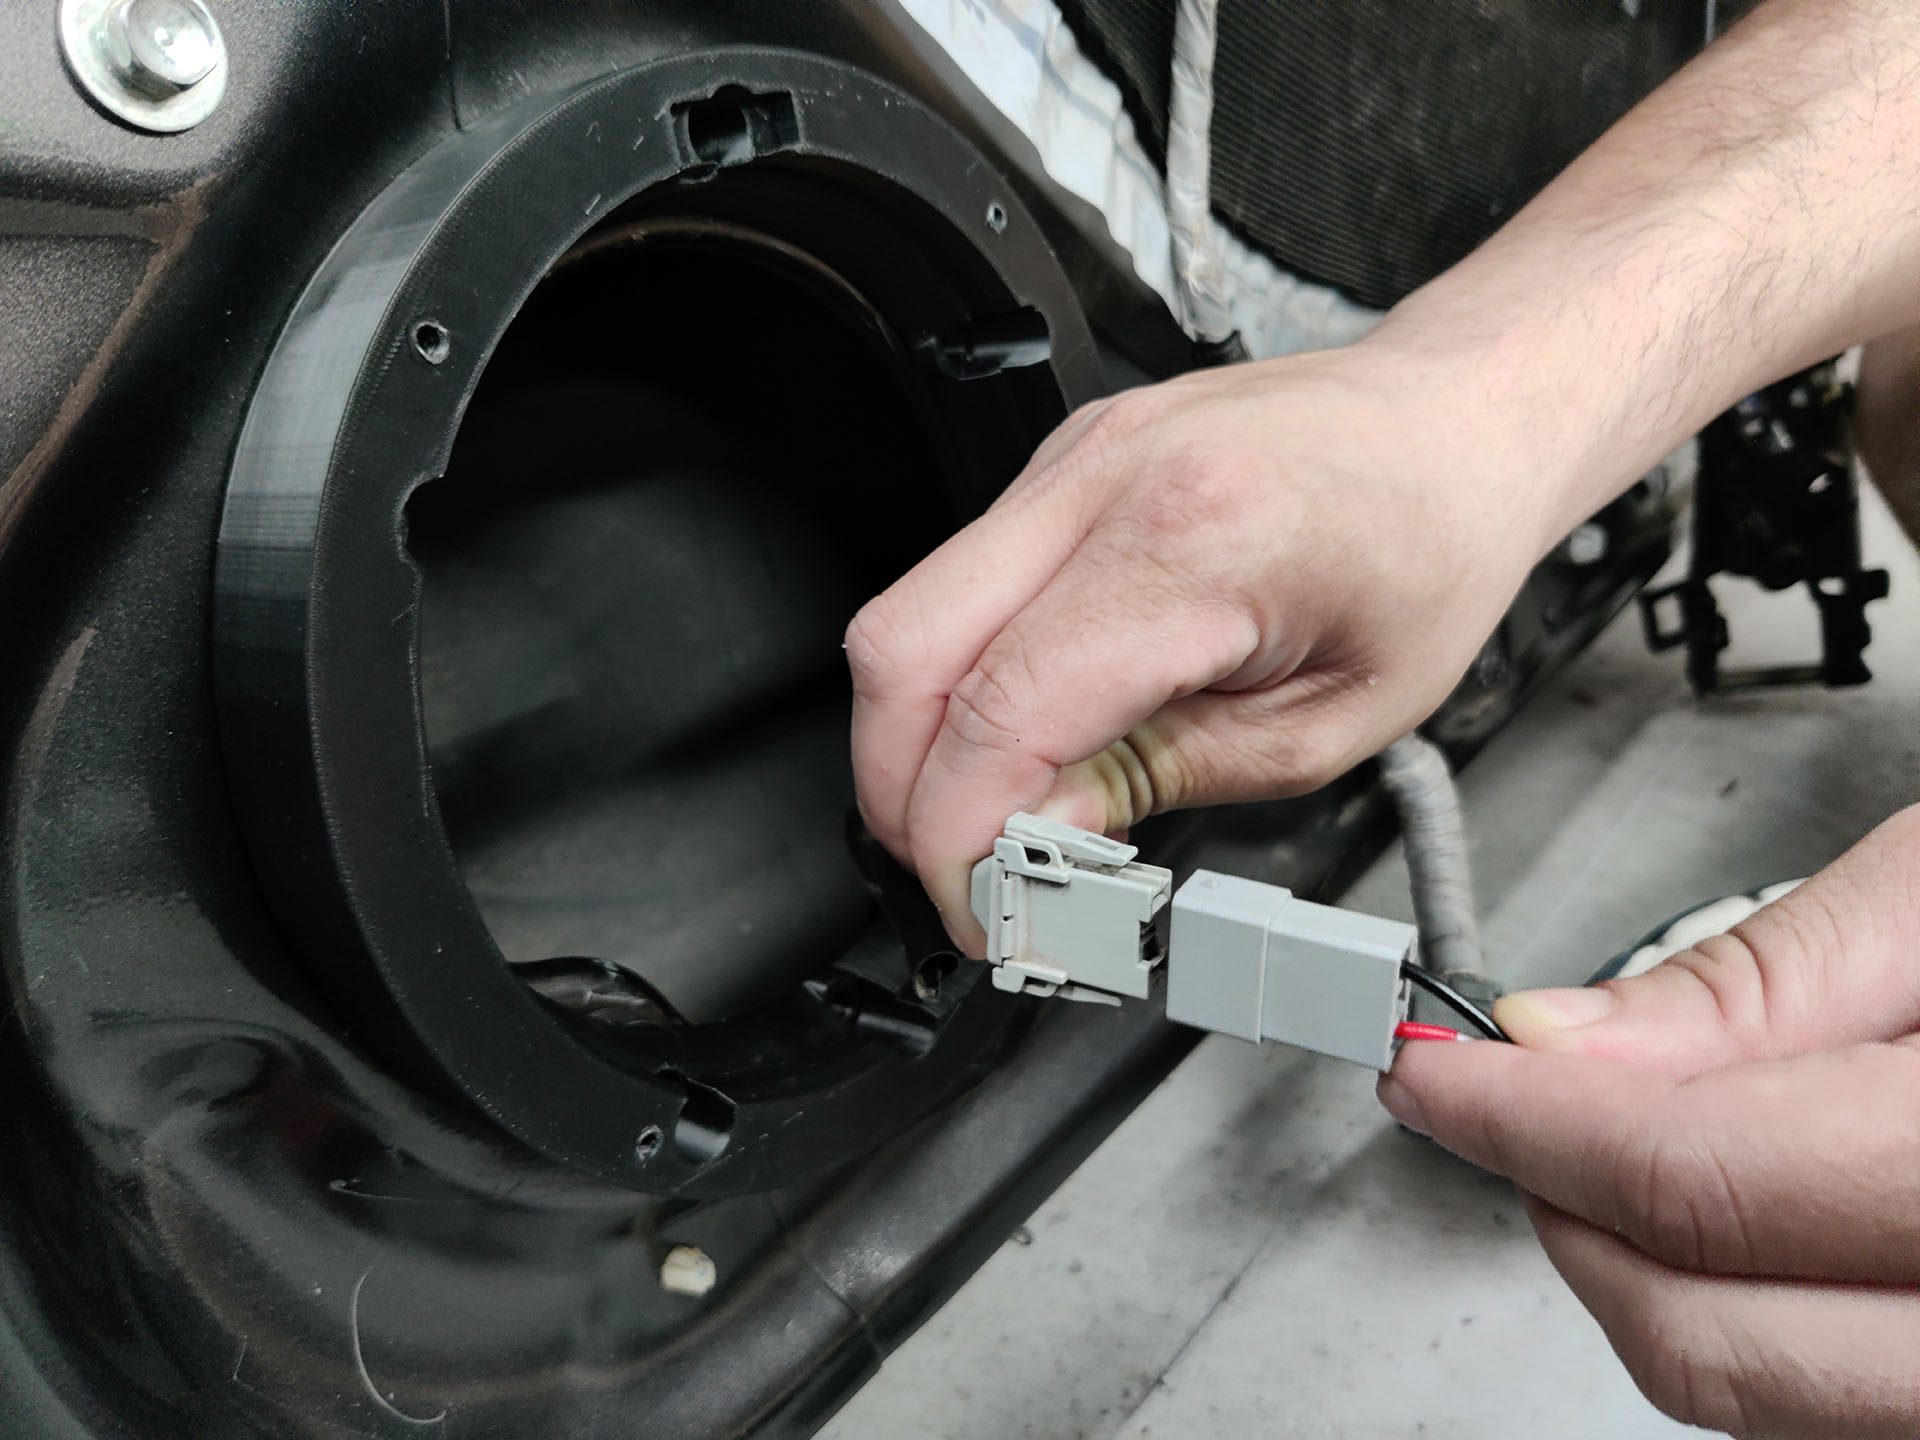
  10. Next Disconnect the electrical cable connectors from the door panel. Almost all of the electrical connectors will have triggers or tabs that you must press down on to release them from the mating connection.
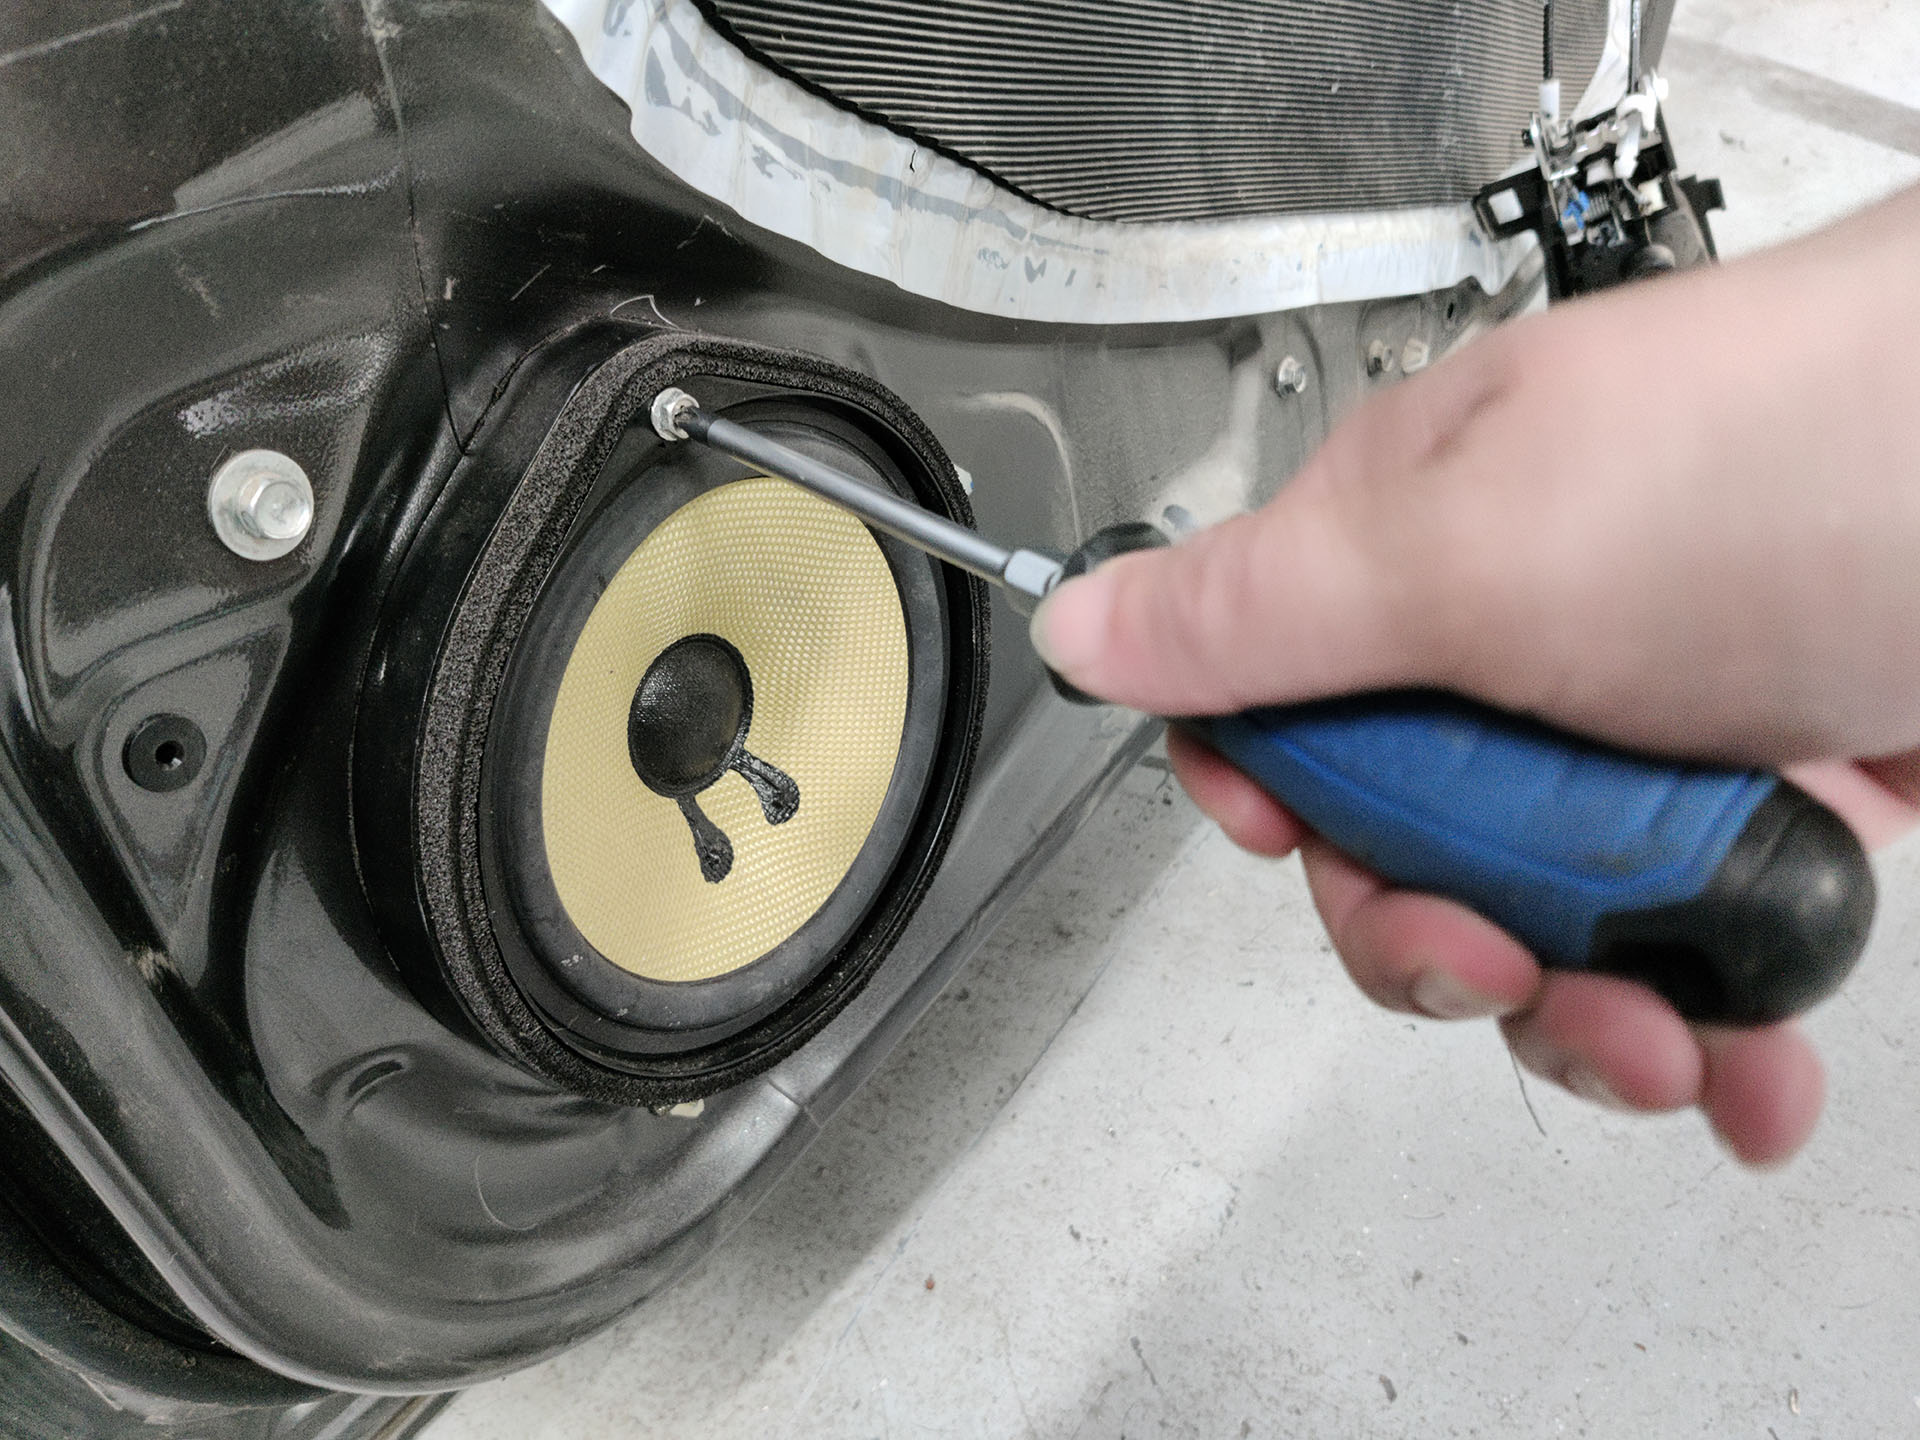
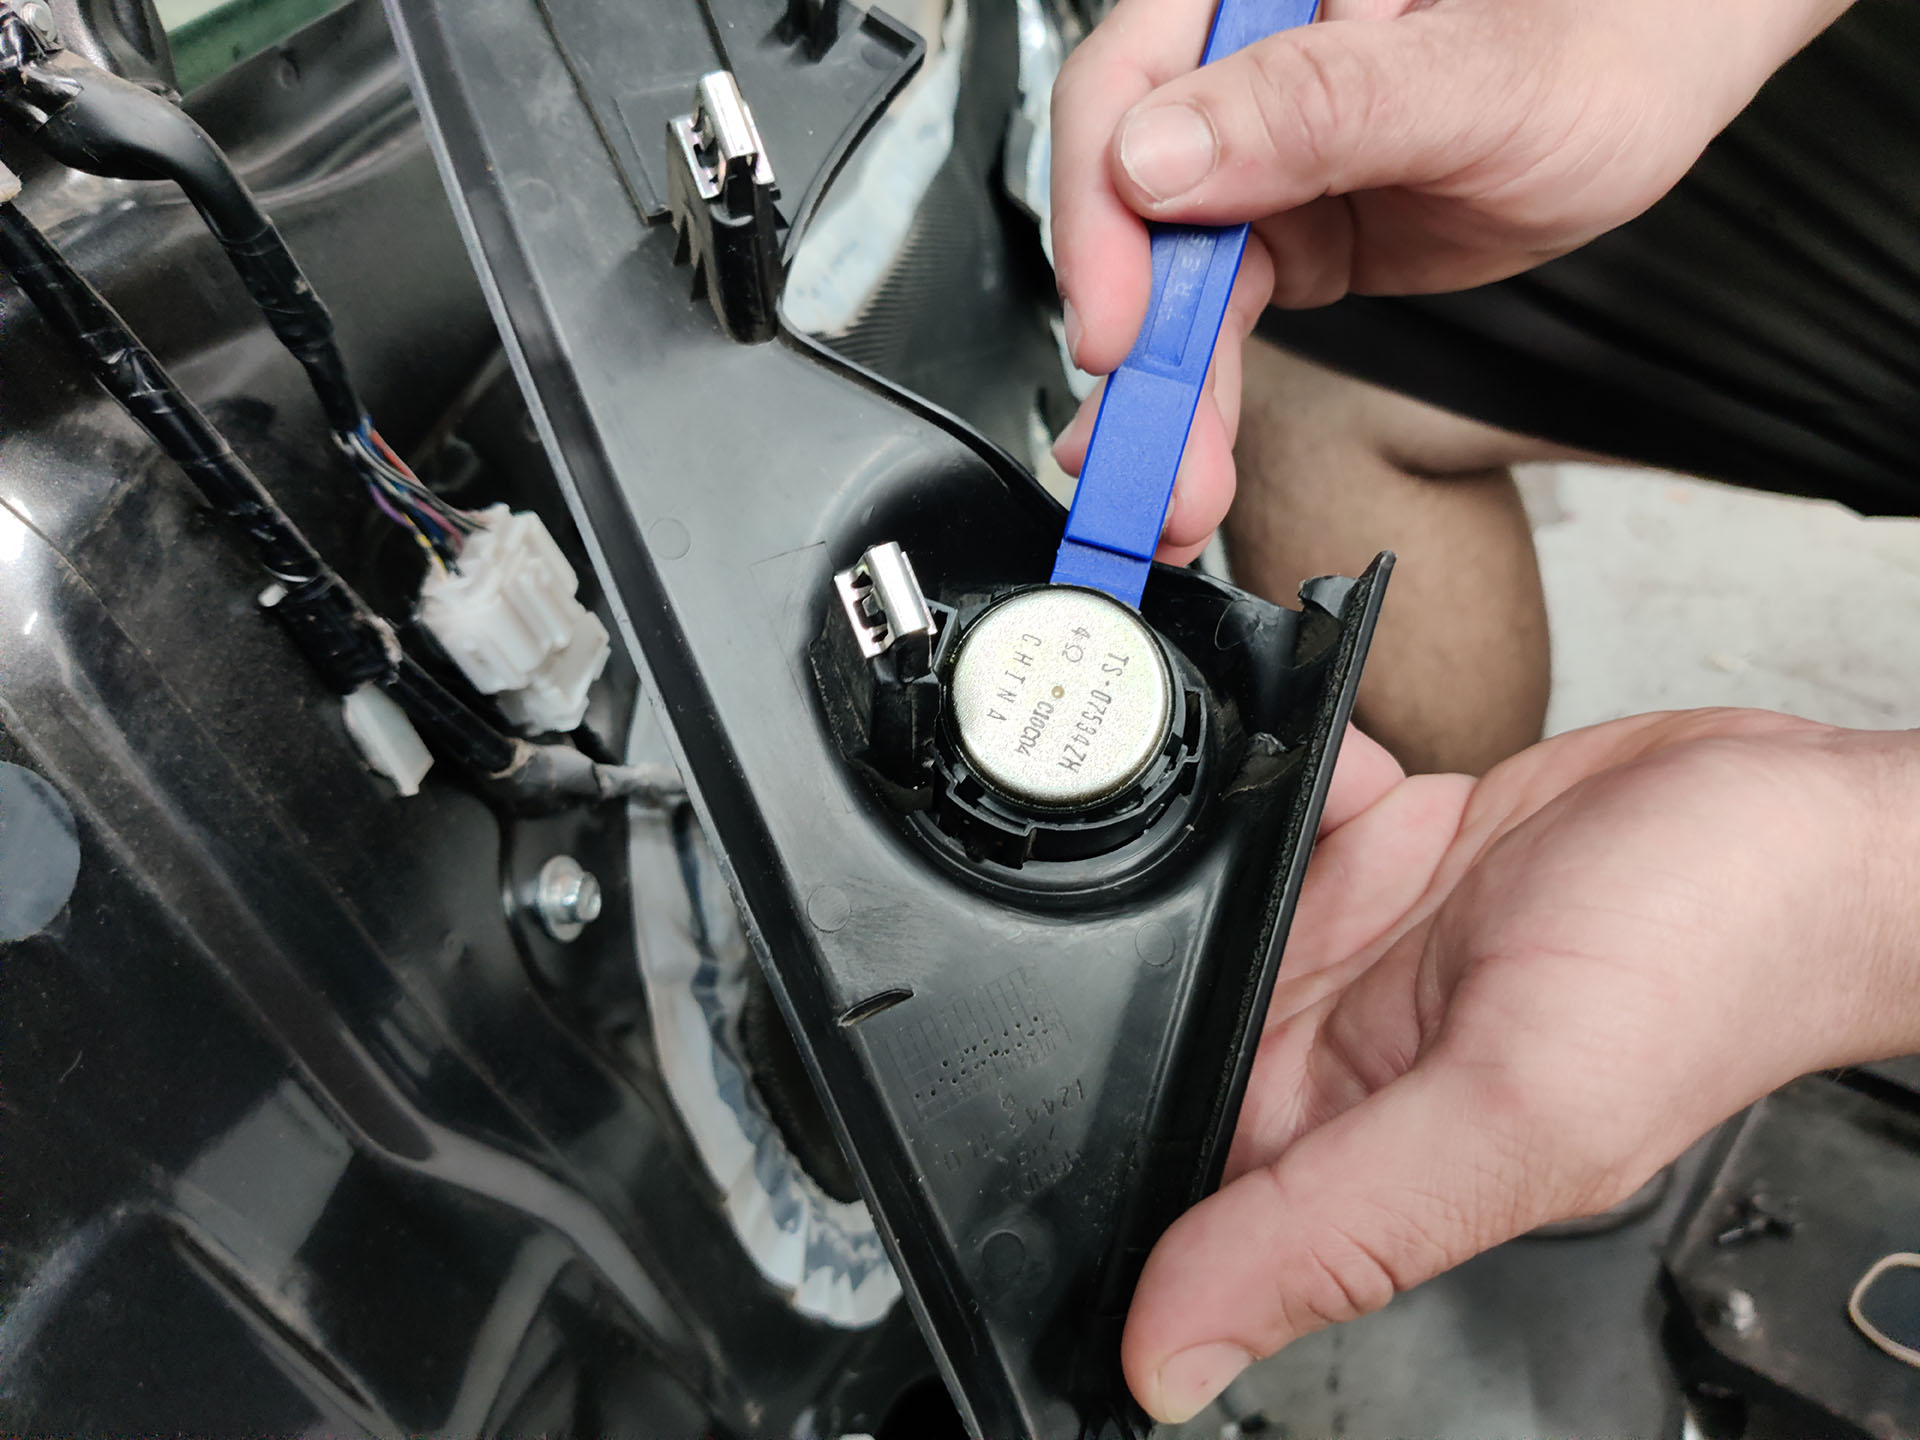
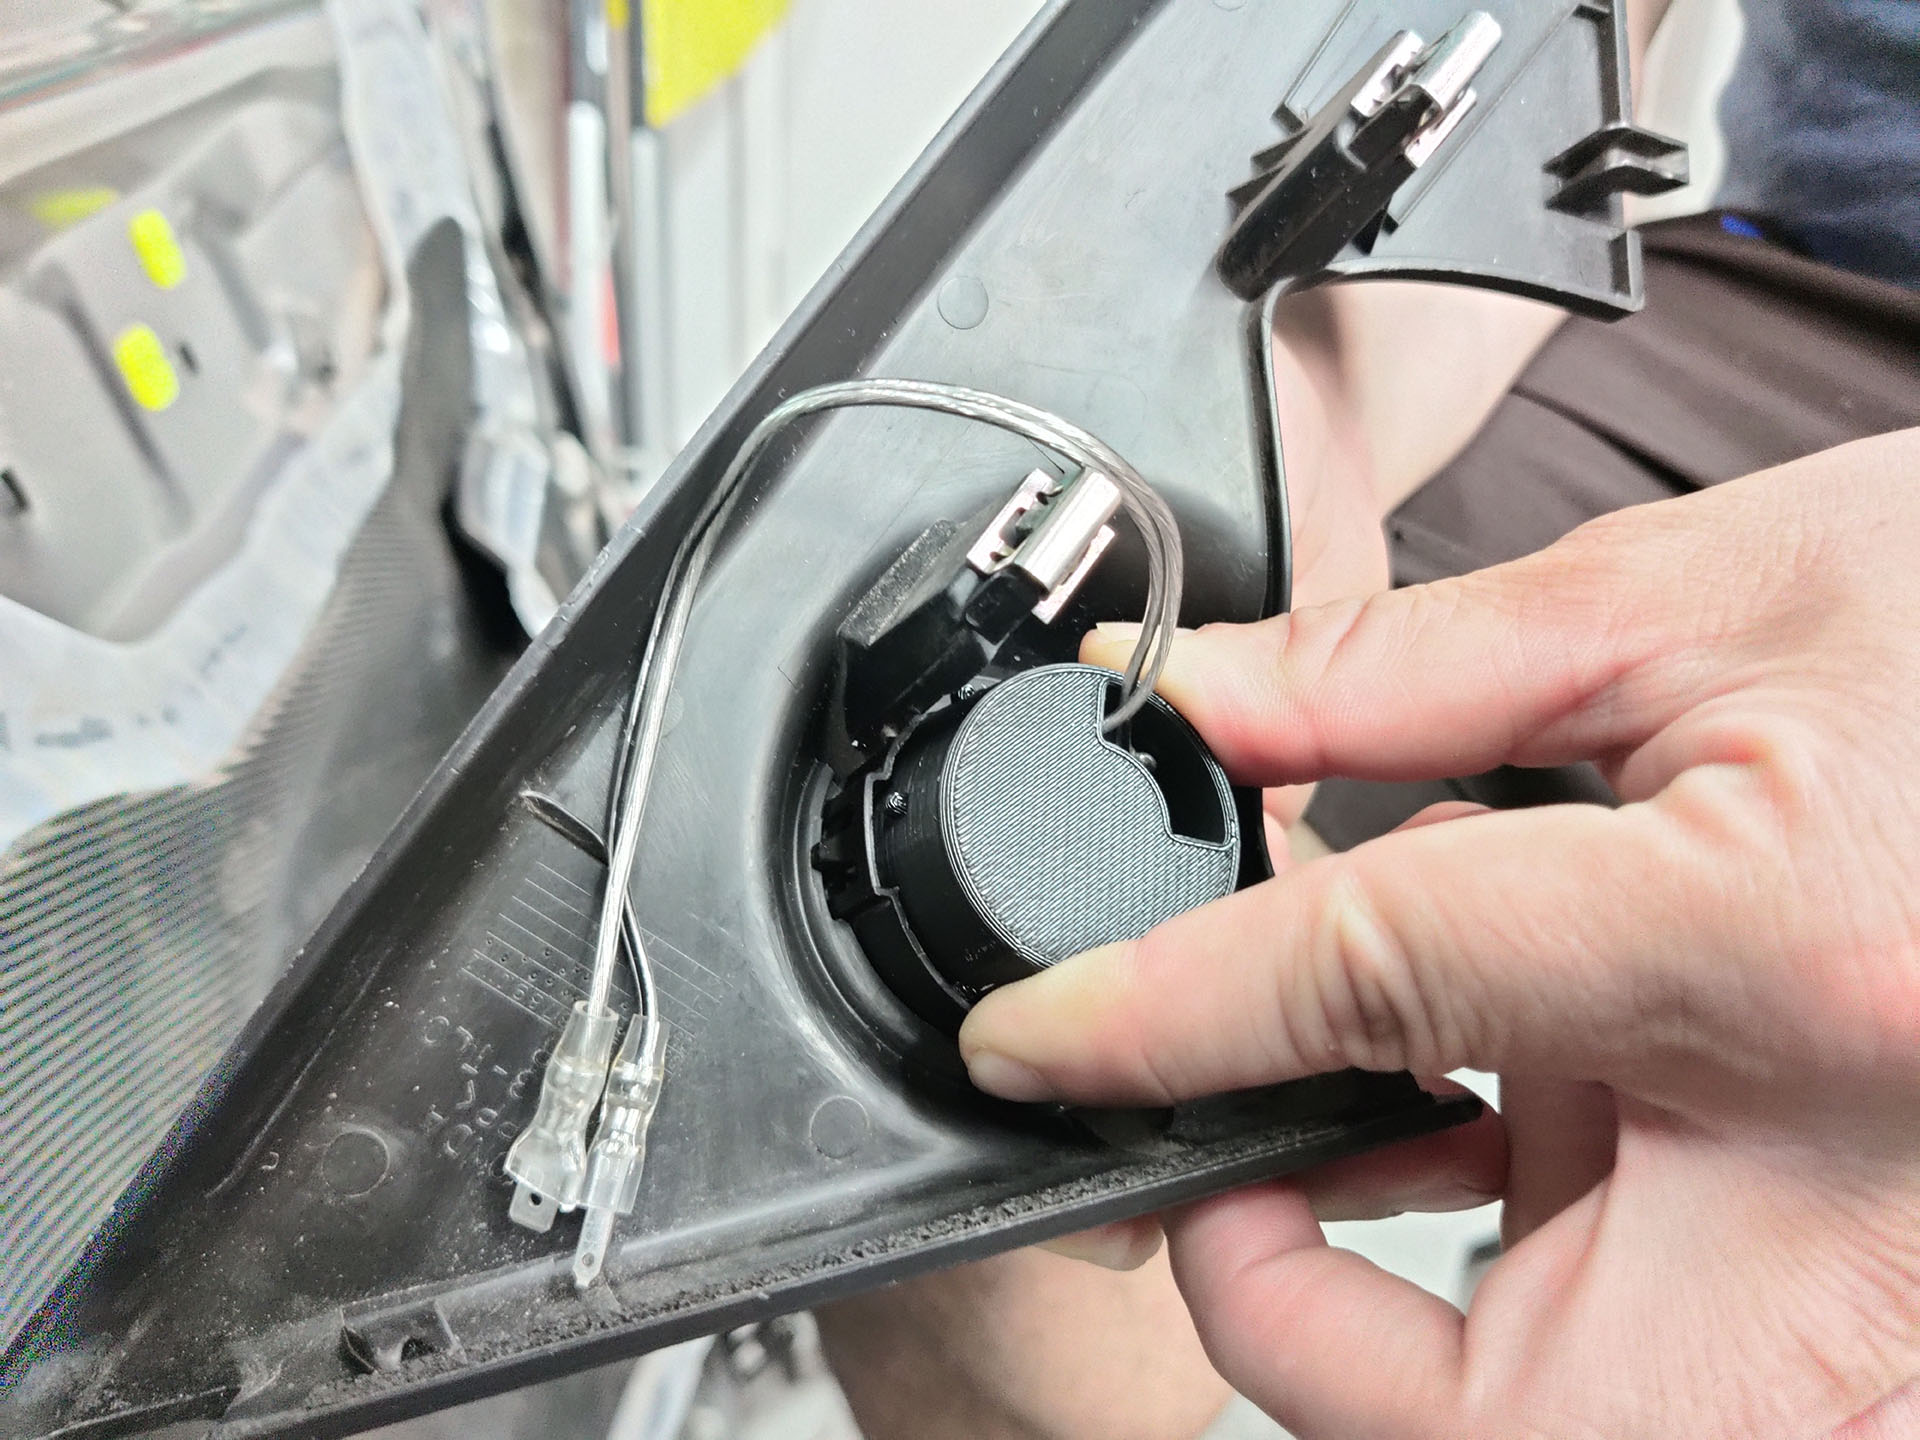
  11. Now with all cables disconnected you can set the door panel to the side and start the removal of the speaker. There are 1 to 3 visible screws holding on your factory speaker.
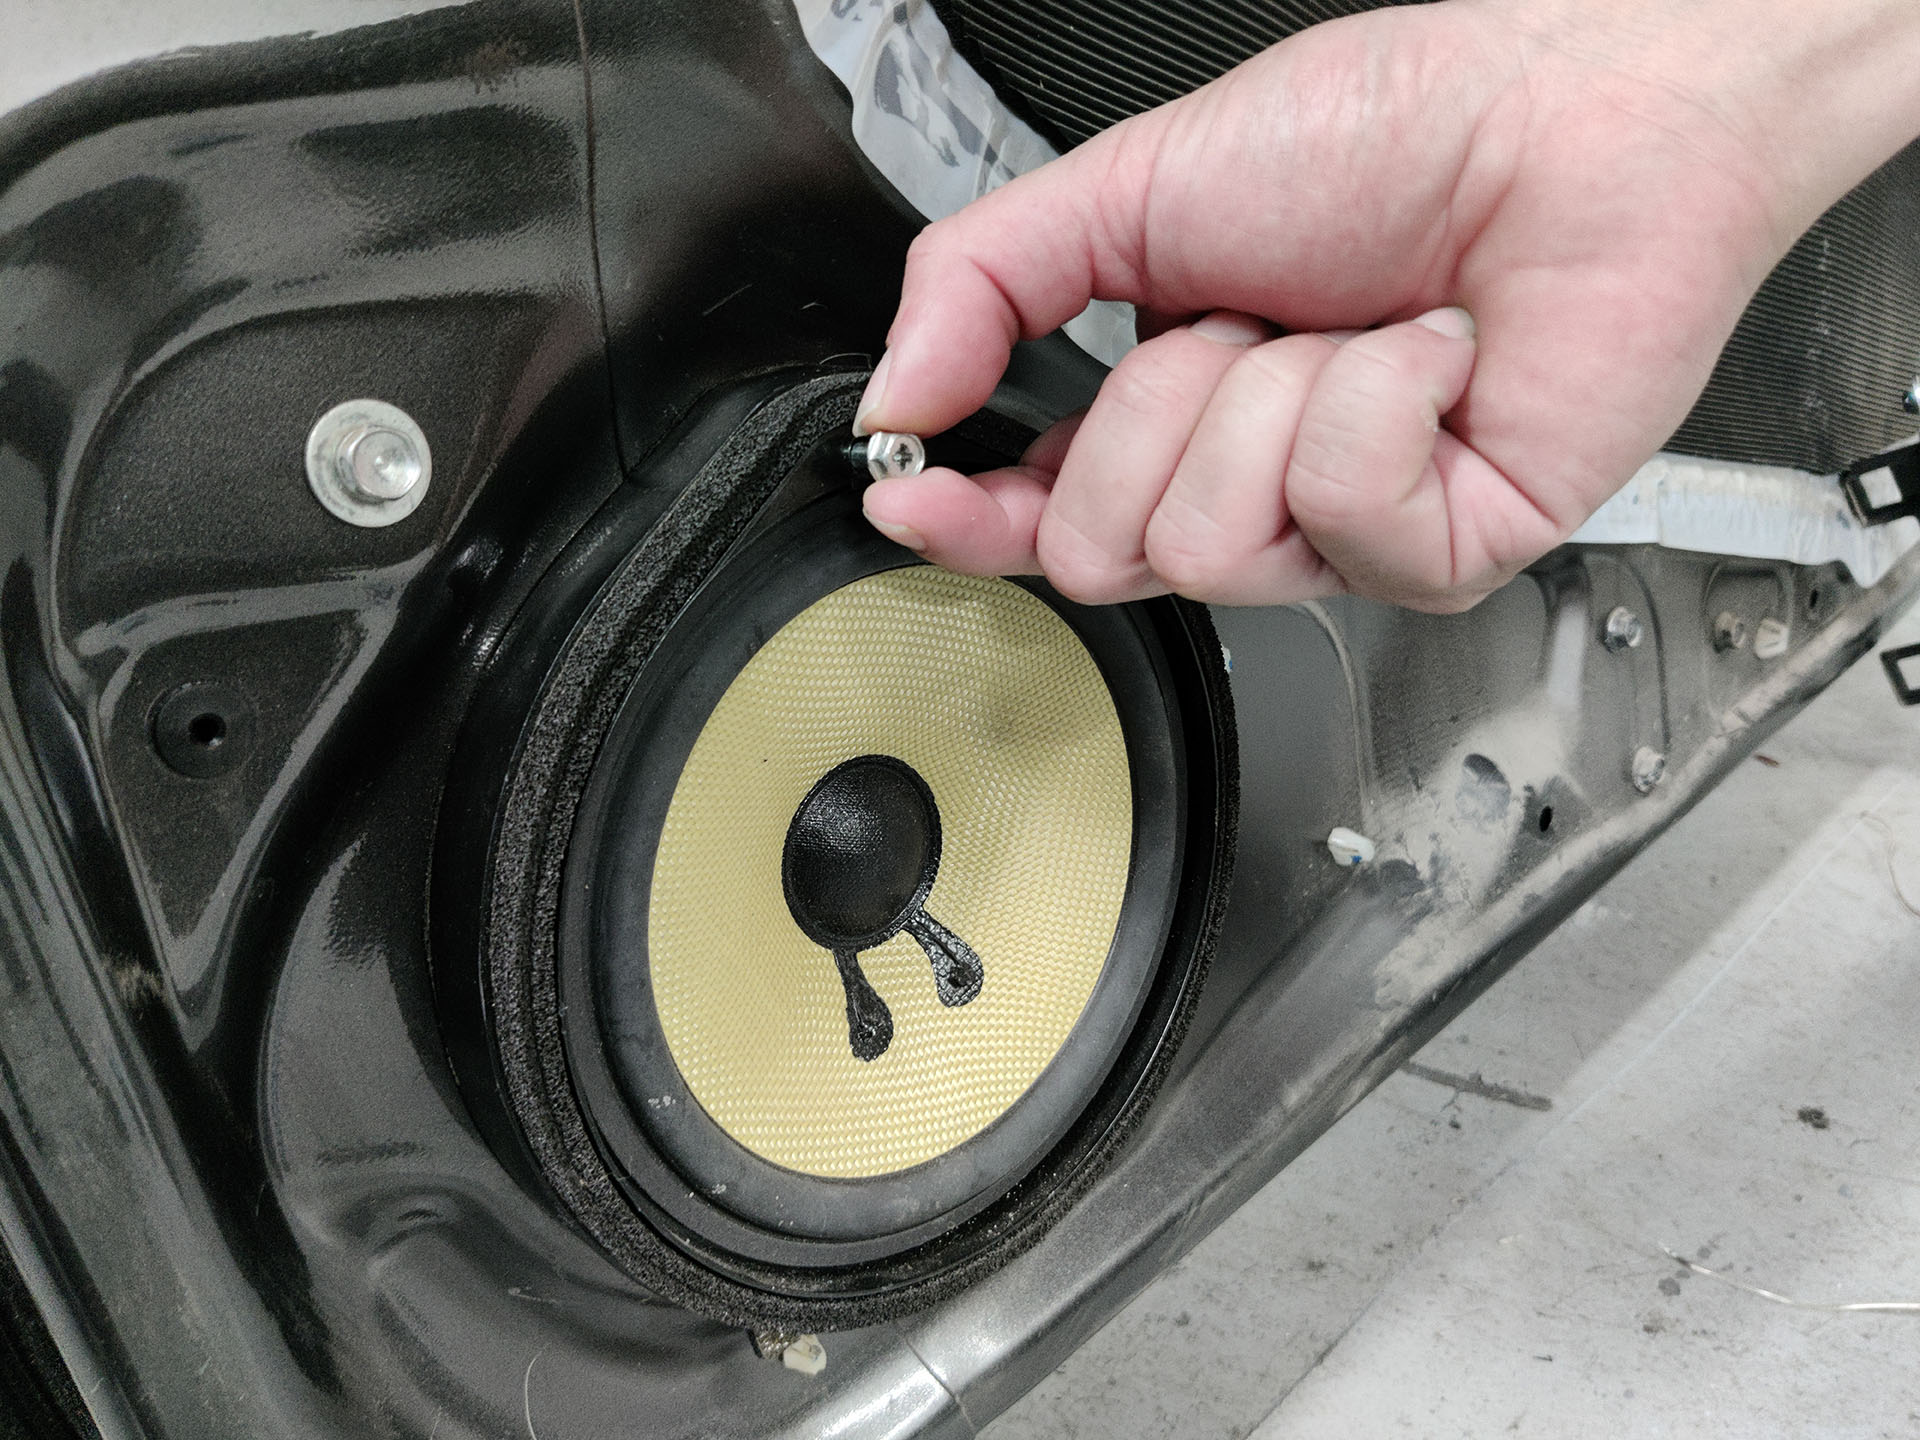
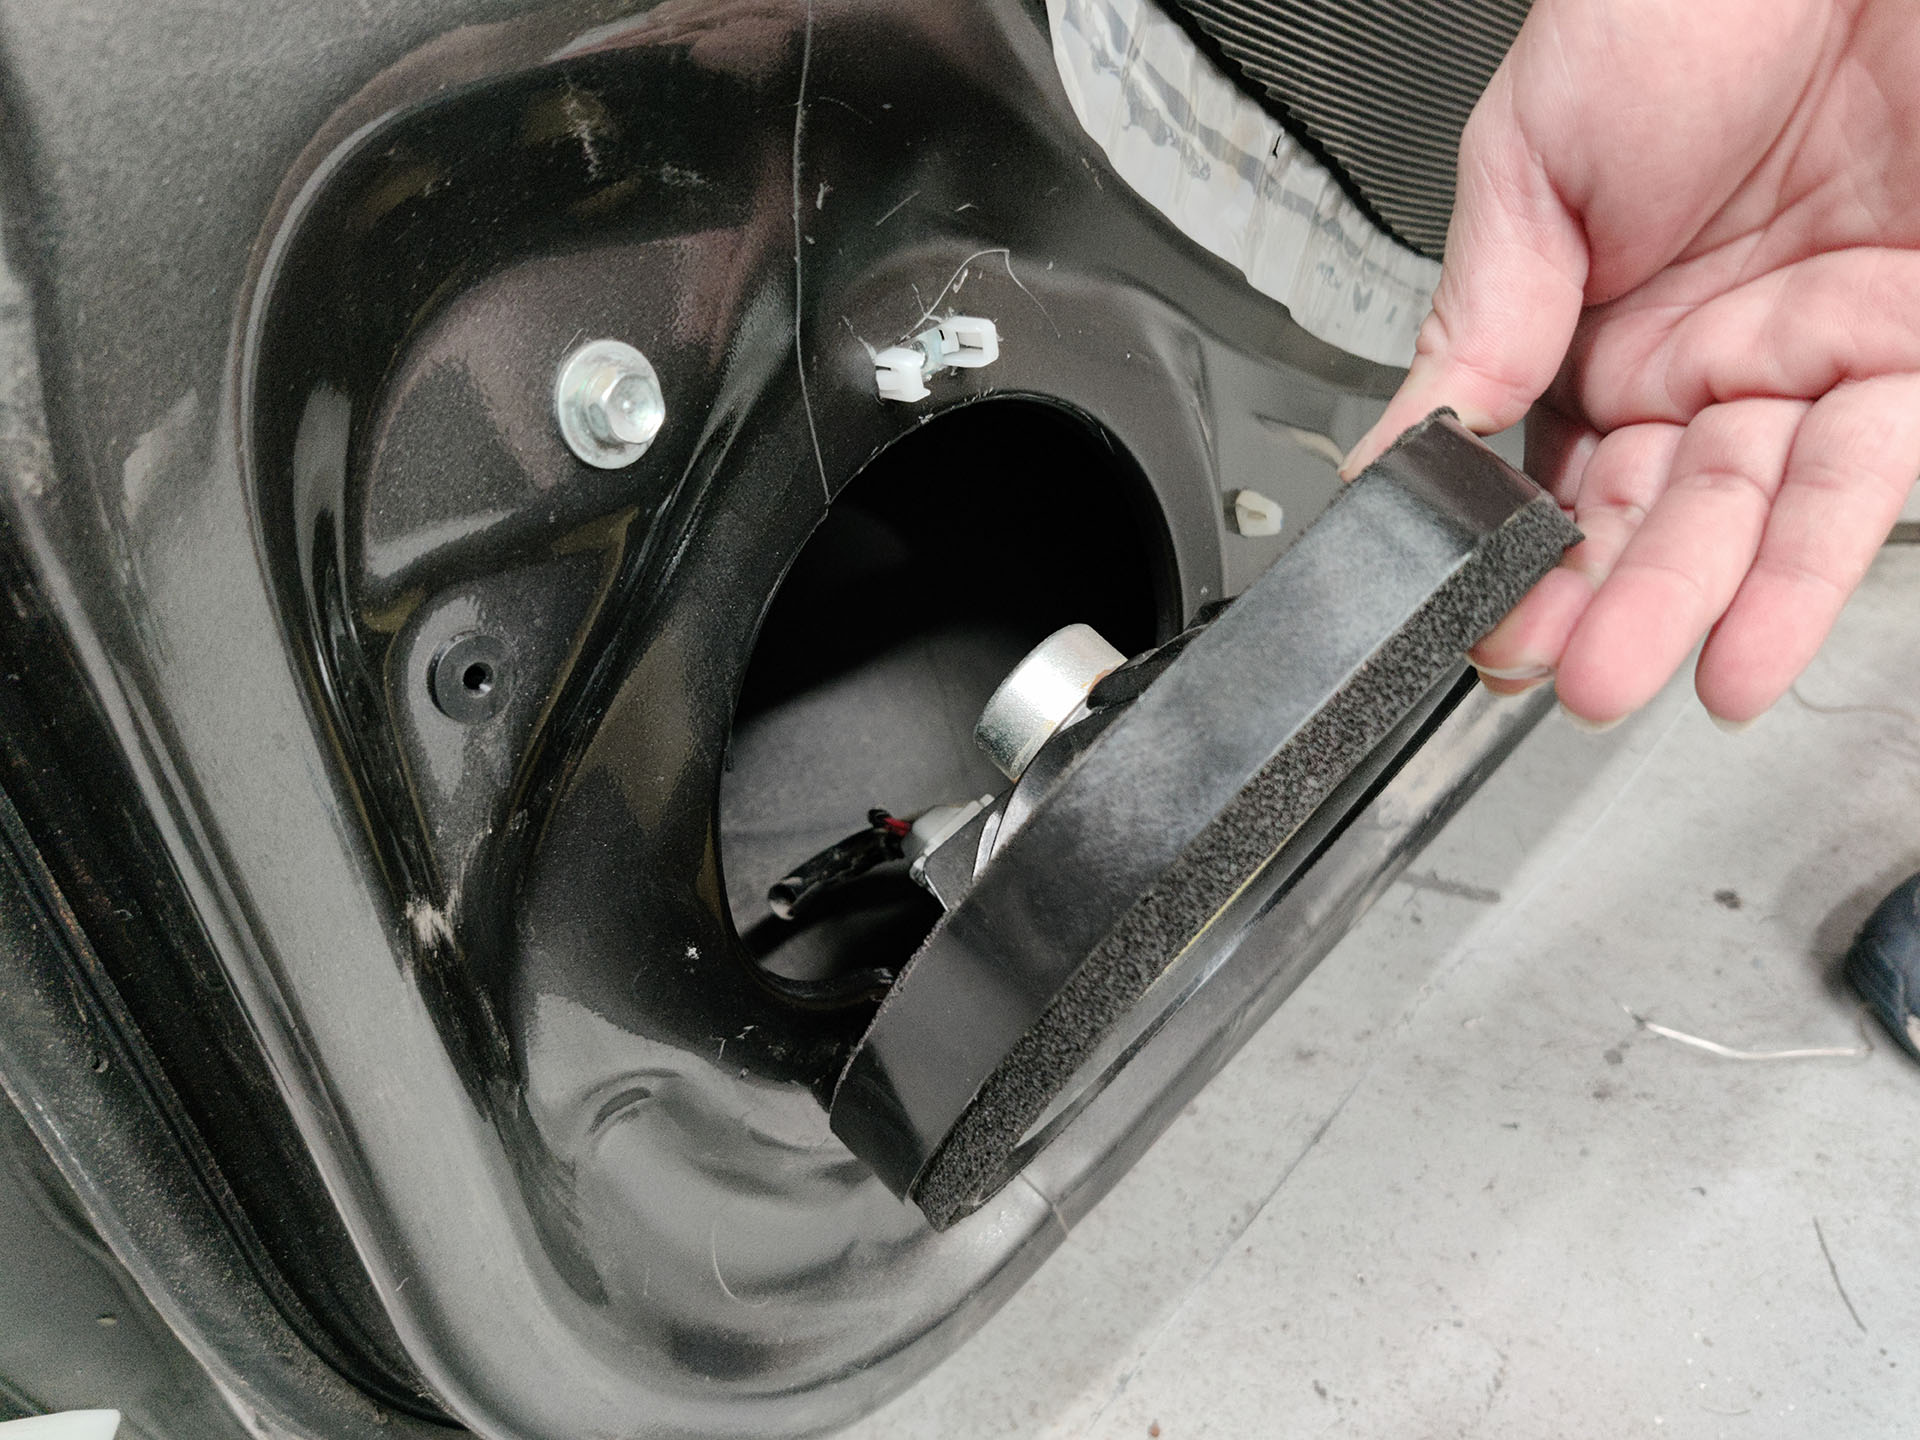
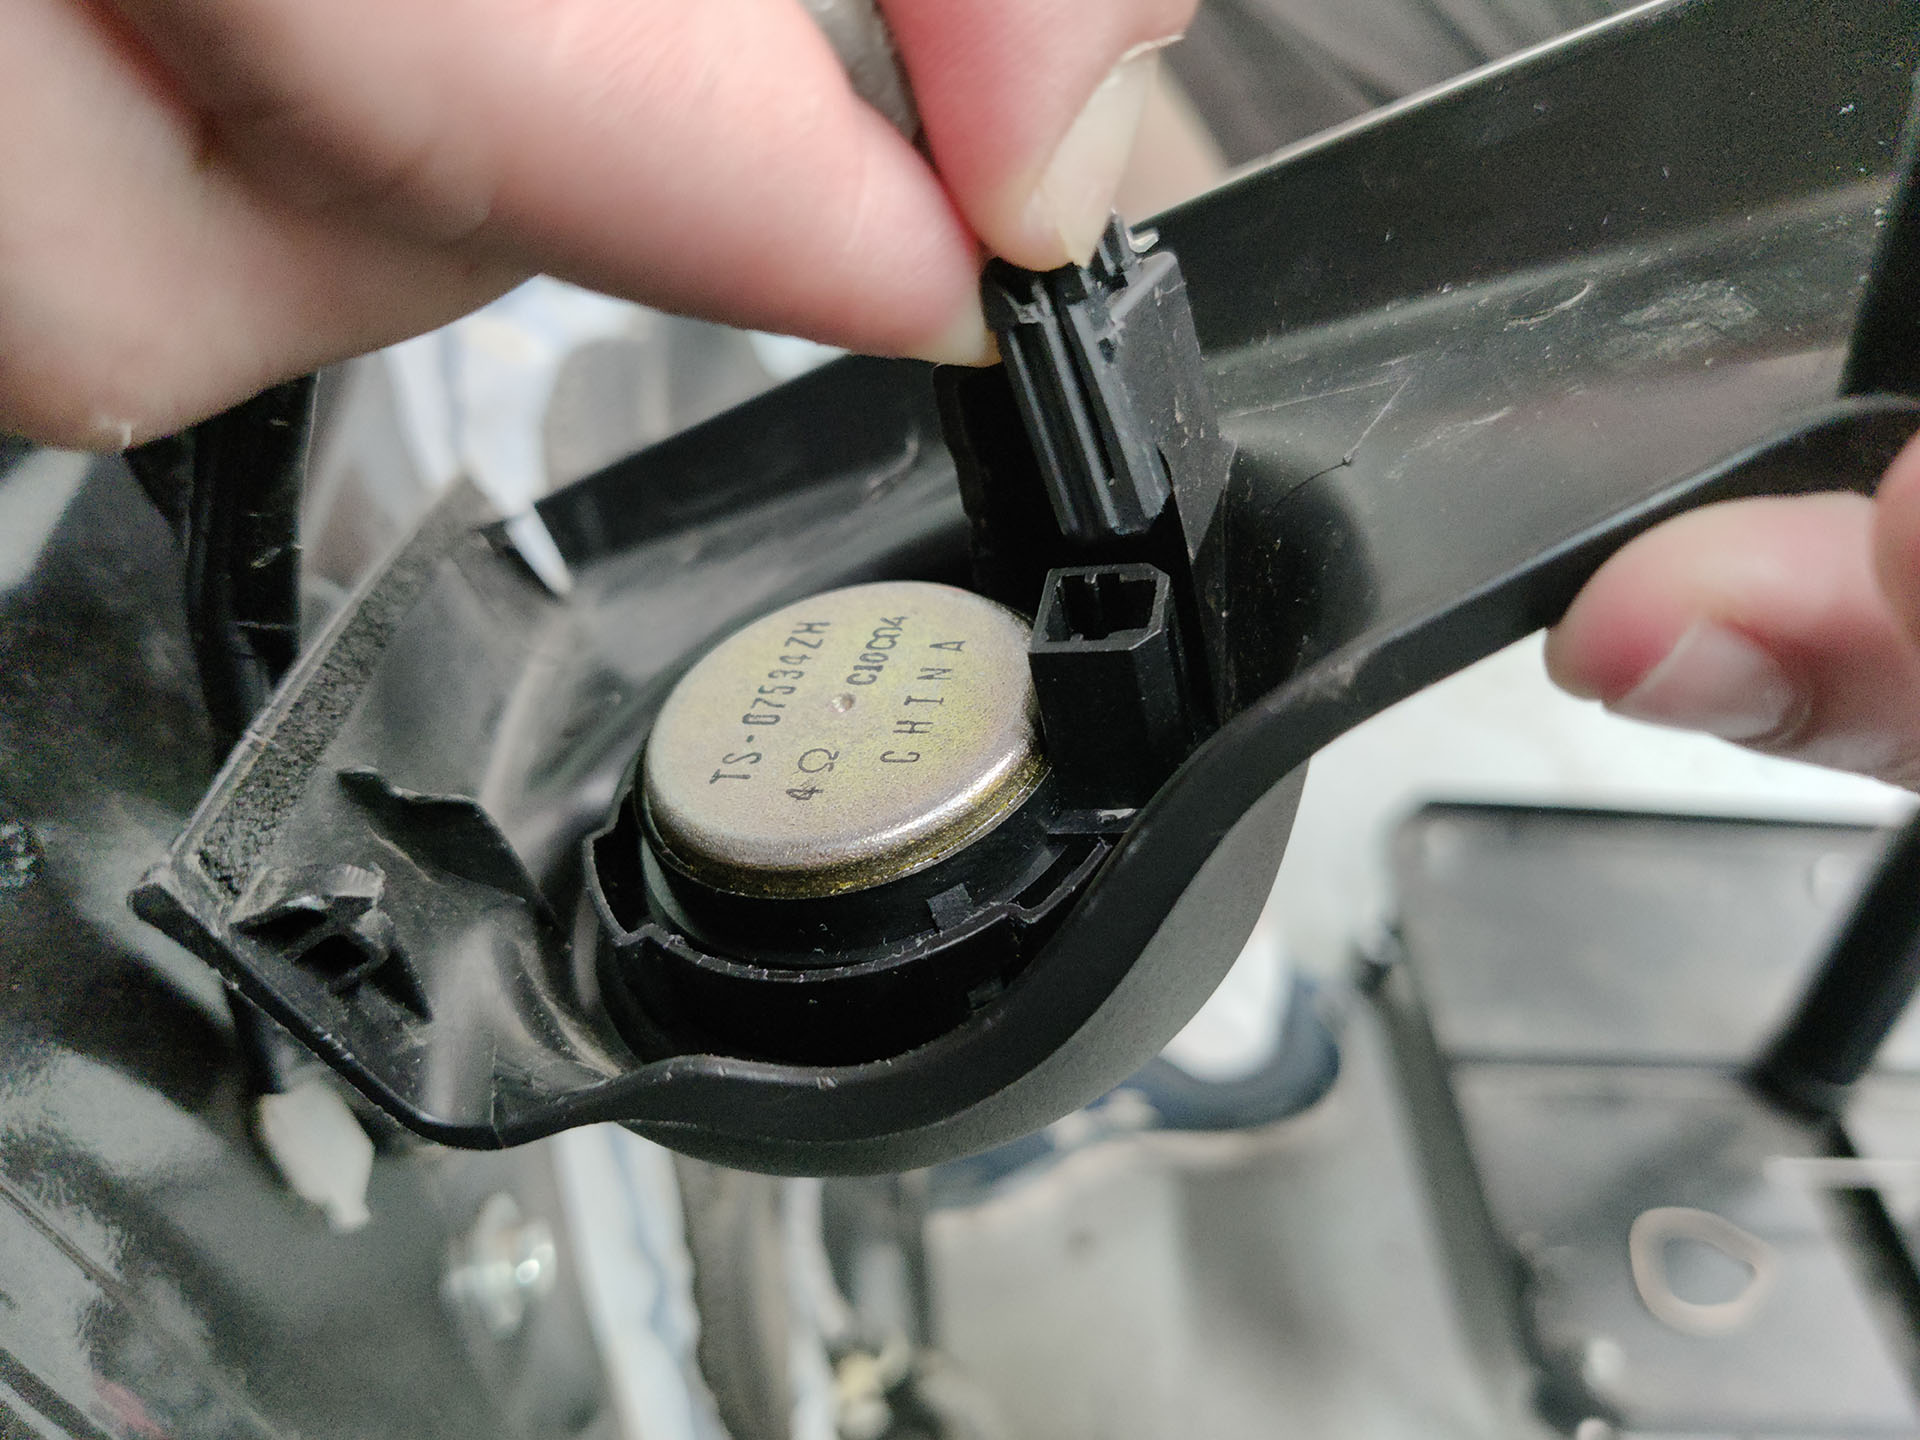
  12. Remove all the screws and then pry the speaker from the top. If your speaker does not have any screws you must just pry against it from the top with a flathead screwdriver. After prying the top of the speaker the speaker will separate from the door panel but it might not come all the way out. Next you will need to lift the speaker towards you to release the holding tabs from the door.
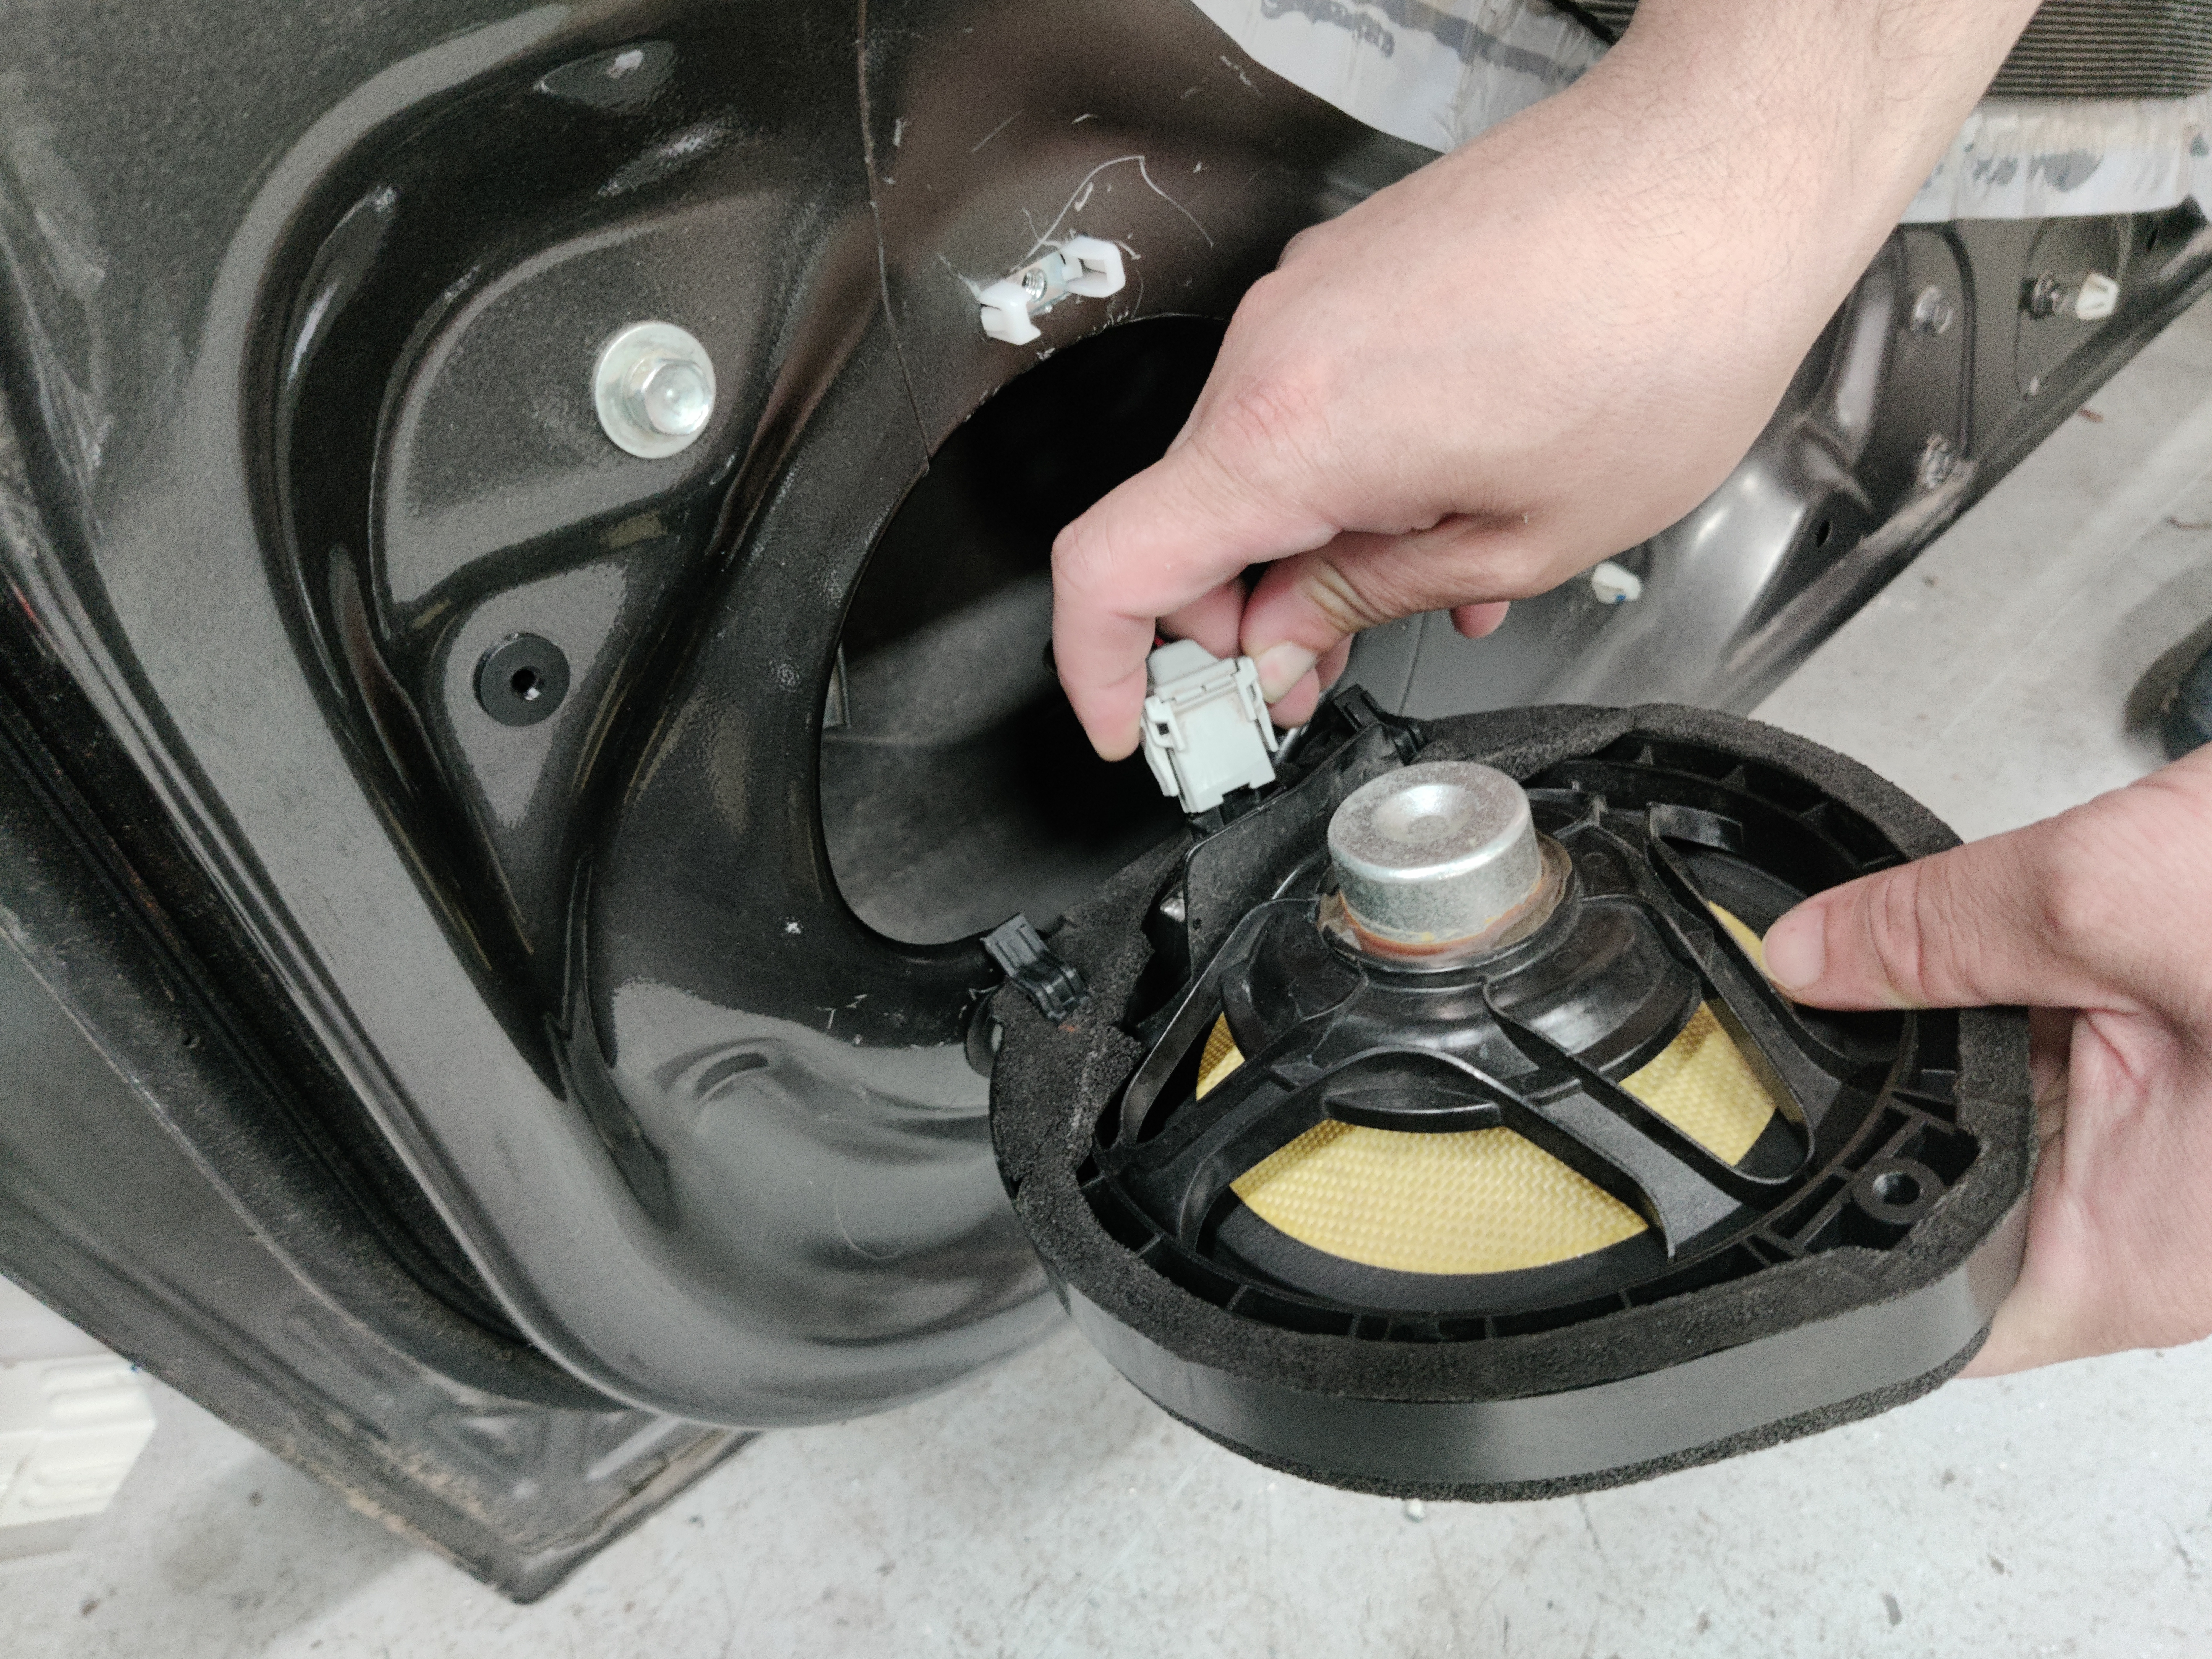
  13. Disconnect the speaker from the factory connector. This connector has two triggers or tabs on the side that you must squeeze to release the speaker. These sometimes are hard to come off and you will need to wiggle them out. Remove the speaker and place it to the side.
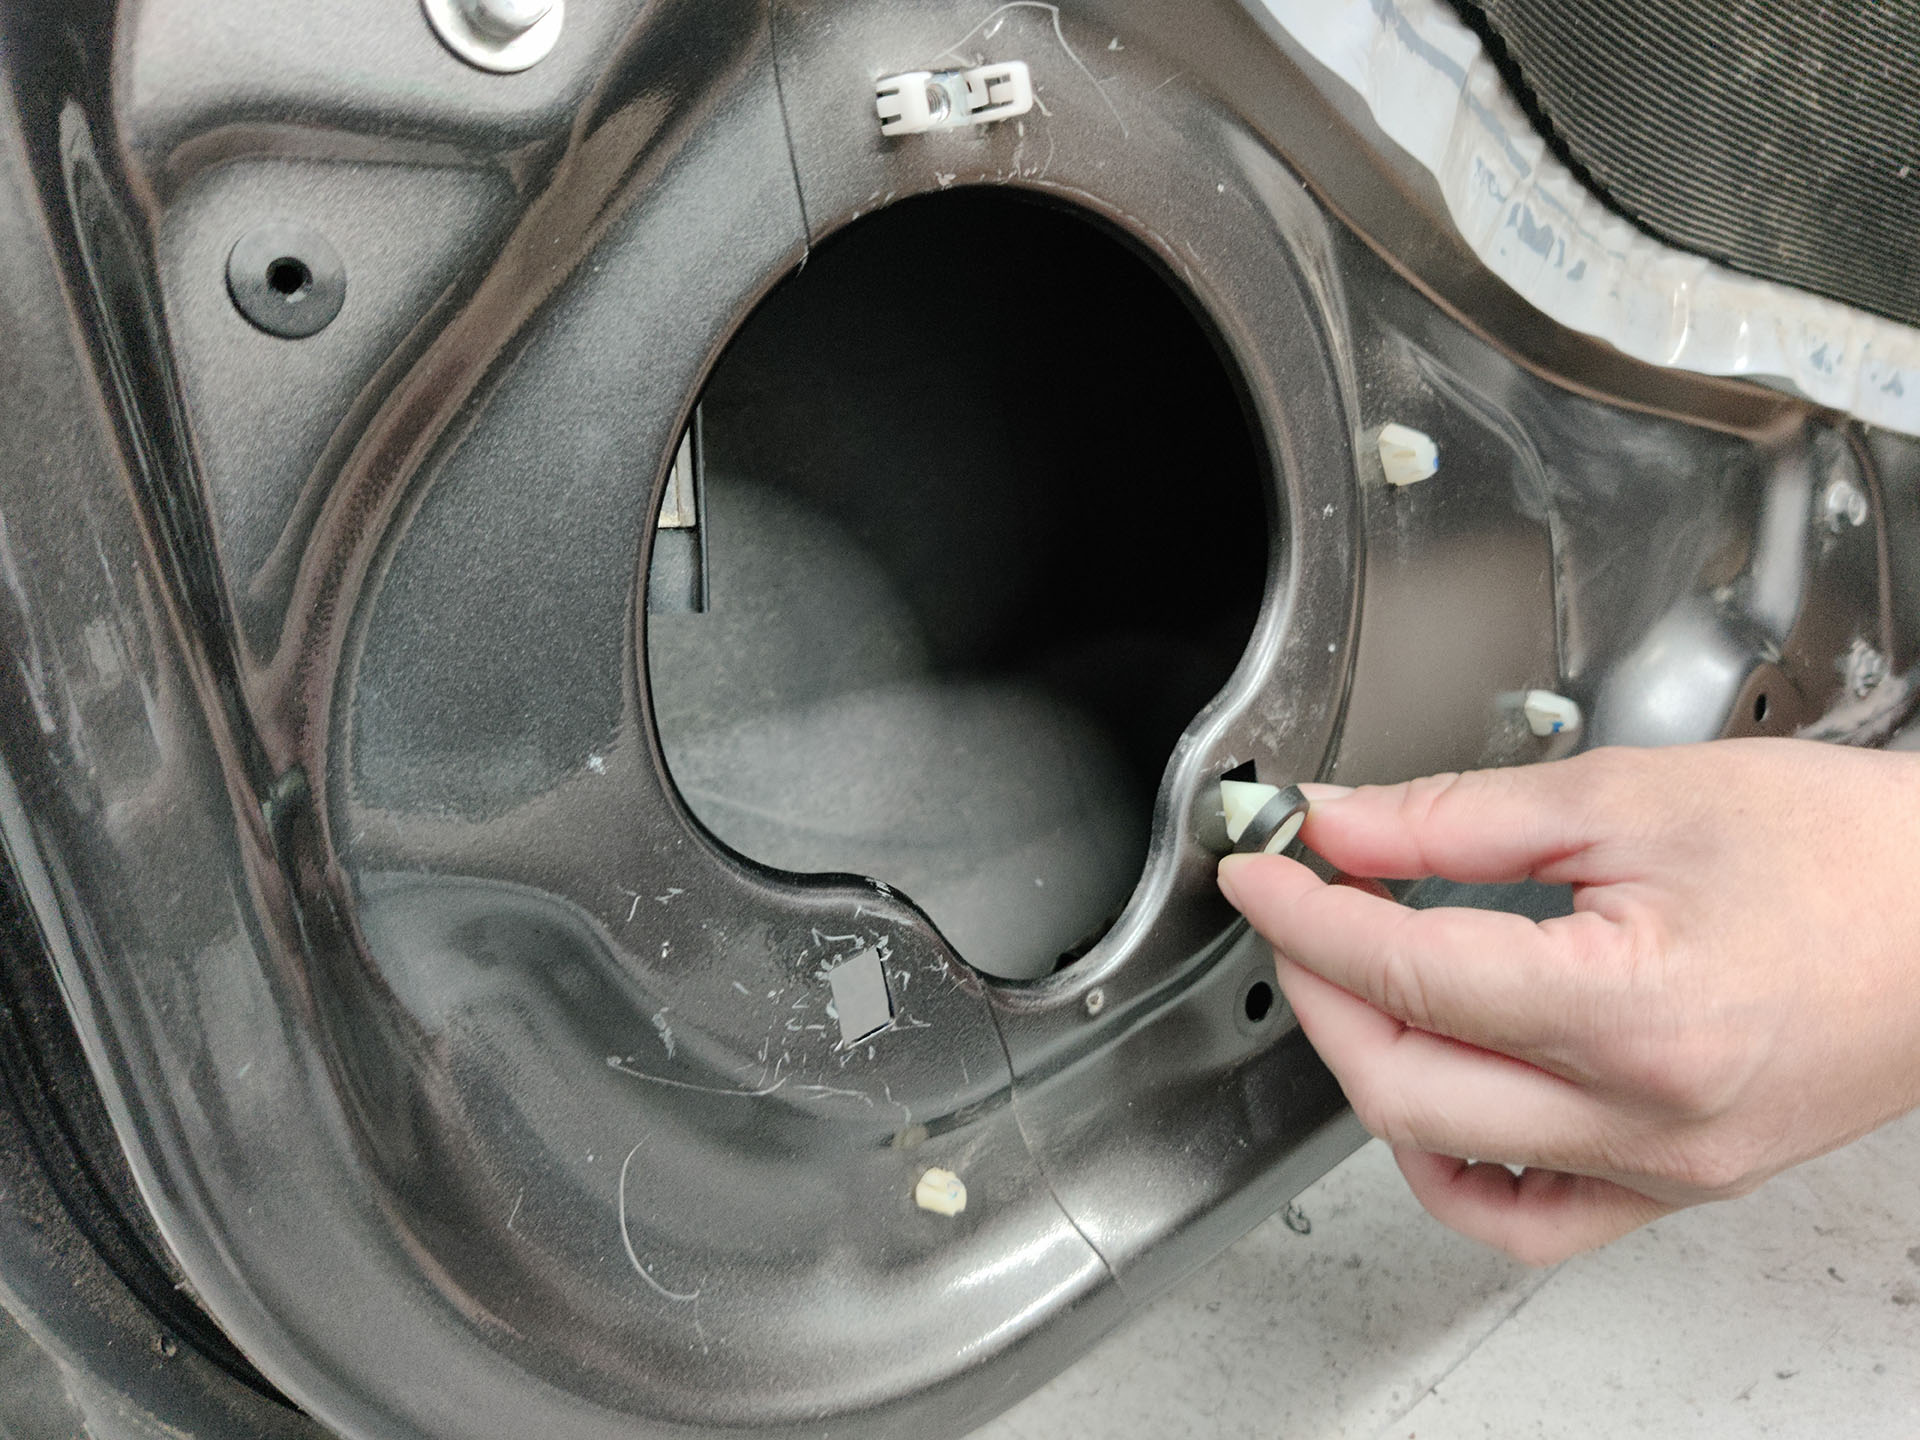
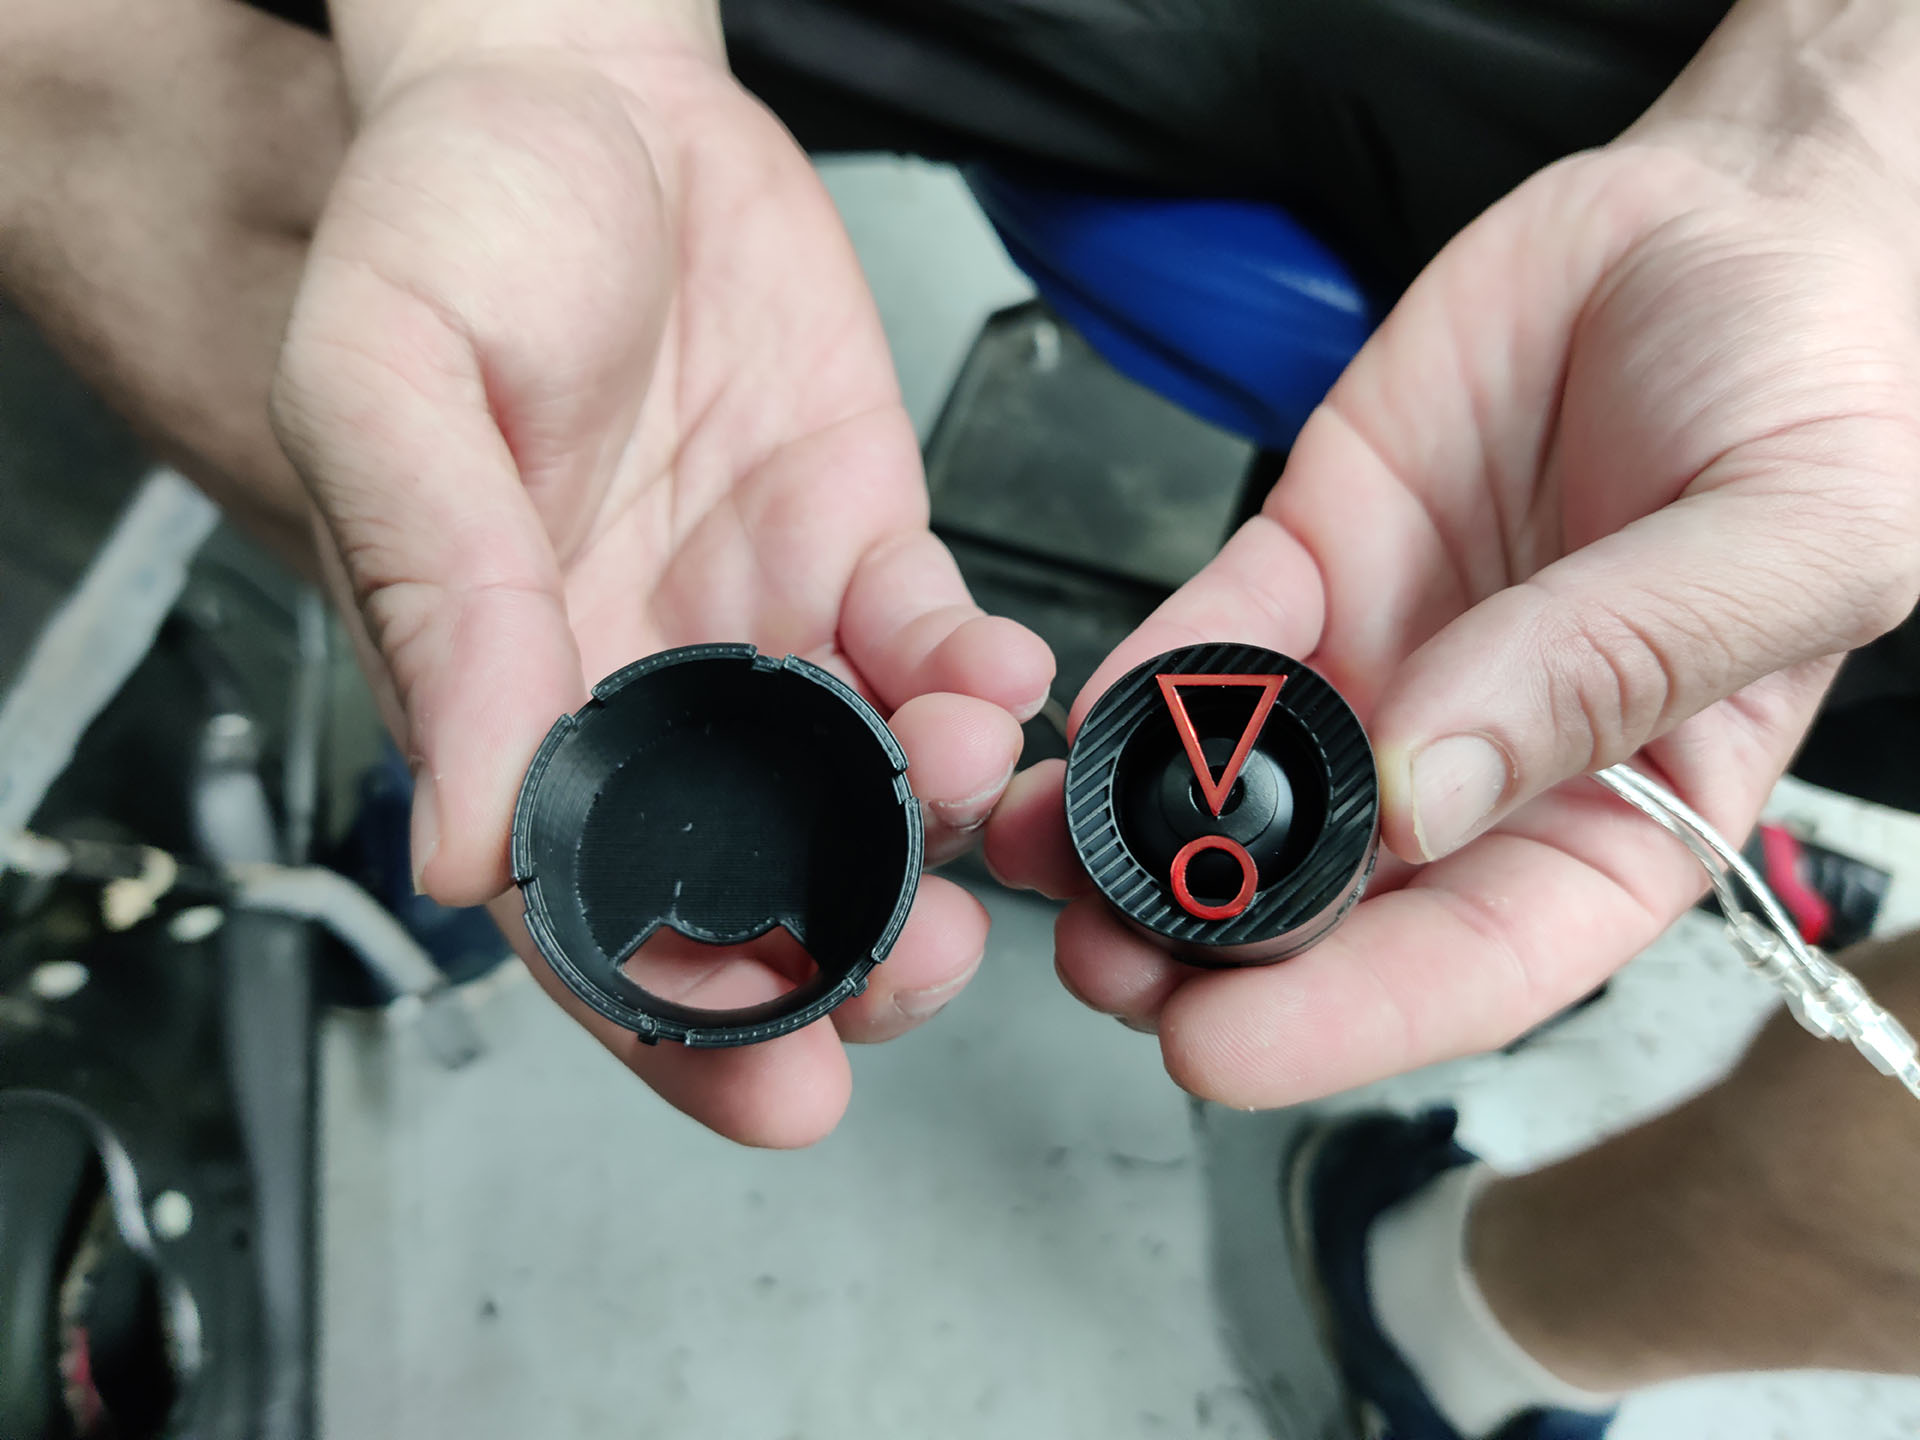
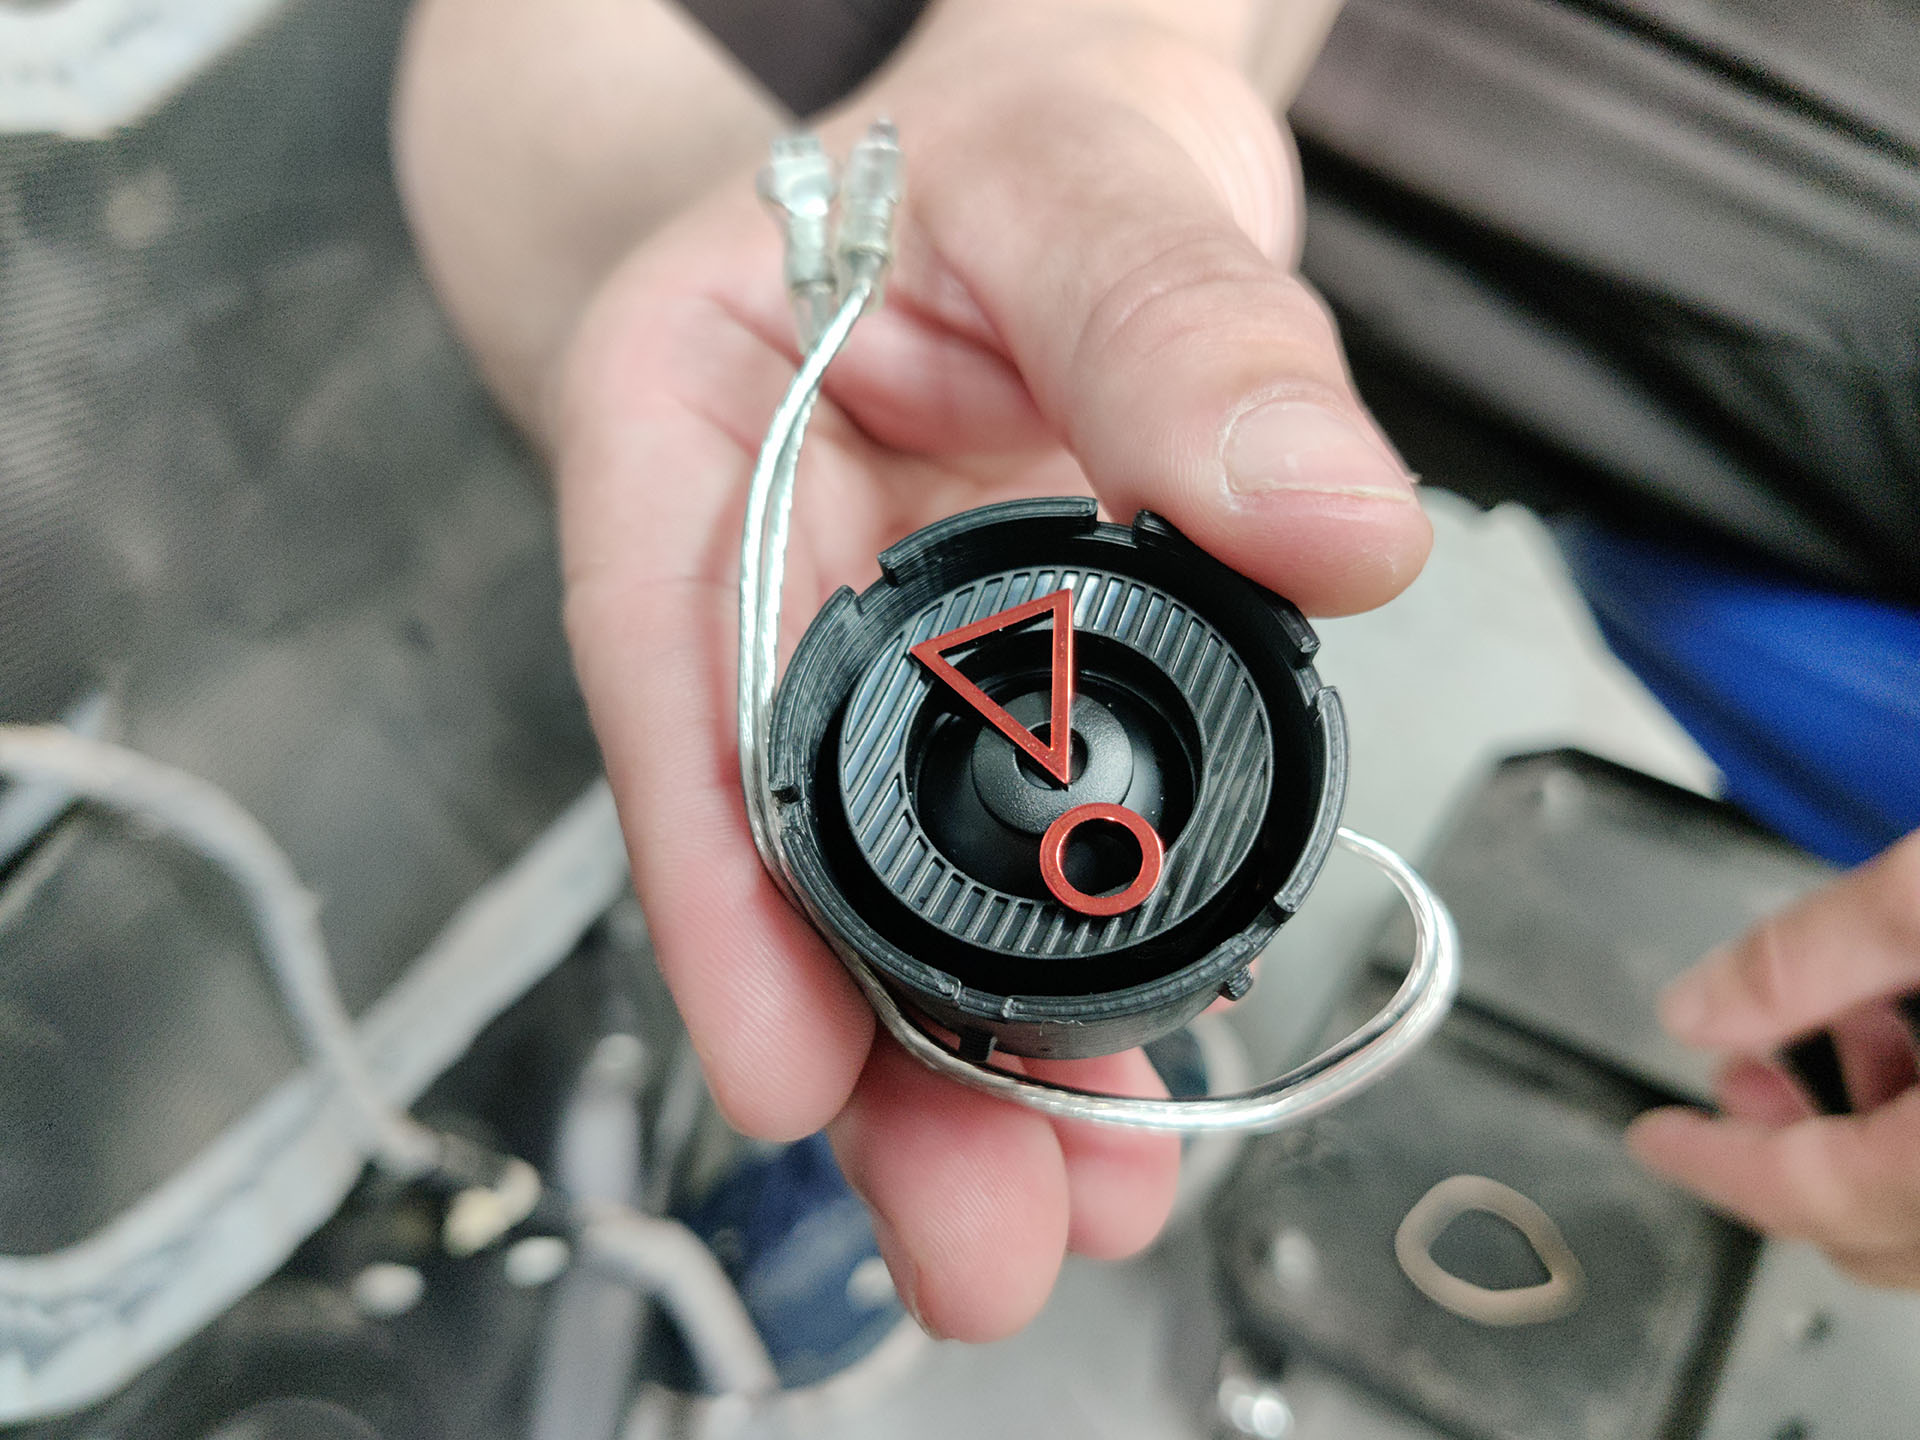
  14. Place the correct plastic inserts into the door. The white inserts are for Acuras made after 2009. The black inserts are for Acuras from before 2009. There are special inserts for the 2nd gen TSX and accord. After matching all the inserts to the proper wholes you may mount the spacer.
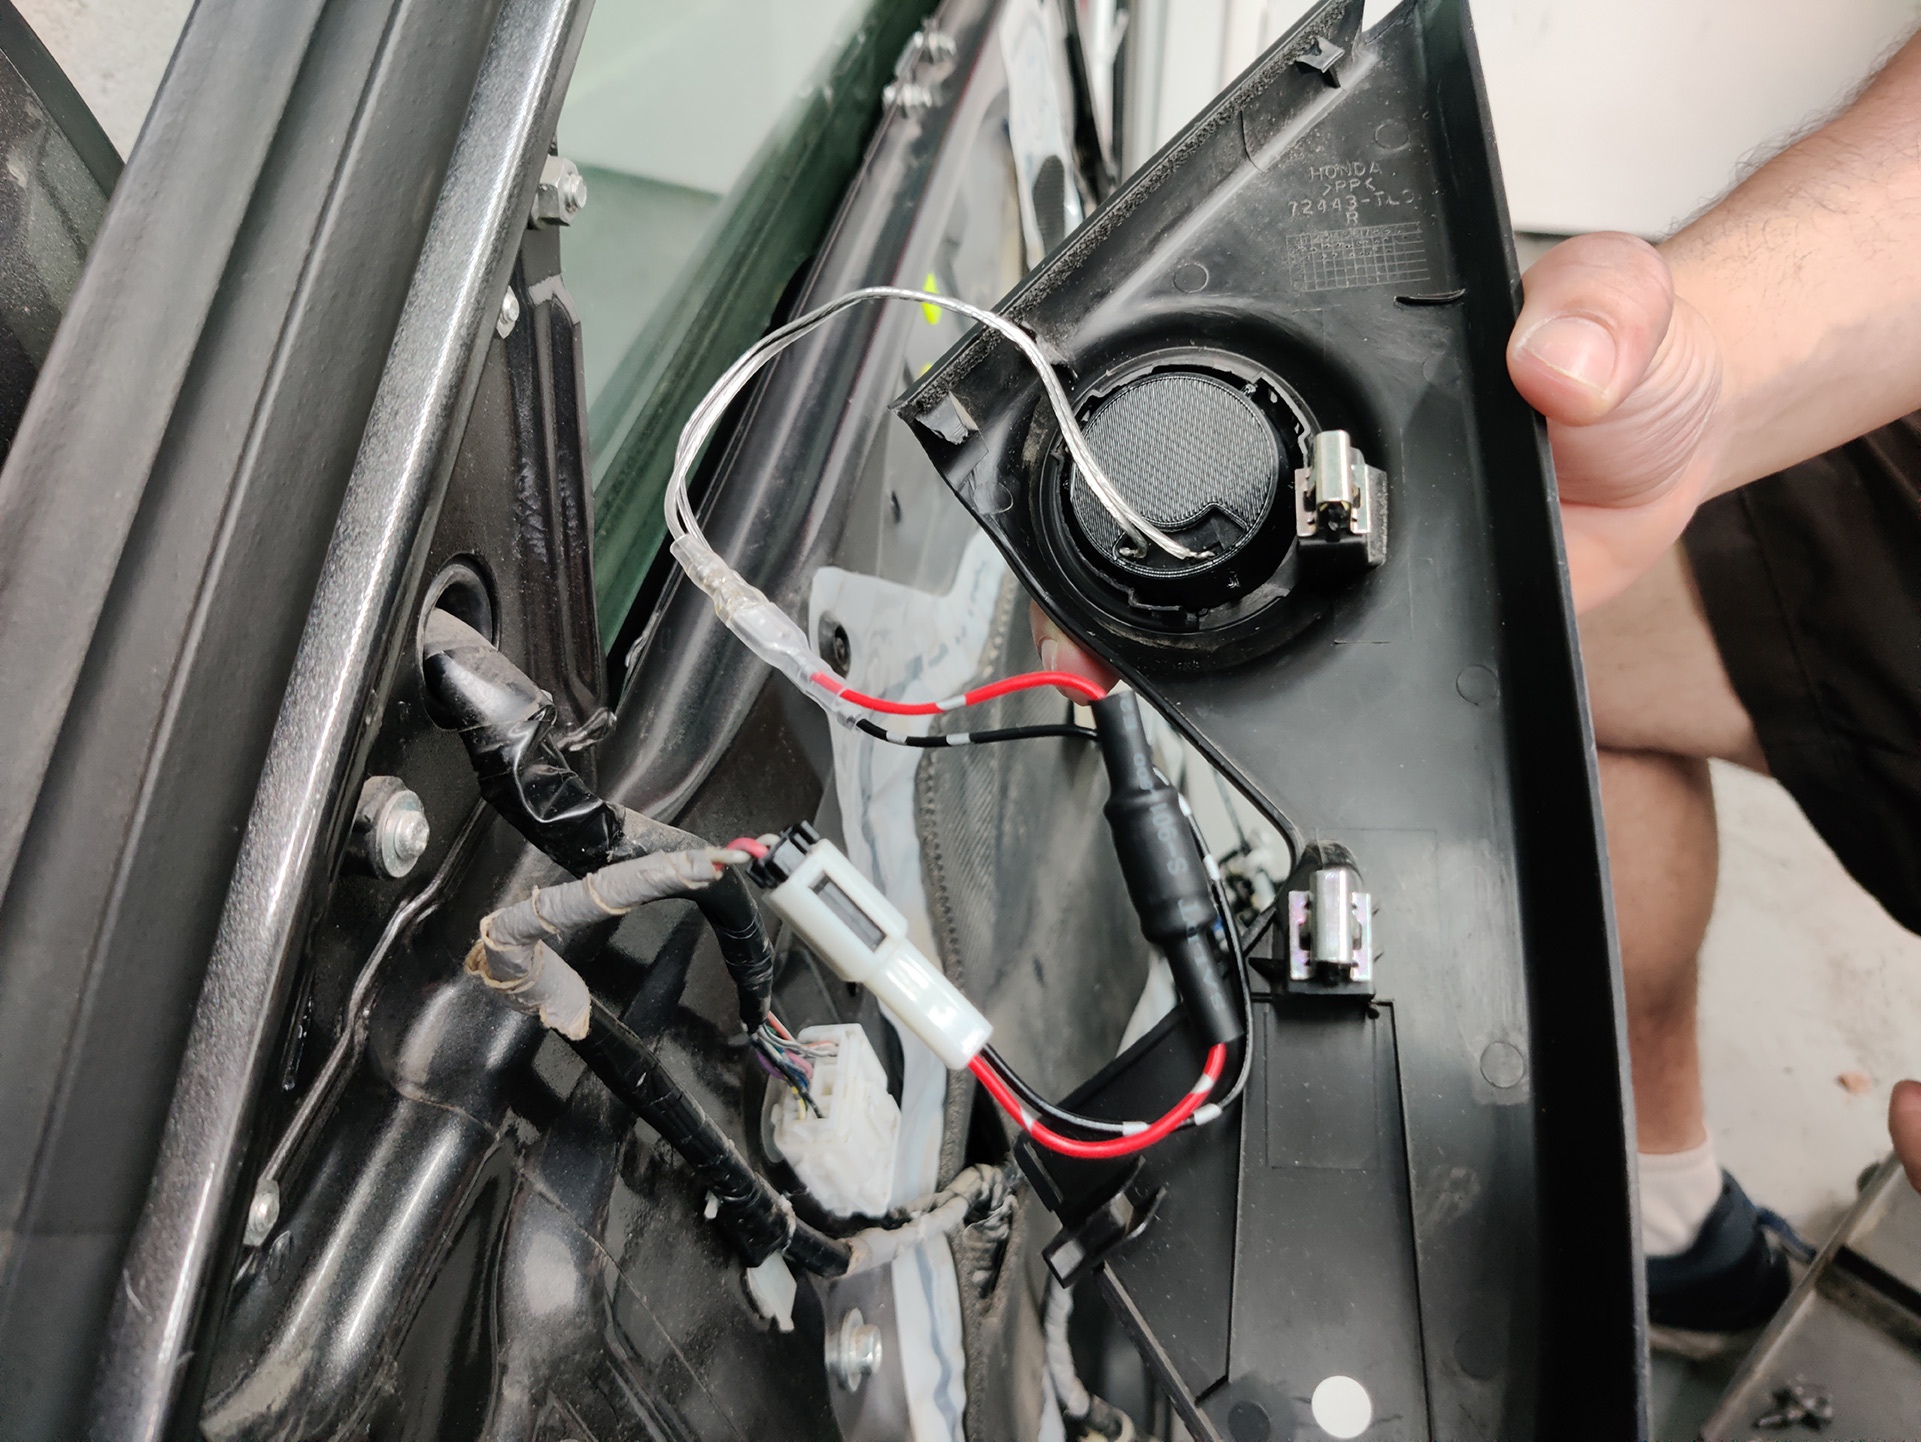
  15. Line up the speaker spacer with the matching holes of the door cavity and insert locations. Regardless of the year 3 mounting screws will be used to secure the spacer to the door. Apply the gasket foam tape to the back of the spacer and begin securing it to the door.
  16. Secure the spacer to the door using the provided 3 long black screws. We recommend hand tightening these screws.
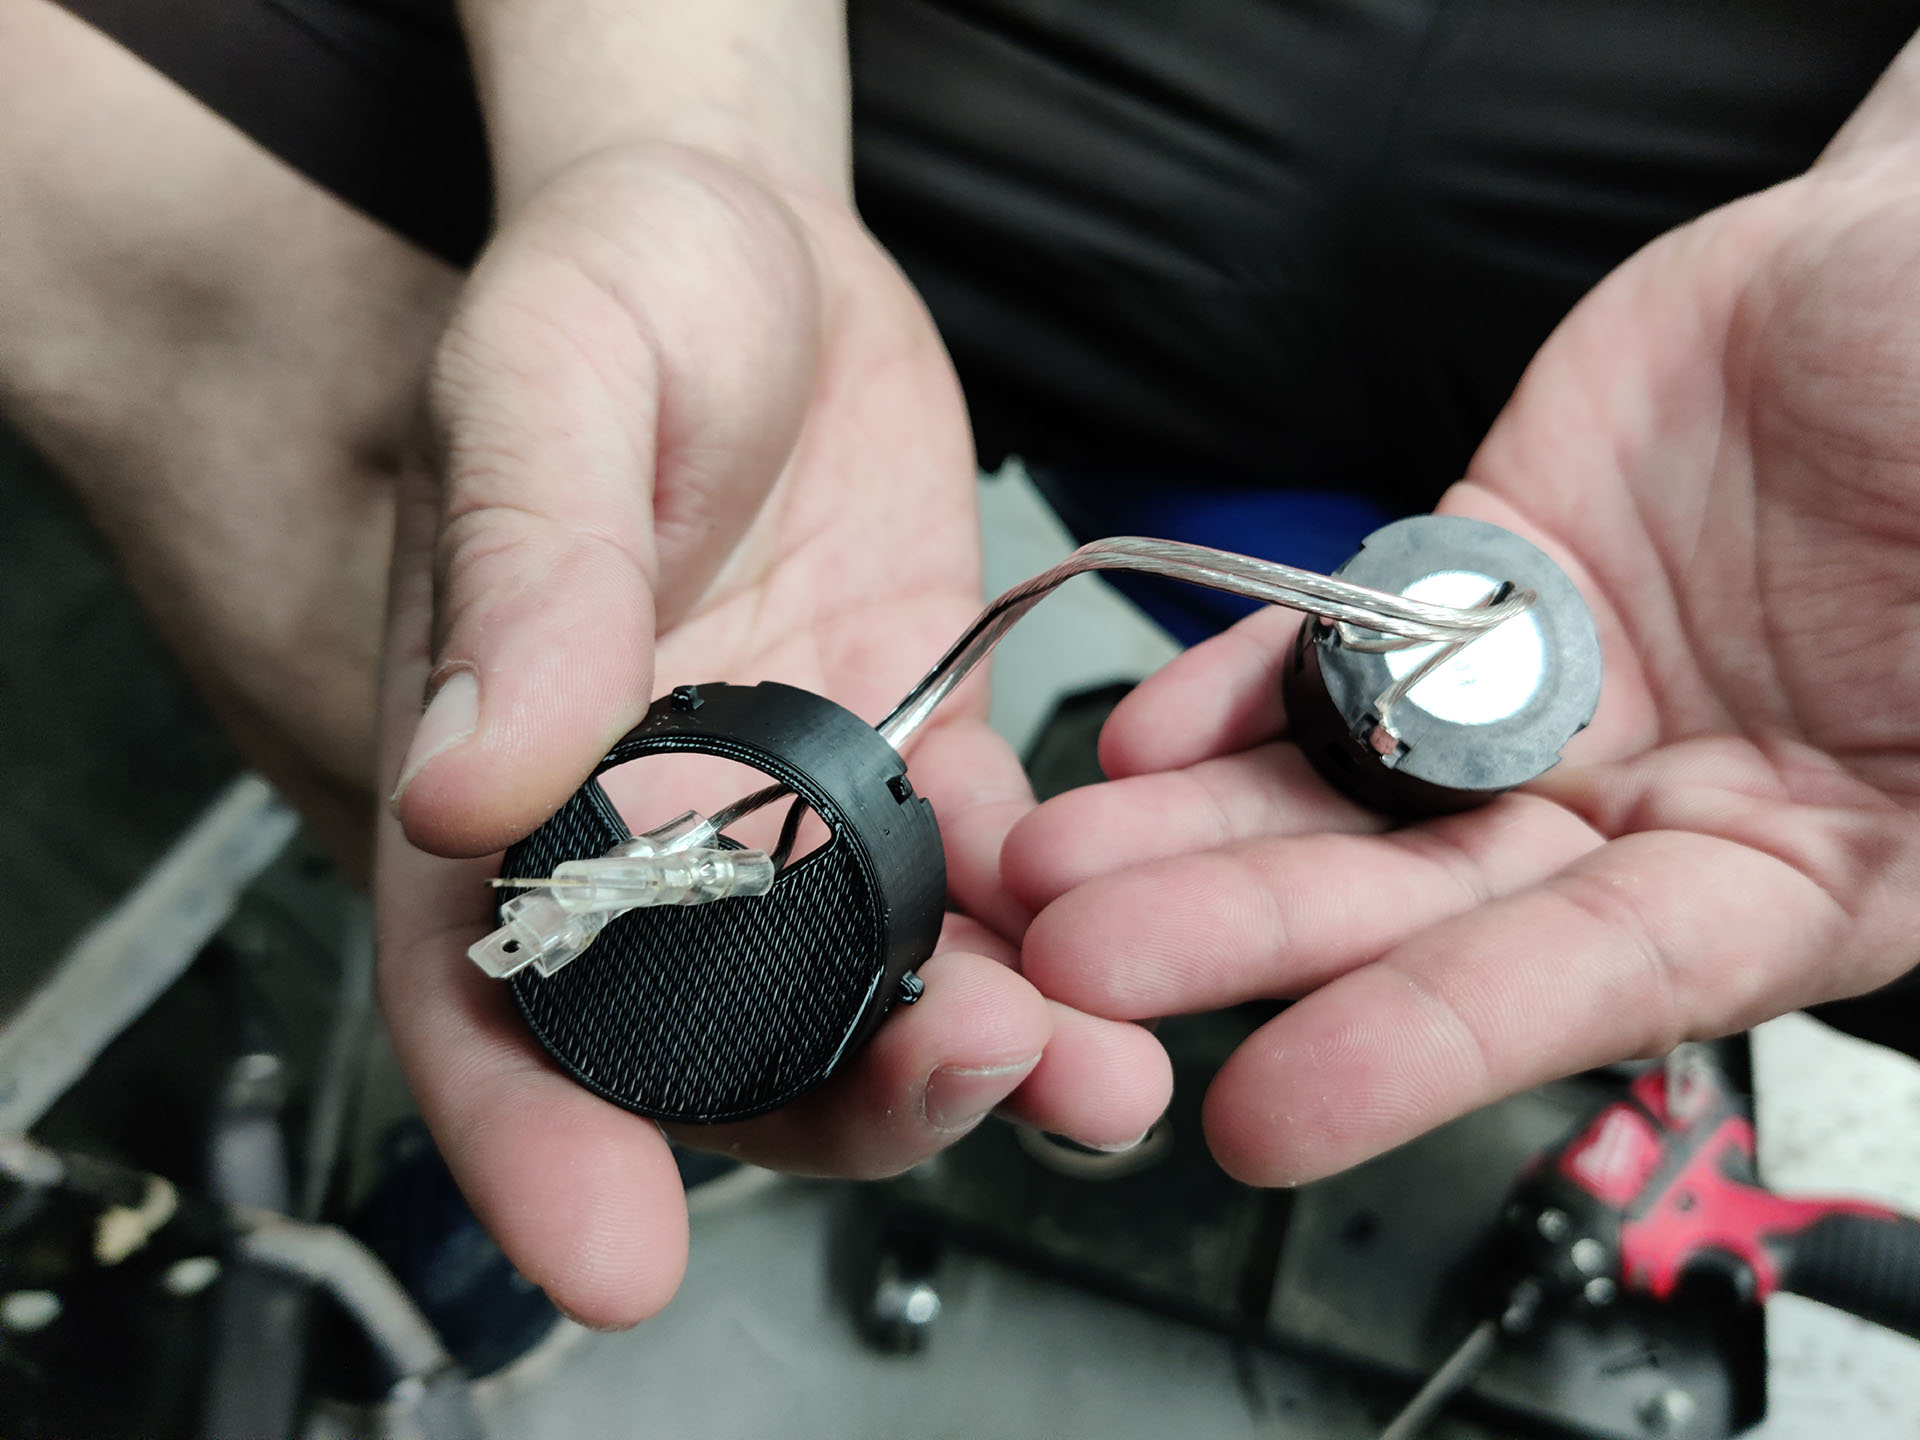
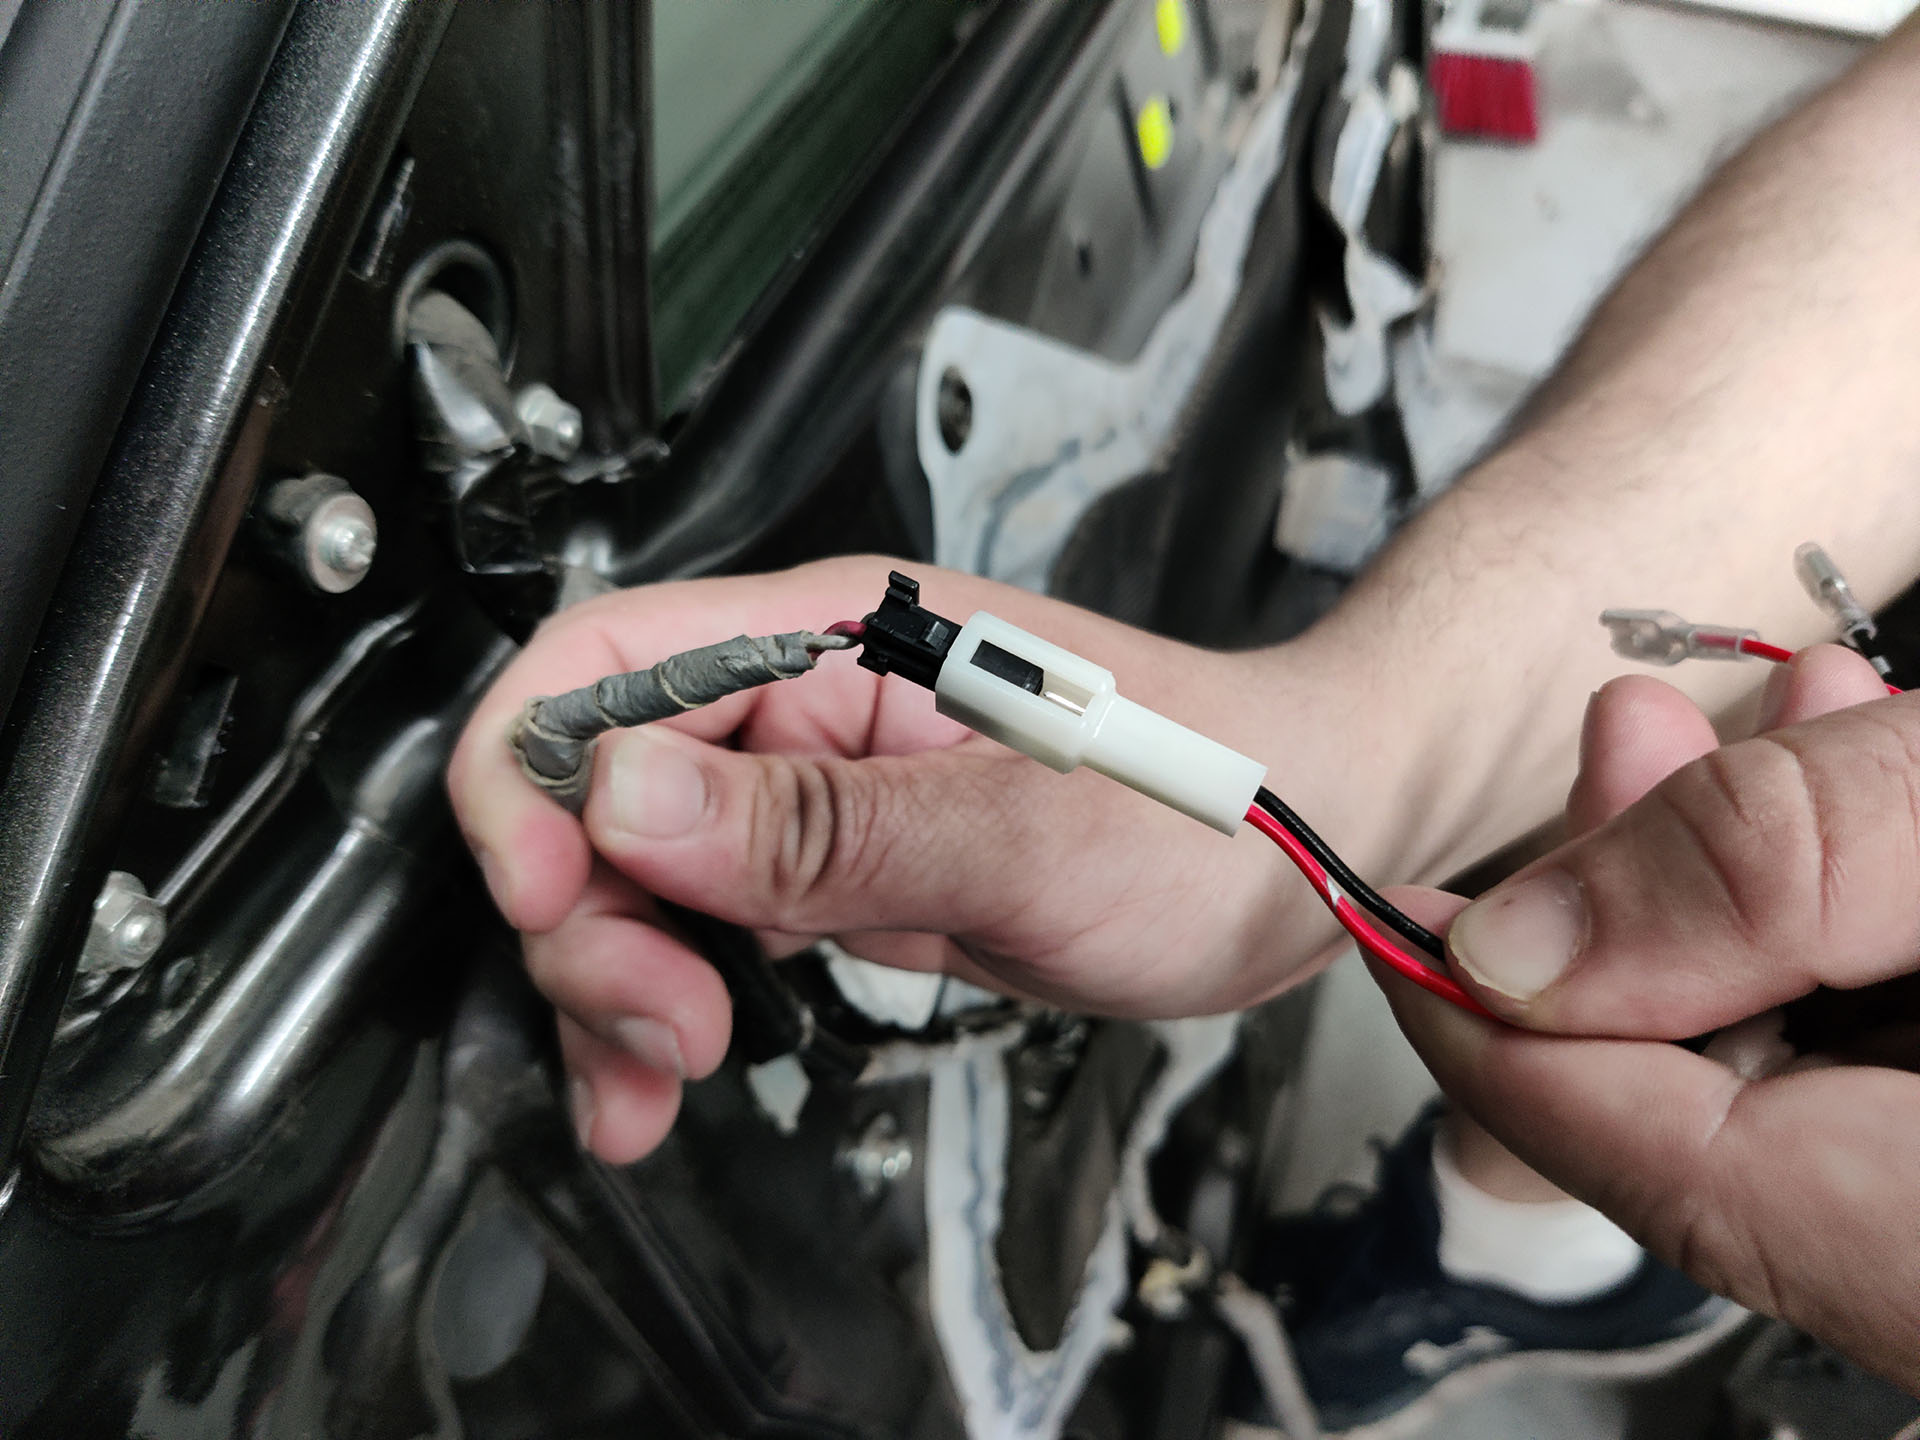
  17. Prepare your speaker for installation, attach the acura speaker harness to the speakers and locate your 4 mounting screws.
  18. Connect your speaker to the factory harness and use the 4 mounting screws to mount the speaker to the speaker spacer. Only utilize the holes already made on the spacer and do not drill new holes. When mounting the speaker make sure that the final position of the speaker does not allow for the speaker terminals to touch the metal of the door. This will create a short.
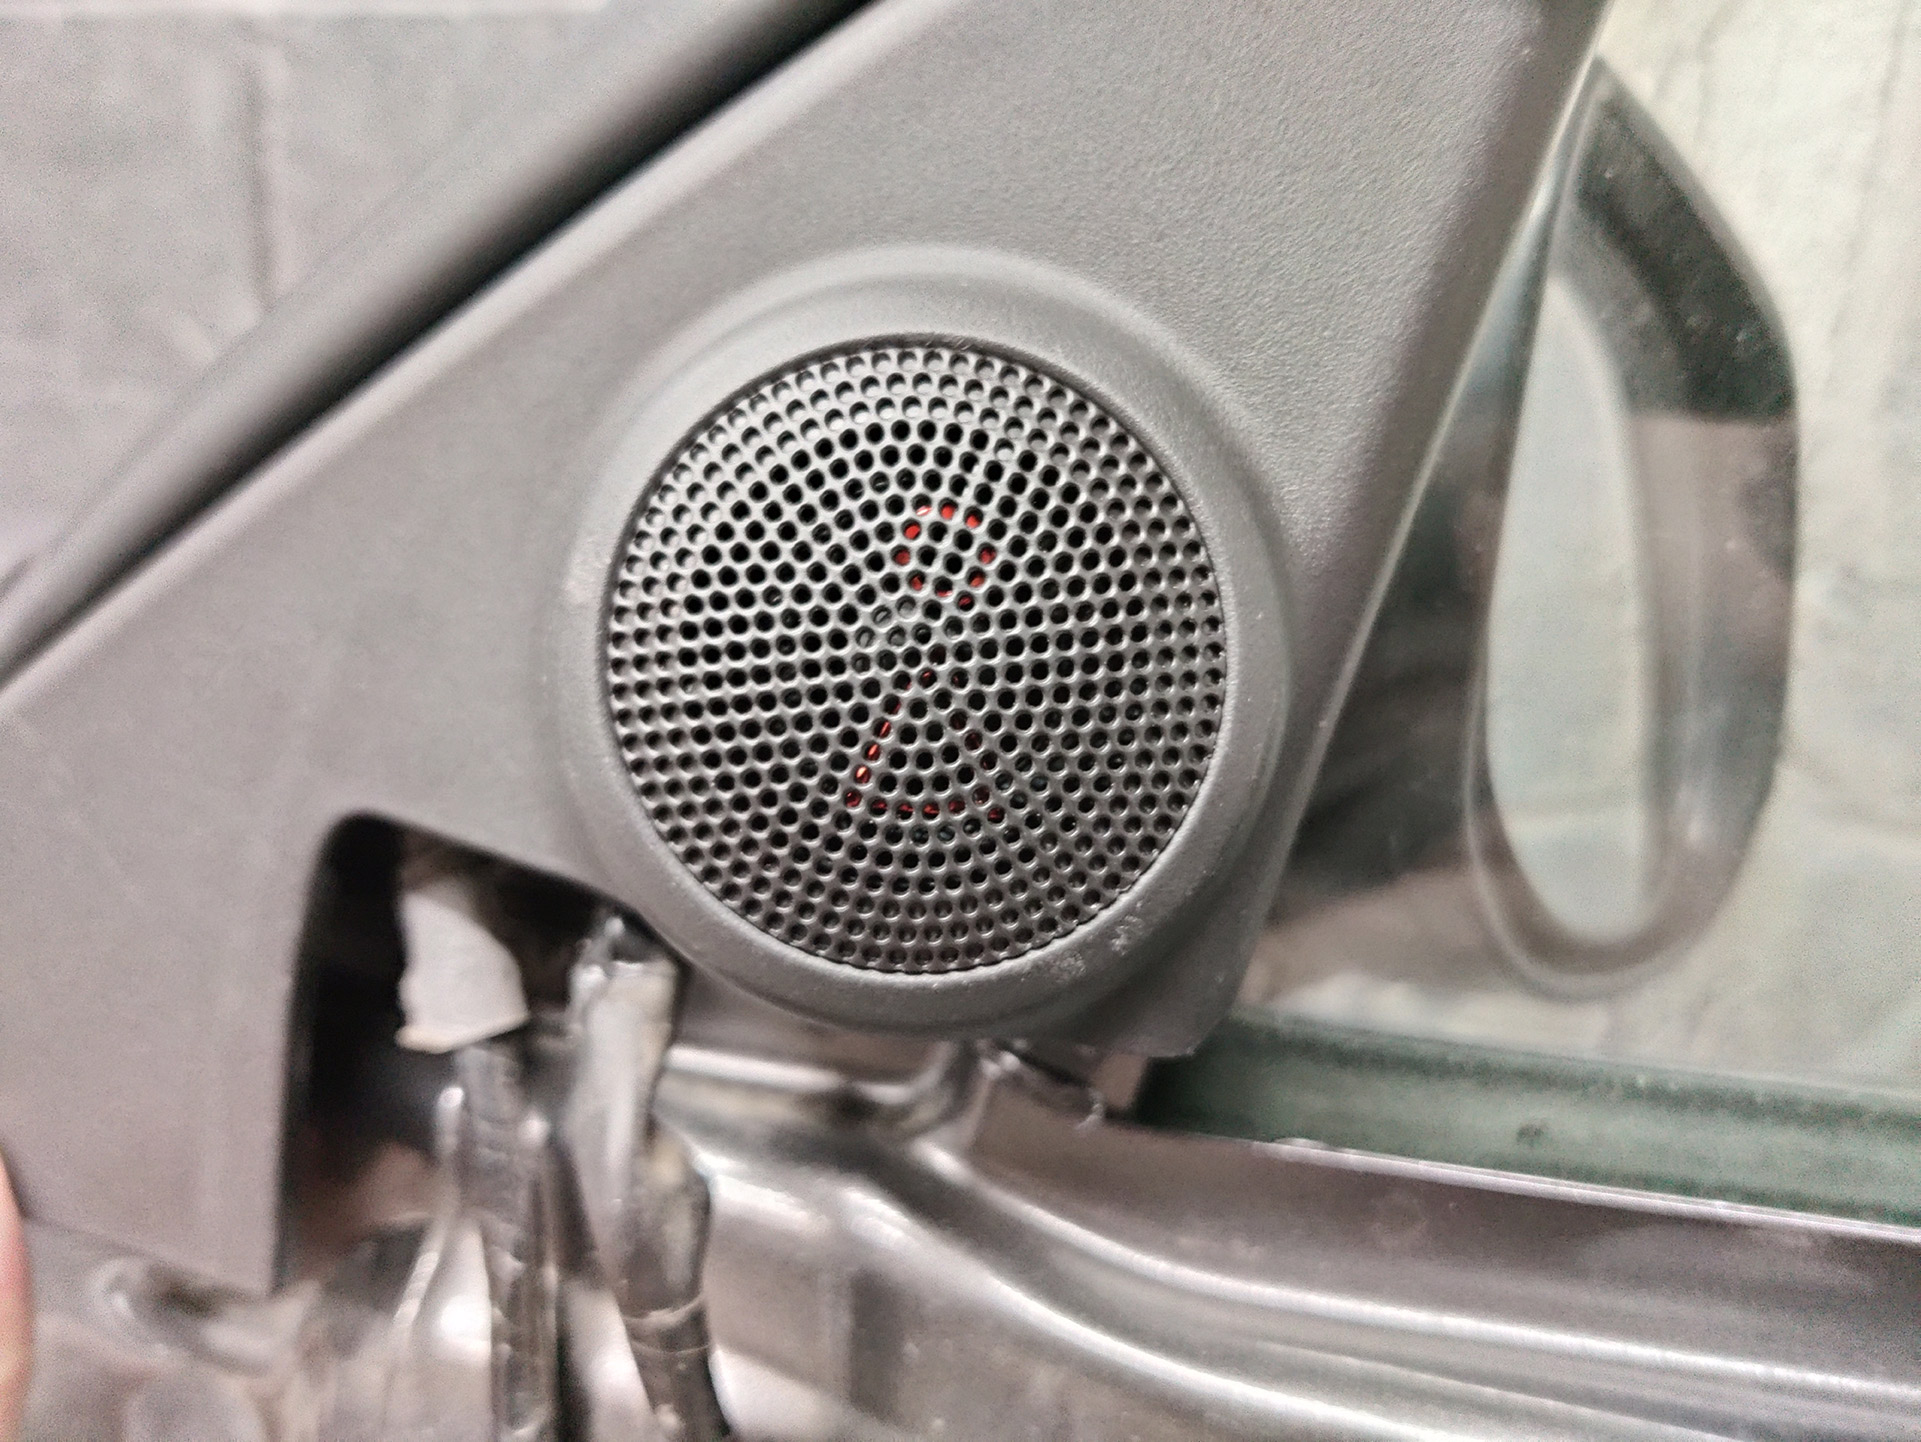
  19. Test the speaker by playing audio through your system to make sure it is working as expected and securely mounted so it will not rattle.
  20. Grab the door panel and begin plugging in the electrical connectors and mount the door lock and latch cables back.
  21. When installing the door panel back on the door make sure to not scratch or damage the speaker. If you find that your speaker/spacer combination is touching the door panel or not allowing it to sit flush. You can use a box cutter to trim ÂĽ inch from the plastic that surrounds the factory speaker on the door panel. Removing some plastic will allow it to sit flush.
  22. Slide the door panel into place and then press it onto the door so that the clips engage back onto the mounting locations. You want to make sure you slide the door panel over any edges or components it was originally over such as the window track or the door latch.
  23. After the door panel is mounted you can reinstall the screws and covers you removed. Once the panel is fully installed the door panel will sit close to but will not touch the new speaker you installed. You can shine a flashlight into the speaker grill to verify.


Posted on Leave a comment

How to Replace Your Acura’s Front Speakers

If you are looking for an instruction video instead click here. Also for videos on how to remove your door panel please click here.

      1. Remove the screw securing the factory speaker
      2. pull the factory speaker forward and lift up.
      3. Disconnect and remove the factory speaker. Leave the top clip inserted into the door panel.
      4. Install the two white inserts. The metal screw is for the top the black screws for the bottom.
      5. Install the speaker gasket onto the spacer.
      6. line up the spacer with the corresponding holes on the door panel. Screw the spacer into place
      7. Connect the speaker harness to the factory harness. Connect the harness to the aftermarket speaker.
      8. Mount the speaker onto the spacer and test the speaker.
      9. Pry the tweeter panel away from the door
      10. Disconnect the tweeter and carefully pry the tweeter out of the factory housing.
      11. Prepare the tweeter and tweeter cup for installation. Add the necessary foam to reduce any rattle.
      12. Install the tweeter on the factory housing and adjust the tweeter cup until it clicks into place.
      13. Connect the tweeter harness to the factory harness and aftermarket tweeter.
      14. Secure the wiring and install the tweeter housing back onto the door panel.


Posted on Leave a comment

POST Aftermarket Radio Installation Questions

After upgrading your radio you may be experiencing some issues. The most common issues we are aware of are speaker hissing, speaker whining, steering wheel controls not working, no audio, no power and power cycling issues.

  1. Aftermarket Radio speakers hissing
    If your speakers are hissing or whining your first step is to thoroughly clean and tighten the battery terminals. This seems trivial but will cause the speakers to hiss. If cleaning the battery terminals did not help the next step is to disconnect the factory center dash speaker. You can disconnect this speaker by carefully prying up the grill above the clock and reaching into disconnect the speaker. That speaker is usually the only one hissing after you upgrade the radio.
  2. Aftermarket Radio whining coming from speakers
    The whining is most likely alternator feedback and if you hear it through every speaker than it most likely indicates that your factory amplifier is bad/going bad. Even though with the factory radio you did not have this issue if you encounter it after upgrading the radio it is still the amp and not the radio. If you only have whine in one speaker then it could be a bad RCA port or RCA cable but if its in all speakers then you will need to replace the factory amplifier with another used one, have yours repaired or replace it with another amplifier all together we have PNP amps and amp bypass harnesses available.
  3. Aftermarket Radio steering wheel controls not working
    If your steering wheel controls aren’t working then the process of elimination to get them working is as follows. If you have a Kenwood make sure the blue/yellow wire connected to the brown wire (with headphone jack). If you have a radio where the 3.5mm headphone jack plugs straight into the back of the radio make sure the plug seated all the way in. If the connections are correct and secure then your next step is programming.We recommend and only sell the AXSWC so if you are using another module you will need to look for specific instructions of that modules. The AXSCW has a reset button that you must activate is programming wasn’t successful on the first try. All you need to do is hold the programming button for 3 seconds and then let go. The button is on the same side as the LED light it is in the other hole form the LED. After you held the button for three seconds and let go it will begin to flash red/green very quickly. Now press and hold volume up on the steering wheel. The led will flash several times with red and green flashes slowly then quickly, then finally it will turn solid red after about 15 seconds. Once it does release the volume up button cycle the key on and off and the controls should begin working. If they do not work you will need to switch the radio mode or manually program. You can find more information on the AXSCW product page.
  4. Aftermarket Radio no audio
    If you have no audio after installing an aftermarket radio this is most likely because the factory amplifier is not turning on. First verify you have connected the blue/white wire often labeled remote/amp on from your aftermarket radio the corresponding wire on the grey plug from the accessories we sent you. If this occurs on a plug and play harness it is often due to the manufacturer changing the location of the pin with the blue/white to another location. Verify that the harness we sent you and the harness that came with your radio have the wires in the same locations. If the blue/white wire is in a different location then that is issue. You can either unpin the wire or cut and connect and that will get your sound working. If this is something you rather not do then you can send the harness back to us so we can fix it. The shipping will be covered by us. If your connections are correct but you still aren’t getting sound check the settings of the radio to make sure the amplifier setting is set to on or sometimes it’s a setting call subwoofer that you need to make sure is on to enable the amplifier to work. If none of these solutions work for you please call or email us so we can help fix the issue.
  5. Aftermarket Radio sound only form 3 speakers
    If you only have audio out of certain speakers and not others check the connectors for any bent pins or any pins that are starting to come out of the harness this can happen and cause a bad connection or speakers to short out. When you connect the connectors to the factory harness or to the aftermarket radio you should hear a click and encounter some resistance but it shouldn’t take all the force you have to get the connector to come together. If everything checks out but you still have low or faulty audio a component in the harness could be bad or your speakers/amplifier could be bad reach out to us for your next steps.
  6. Aftermarket Radio not turning on
    If you have no power to your new aftermarket radio don’t panic this is often because you blew a fuse during installation. This is common and why often it is recommend to disconnect the battery before installation. Check the fuses at the passenger kick panel look for the radio and accessory fuse to verify they are both good. If you still have no power check the fuse on the back of the aftermarket radio usually right where the connector for the radio connects. If you still have no power you must check the fuses under the hood for blown fuses. The Acura system is very tied together so a fuse that may have nothing to do with the radio directly will cause it not to turn on. Check every single fuse if you cannot get power to the radio. If you connect the factory radio back (make sure to input the radio code) and it does work but the aftermarket radio does not then it might just be a bad or dead radio. You can also test the connectors for power if you have a multimeter to verify that the yellow wire has 12v and the red wire has 12v when you turn the key on.
  7. Aftermarket Radio keeps shutting off by itself
    If you installed an aftermarket radio and the radio keep shutting off as you are driving or when you hit a bump. This means one of the connections is not seated properly or there is a fault. You can test for faults with a multimeter and set it to continuity than begin turning and twisting the harness while check if the continuity stops. Before the continuity test make sure all the connectors are seated properly as that can also cause an issue.