2013 2014 2015 2016 2017 2018 2019 2020 Acura ILX Factory Radio Removal | Aftermarket Radio Installation Procedure

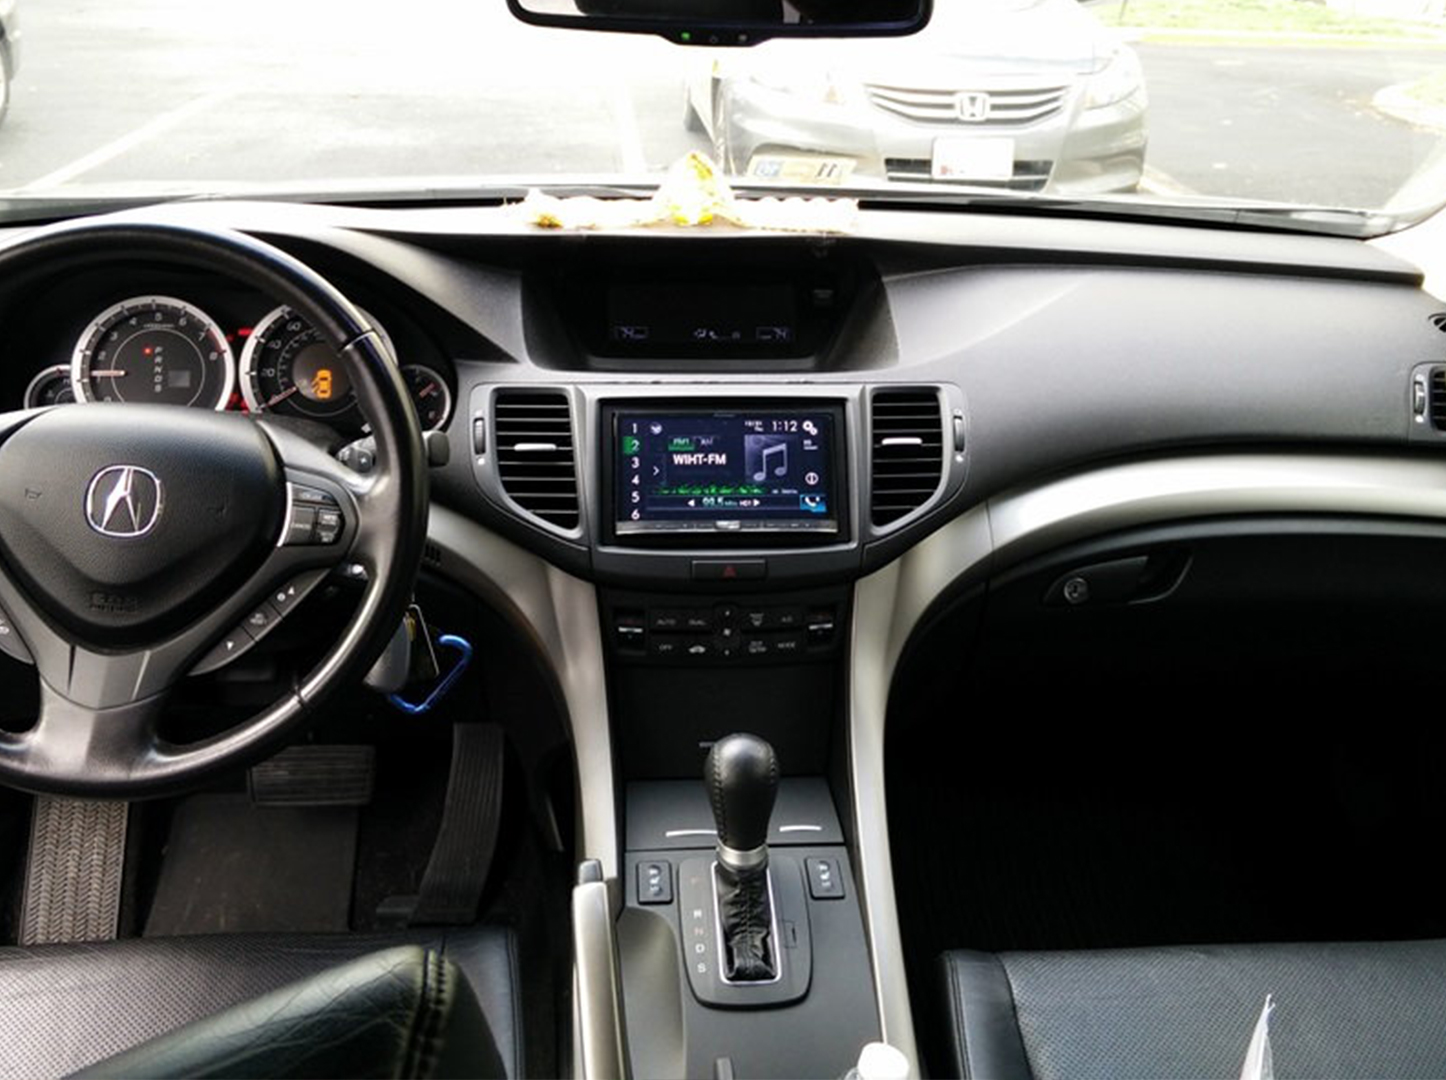
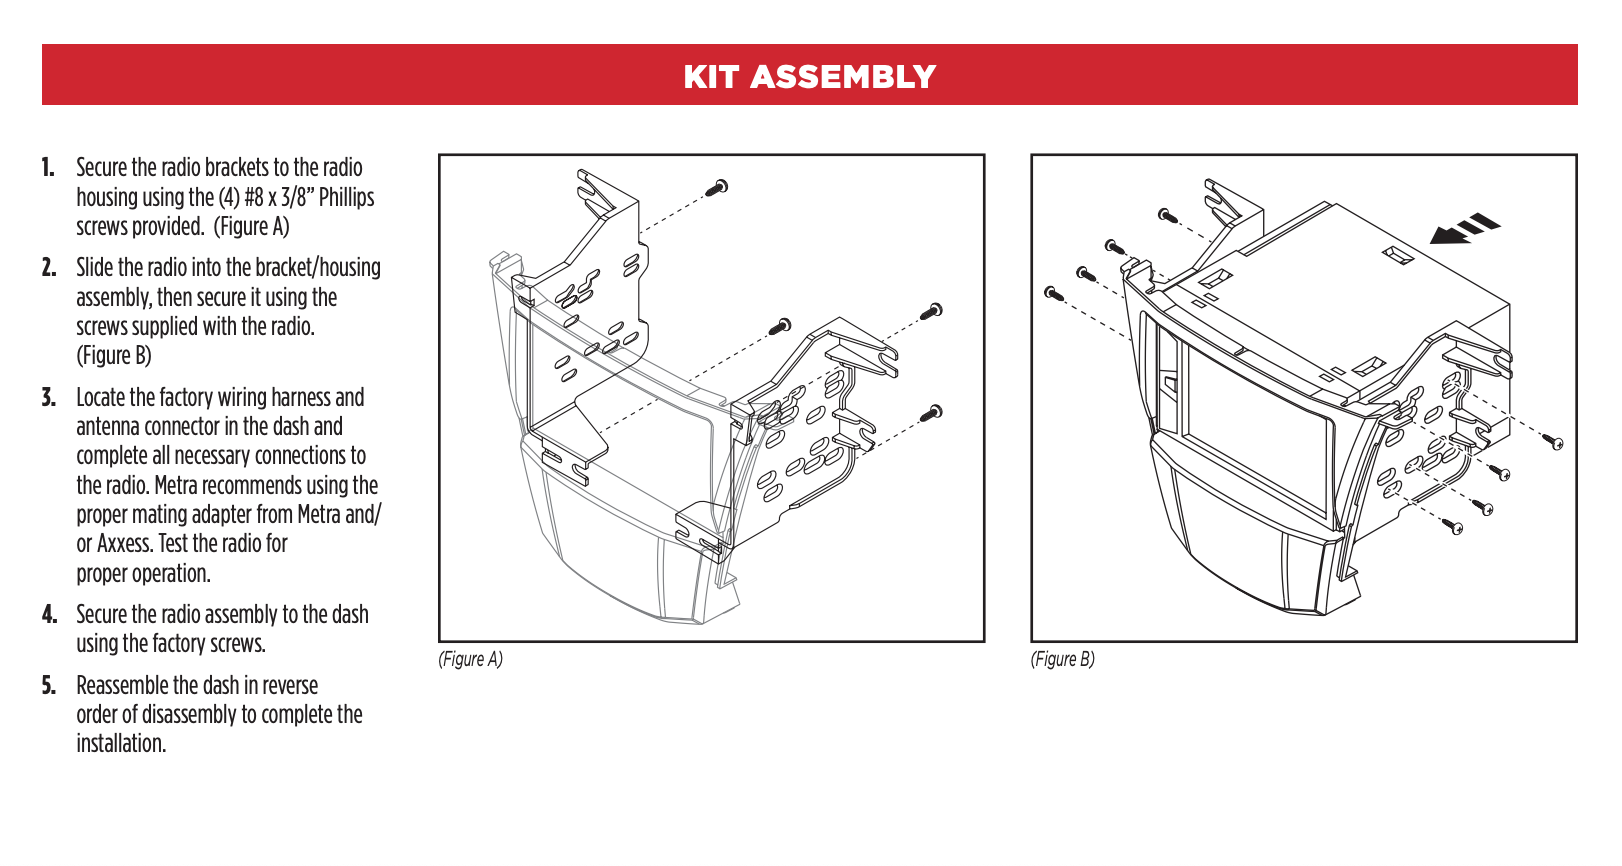
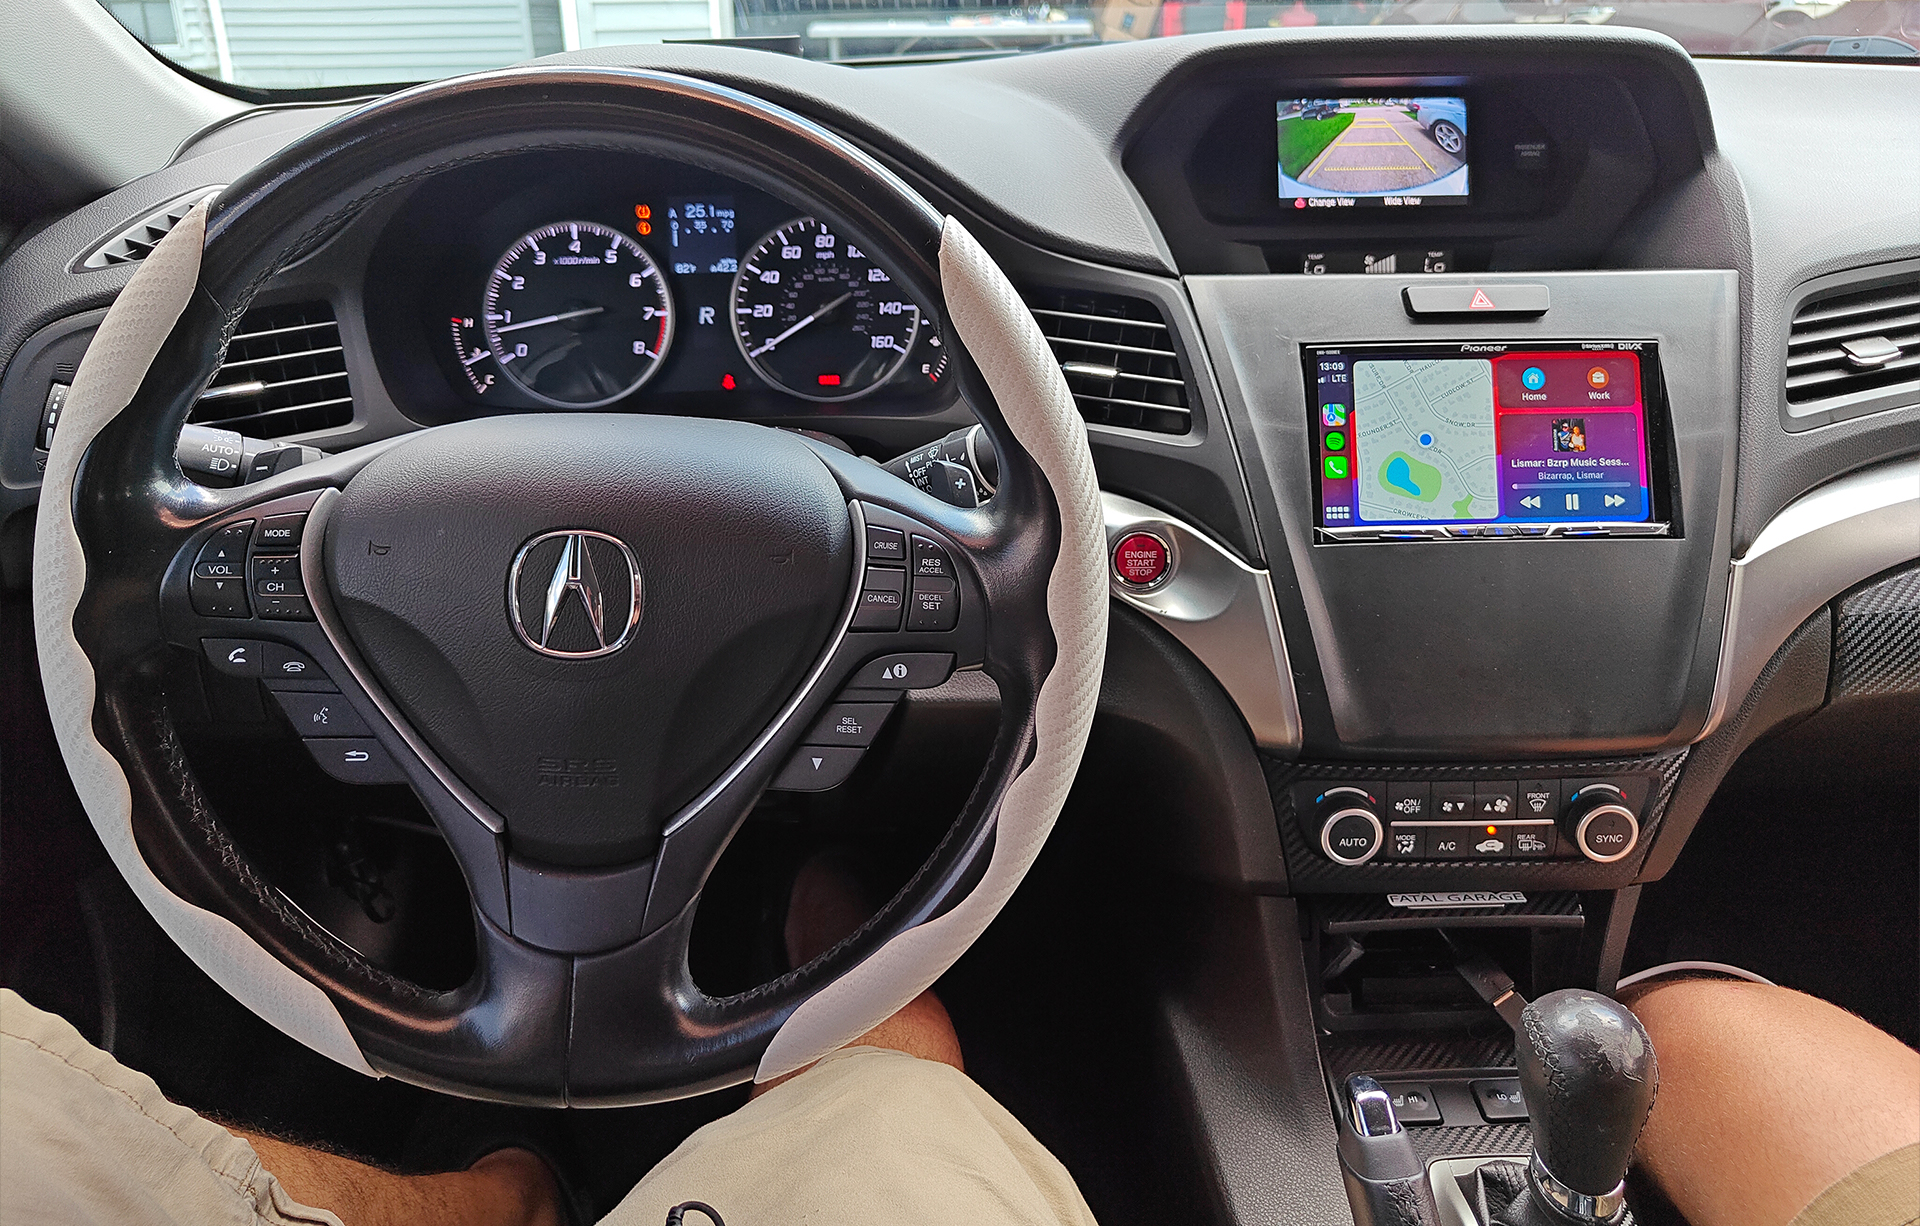
If you are thinking about upgrading the factory radio in your 2013-2022 Acura ILX this dash kit allows you to install an aftermarket double din radio in the factory location without having to modify any factory components. The dash kit fits any size screen from 6.2 to 7″ flush but any radio bigger than 7″ will stick out past the dash kit and float in front of it.

This dash kit is compatible with all audio systems in the ILX but it is important for you to recognize what factory audio system your ILX is equipped with. The 2013, 2014 and 2015 Acura ILXs have the base (single screen), premium (single screen) and ELS Audio systems (navigation screen). The 2016-2022 Acura ILXs have the base (single screen), premium(dual screen), and ELS Audio System (Navigation Dual Screen).

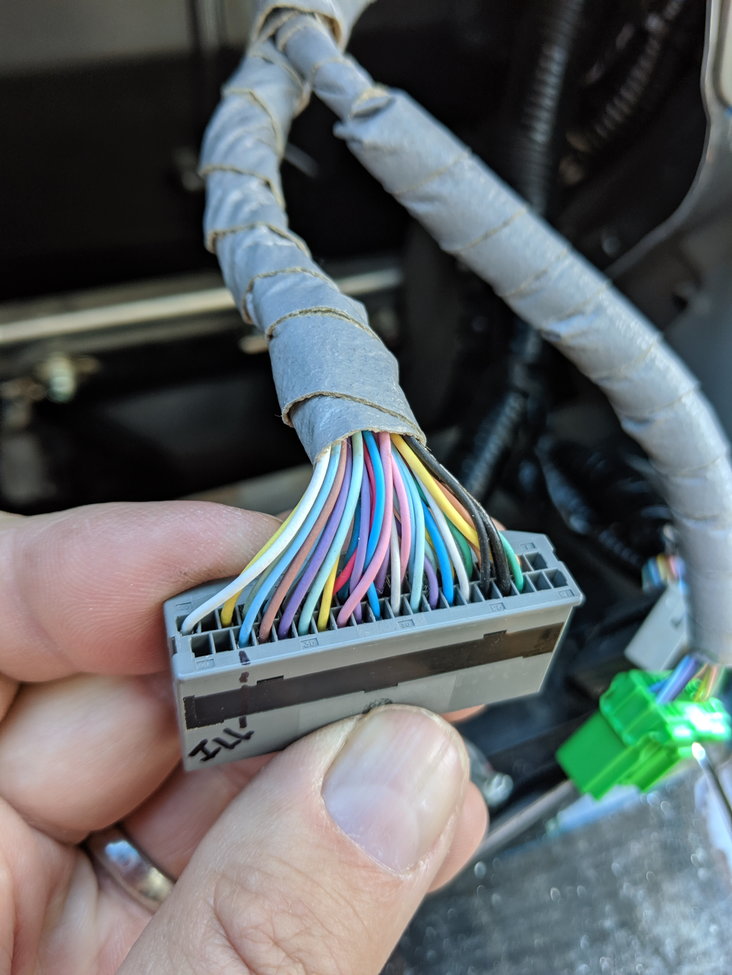
On the 2013-2022 ILX with the base audio system the upgrade is completely plug and play and you are able to keep all your speakers, your backup camera and steering wheel controls.

On the 2013-2015 ILX with the premium audio system the upgrade is completely plug and play you are able to keep all your speakers, your backup camera and the steering wheel controls.

On the 2016-2022 ILX with the premium audio system with the dual screens the installation is not plug and play and requires manual wiring. Also further testing is required to determine which features will be lost.

On the 2016-2022 ILX with the ELS audio system with navigation the installation is not plug and play and requires manual wiring. Also further testing is required to determine which features will be lost.

On all installations the steering wheel call control buttons will not be retained only the volume up, volume, down, previous and mode buttons will work. The factory USB port is not retained, it will only charge. You will not be able to set the time on the screen. The backup camera will work when the vehicle is in reverse. The factory AM/FM antenna is retained and used with the aftermarket radio. The XM tuner is not retained you will lose Sirius XM. The factory Bluetooth module will no longer work to receive and make calls. You will instead use the aftermarket radio. The Factory AUX port will not be retained. The upgrade will not trigger any warning lights on your dash.

You can purchase just the dash kit or the dash kit and our wiring harness. Please make sure to pick the right selection below

Please watch the videos to learn everything about installing and aftermarket radio in your Acura ILX and our dash kit.
2014 2015 2016 2017 2018 2019 2020 Acura RLX Subwoofer Upgrade

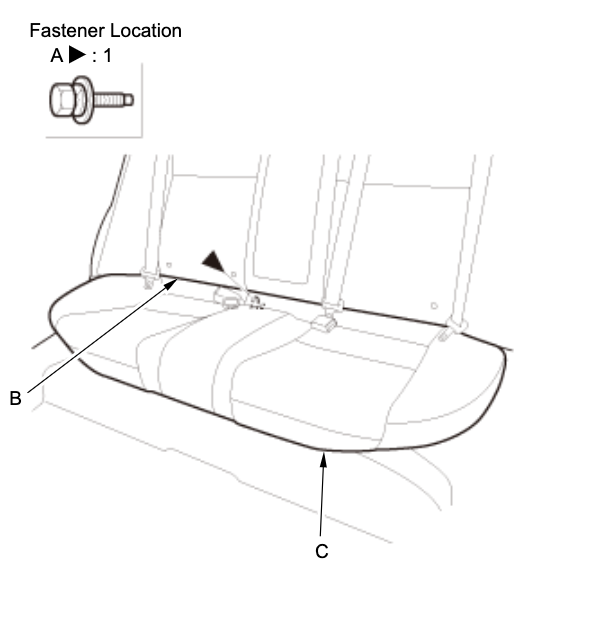
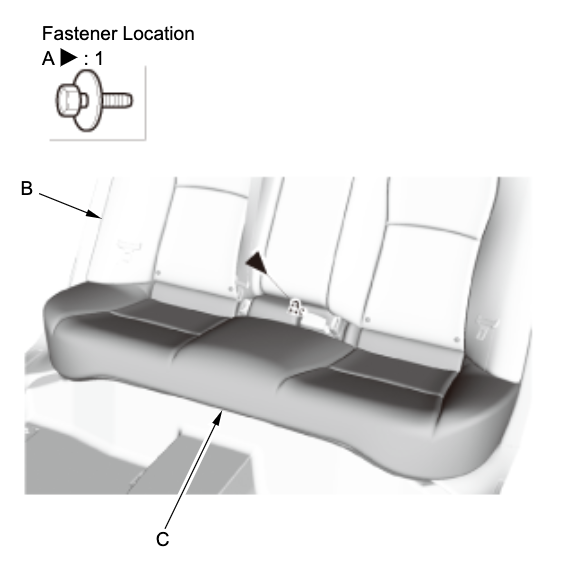
  1. Remove the bolt (A) between the rear seat-back (B) and the rear seat cushion (C).
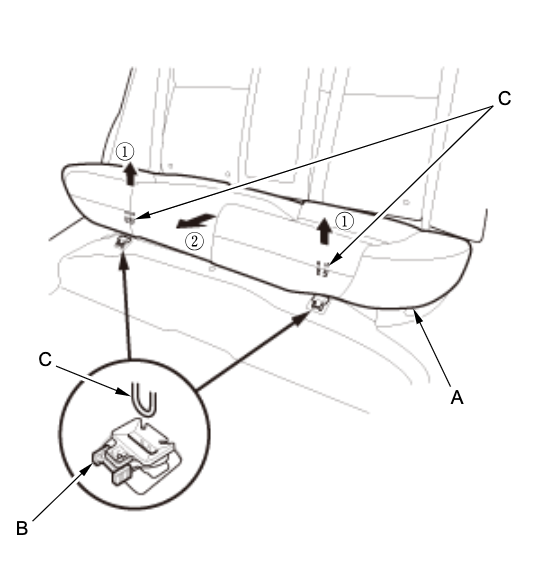
  2. Release the hooks (A).
    While pushing down on the seat cushion (B), pull the seat hook handles (C) to release the hooks.
    Remove the rear seat cushion.
    With rear seat cushion heater: Disconnect the rear seat cushion heater connector (D).

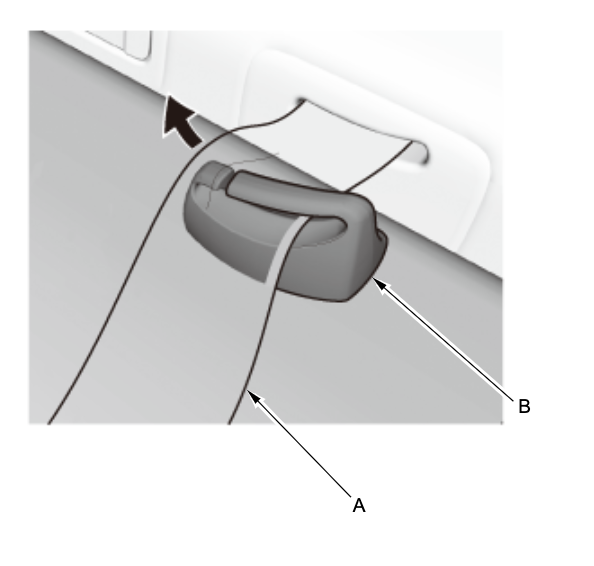
  3. Pull out the center seat belt (A) through the slit in the center seat belt guide (B).
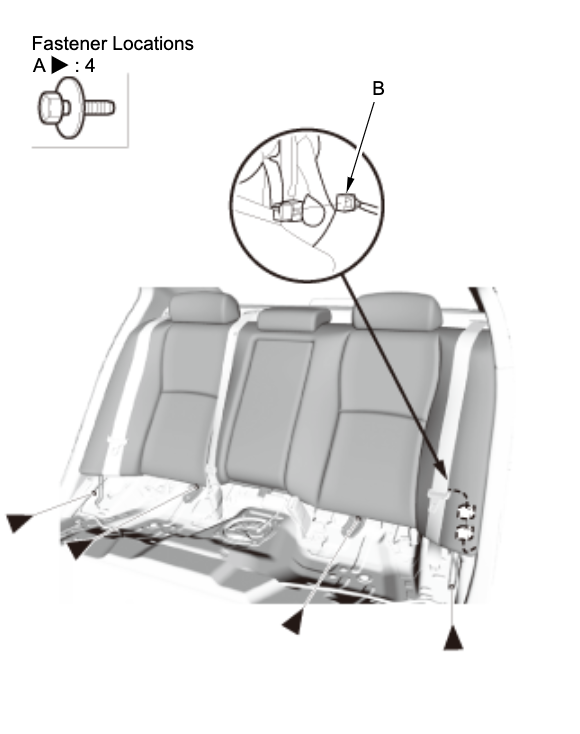
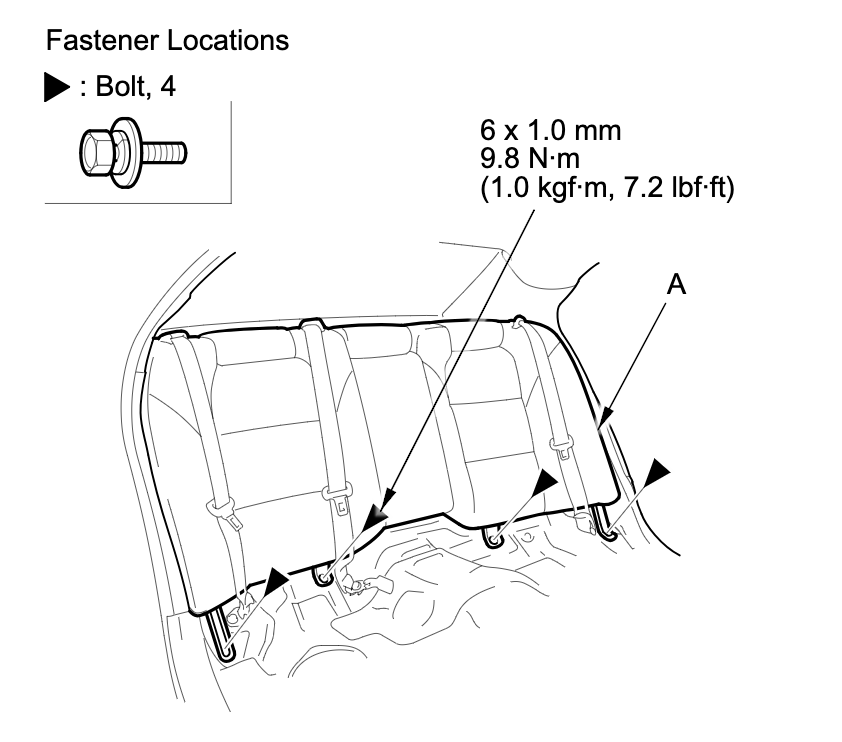
  4. Remove the bolts (A). With rear seat-back heater: Disconnect the rear seat-back heater connector (B).
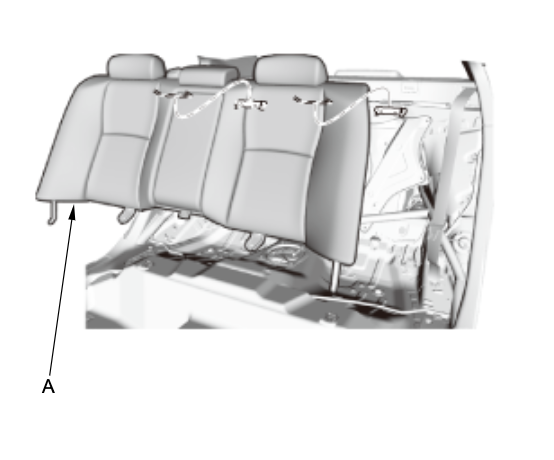
  5. Remove the rear seat-back (A).
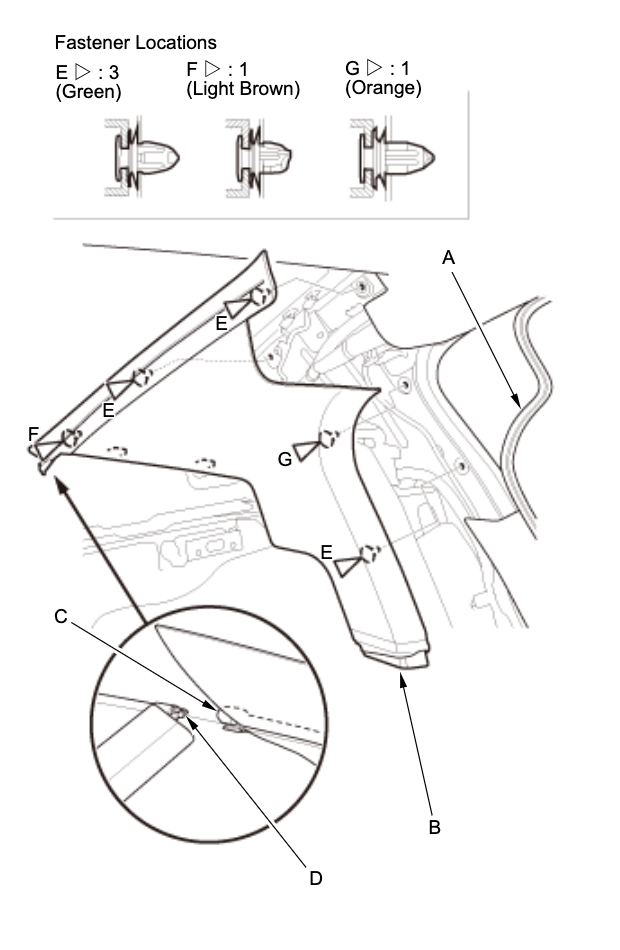
  6. Remove rear door opening seal (A) as needed.
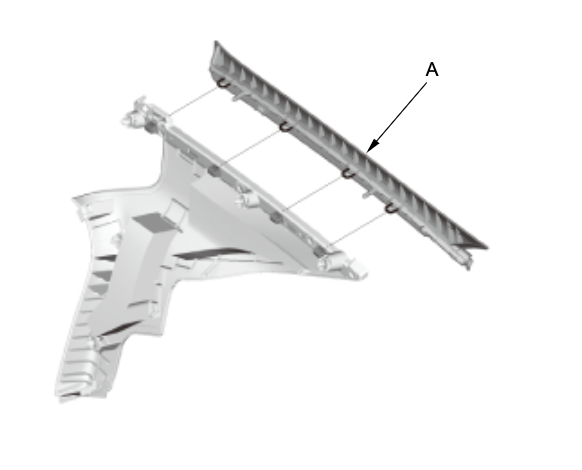
    Remove the C-pillar trim (B).
    With rear window sunshade: Release the guide rail (C) from the rear window sunshade wire (D).

  7. With rear window sunshade: If necessary, remove the guide rail (A).
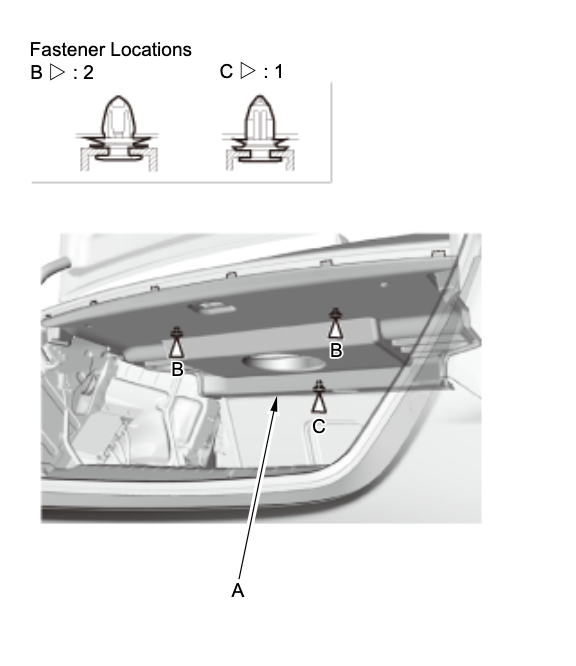
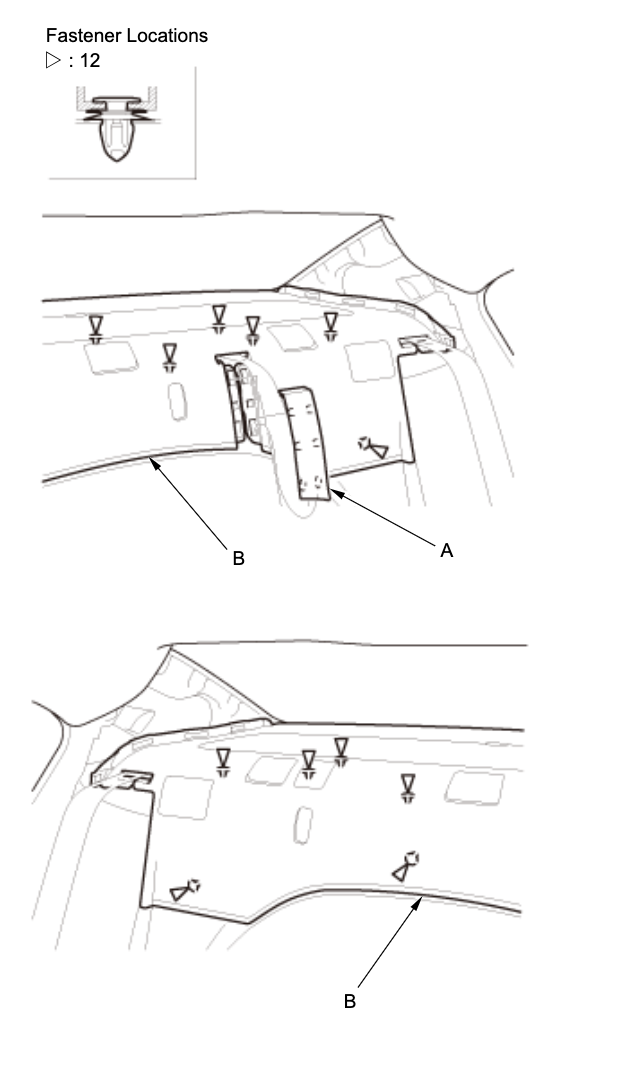
  8. Remove the trunk upper trim panel (B).
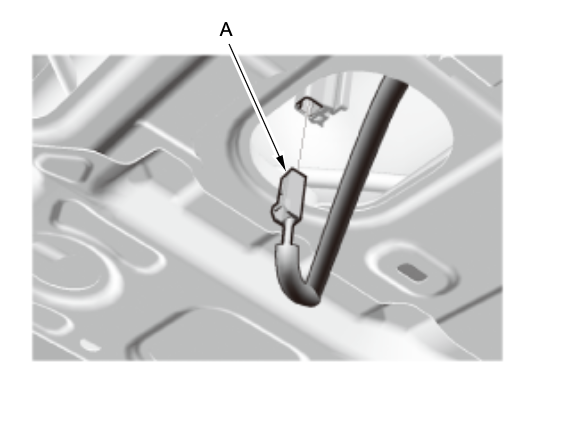
  9. Without rear window sunshade: Disconnect the high mount brake light connector (A).
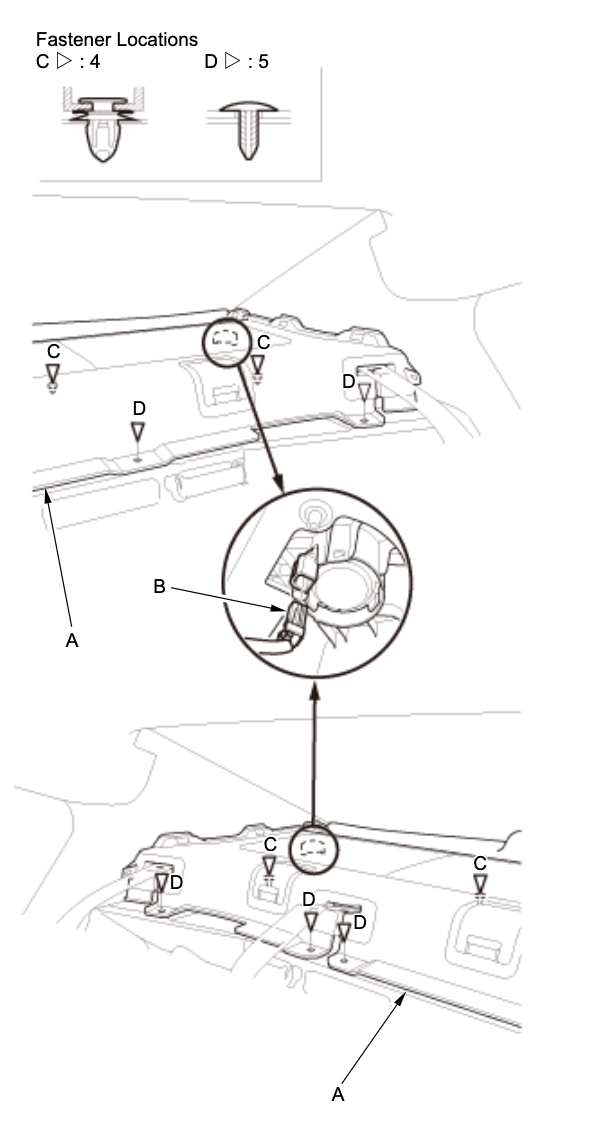
  10. Remove the rear shelf trim (A).Disconnect the tweeter connectors

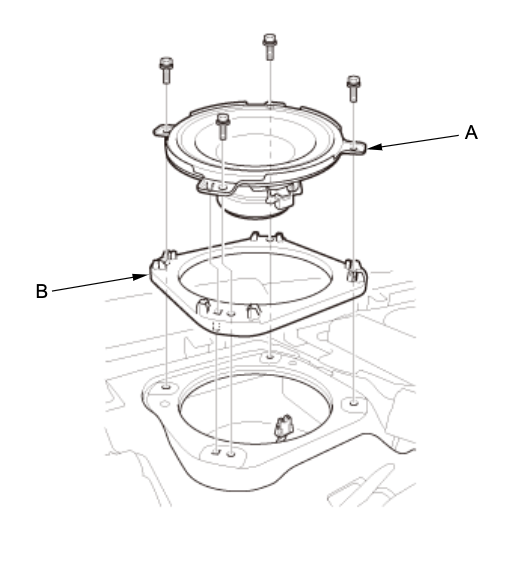
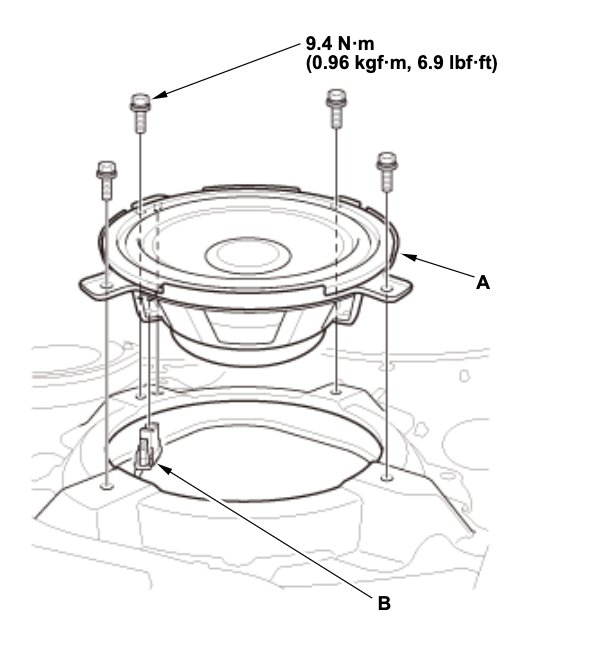
  11. Remove the subwoofer (A). Disconnect the subwoofer connector. Remove the baffle plate (B).

  12. Disconnect the factory subwoofer by pinching the connector at the sides and pulling down until it releases. You will need to pull with moderate force.
  13. Secure the new mounting bracket to the rear deck using the factory screws you just removed.
  14. Connect the new subwoofer to the factory connection using the provided harness.
  15. Mount the new subwoofer to the mounting bracket with the supplied mounting screws.
    NOTE: It is recommended to apply sound treatment material to the rear deck metal and rear deck cover to reduce unwanted rattles and noise
  16. Reinstall the covers you removed in the reverse order.
    NOTE: If the rear deck touches your new subwoofer, trim the rear deck panel so the surround of the subwoofer does not touch or buy longer retaining clips to ensure the rear deck does not touch the subwoofer.
    You can use the ones found at this link. https://www.amazon.com/Rexka-Panel-Retainer-Chrysler-6503709/dp/B07CJP3X5H/

2015 2016 2017 2018 2019 2020 Acura TLX Subwoofer Upgrade

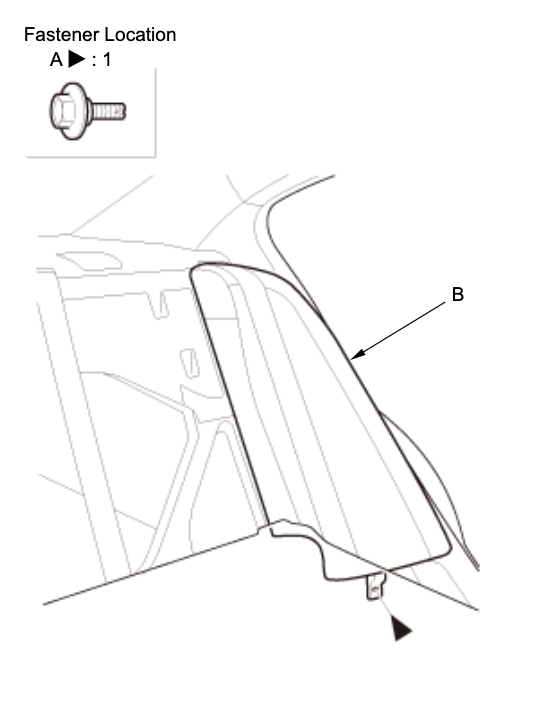
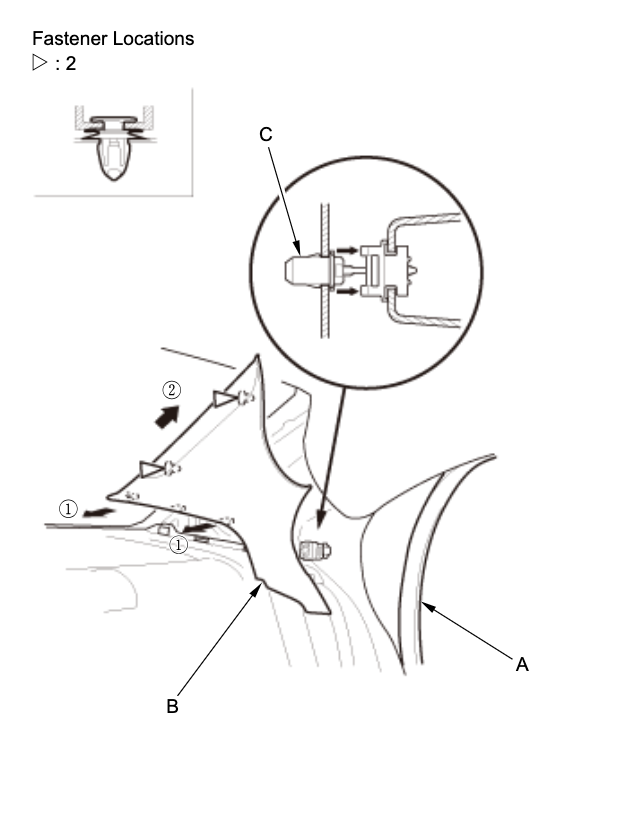
  1. Remove the rear door opening seal (weatherstripping) as needed. (A)
  2. Pull out the C-pillar trim (B).
  3. Slide the C-pillar trim is pulled forward after all clips are removed.
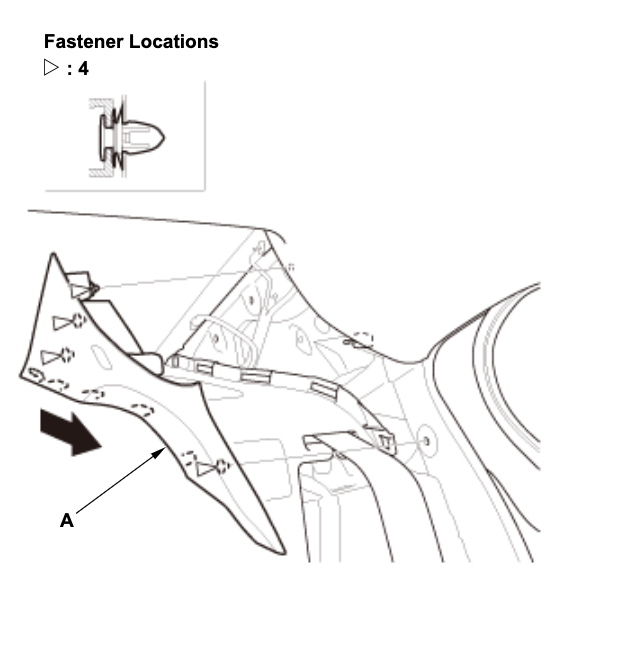
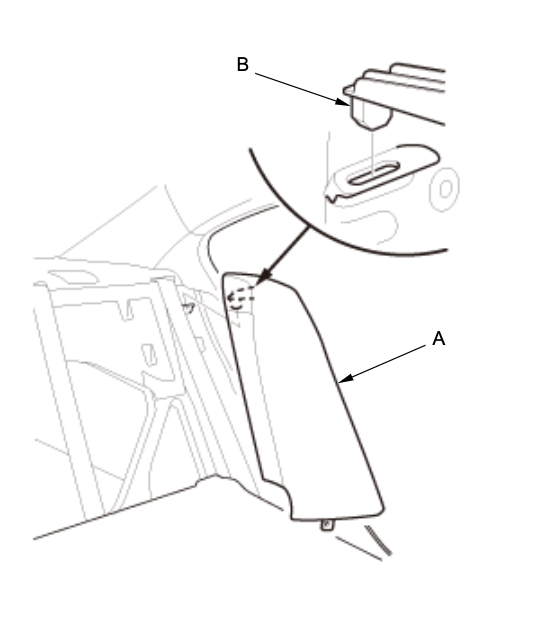
  4. Remove the C-pillar trim (A).
  5. Remove the upper clip (A) from the body.
  6. Fold down the rear seat-back.
  7. Remove the belt hole cap (A).
  8. Remove the rear shelf trim (B). Detach the clips with a clip remover.
    Lift the rear shelf upward and forward to release the rear hook (B).
    Slightly warp the rear shelf to release both side edges from the side curtain airbag inflators, then pull it forward.
    NOTE: Be careful not to damage the speakers.
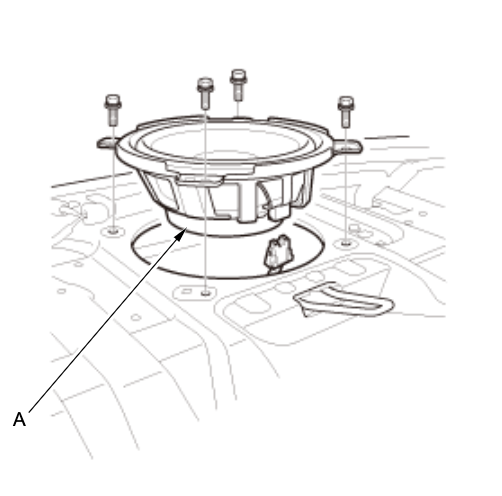
  9. Remove the four bolts securing the subwoofer.
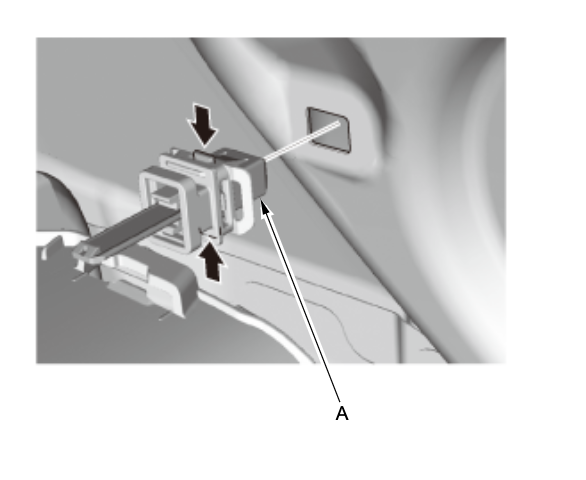
  10. Disconnect the factory subwoofer by pinching the connector at the sides and pulling down until it releases. You will need to pull with moderate force.
  11. Secure the new mounting bracket to the rear deck using the factory screws you just removed.
  12. Connect the new subwoofer to the factory connection using the provided harness.
  13. Mount the new subwoofer to the mounting bracket with the supplied mounting screws.
    NOTE: It is recommended to apply sound treatment material to the rear deck metal and rear deck cover to reduce unwanted rattles and noise
  14. Reinstall the covers you removed in the reverse order.
    NOTE: If the rear deck touches your new subwoofer, trim the rear deck panel so the surround of the subwoofer does not touch or buy longer retaining clips to ensure the rear deck does not touch the subwoofer.
    You can use the ones found at this link. https://www.amazon.com/Rexka-Panel-Retainer-Chrysler-6503709/dp/B07CJP3X5H/

2013 2014 2015 2016 2017 2018 2019 2020 Acura ILX Subwoofer Upgrade Instructions

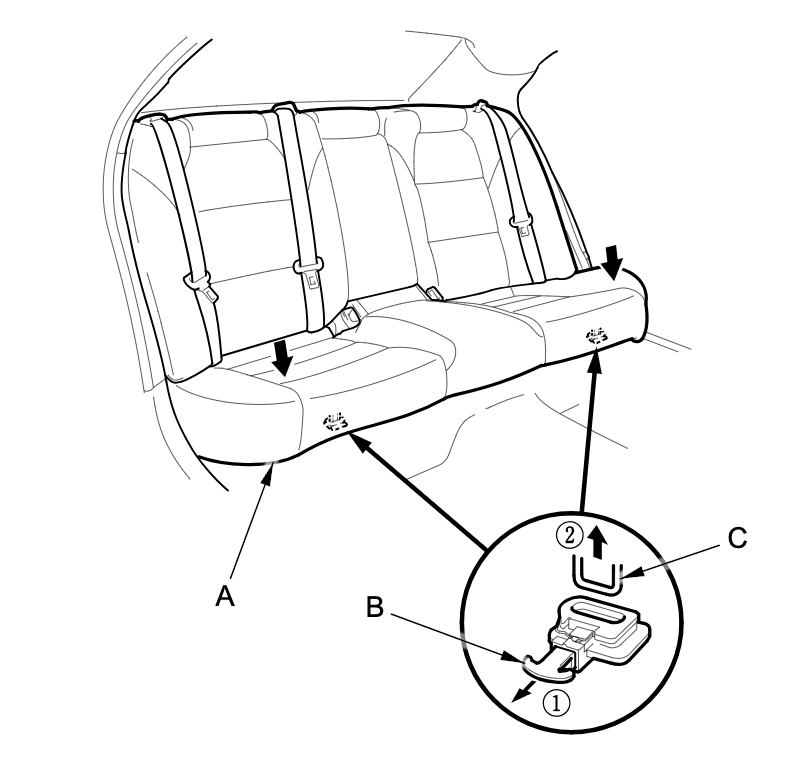
  1. Remove the bolt (A) between the rear seat-back (B) and the rear seat cushion (C).
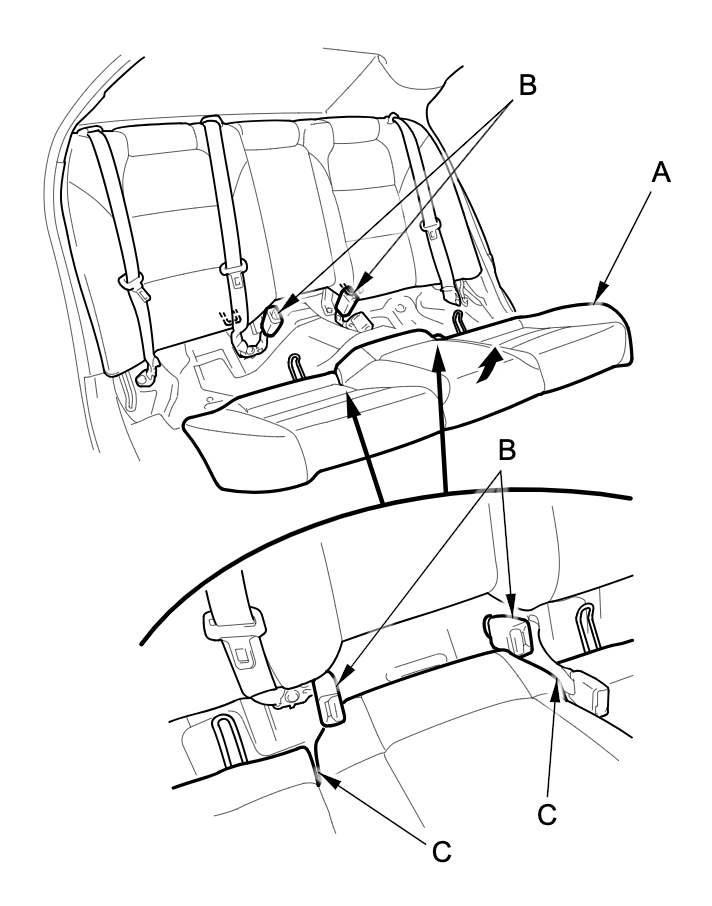
  2. While pushing down on the seat cushion (A), pull the seat hook handles (B) to release the hooks (C).
  3. Remove the bolt (A) securing the seat side bolster (B)
  4. Lift up the seat side bolster (A) to release the hook (B), then remove the side bolster. Remove both bolsters
  5. Remove rear door opening seal (A) as needed.
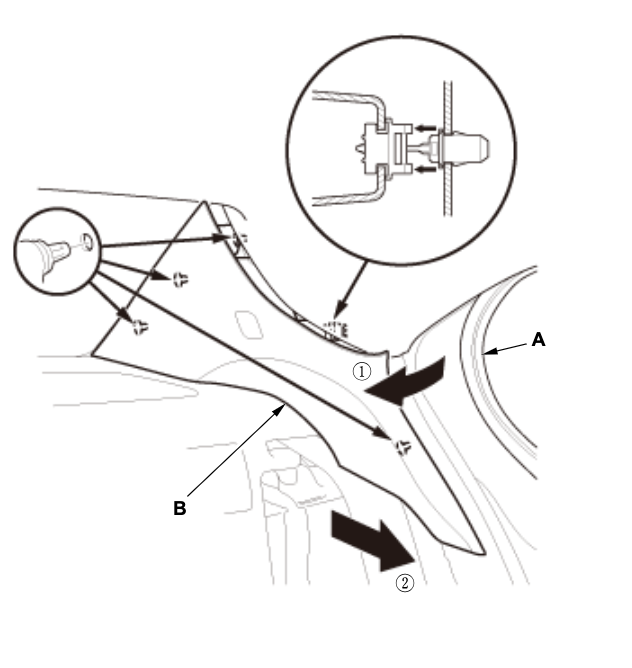
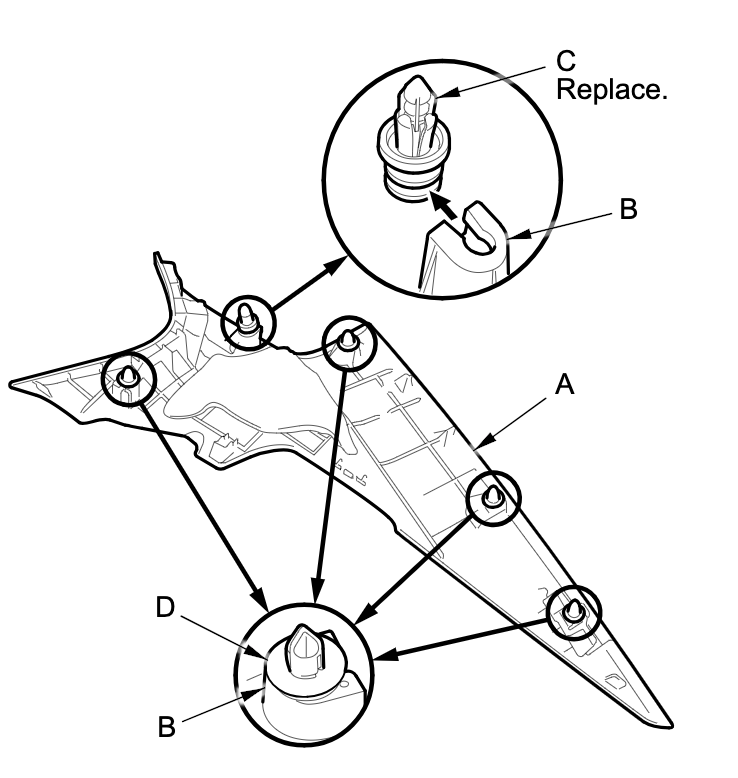
    – Pull out the C-pillar trim (B) to release the clips.
    – Remove the C-pillar trim.
    NOTE: The front clip (C) will stay in the body.
  6. Remove the front clip (A).
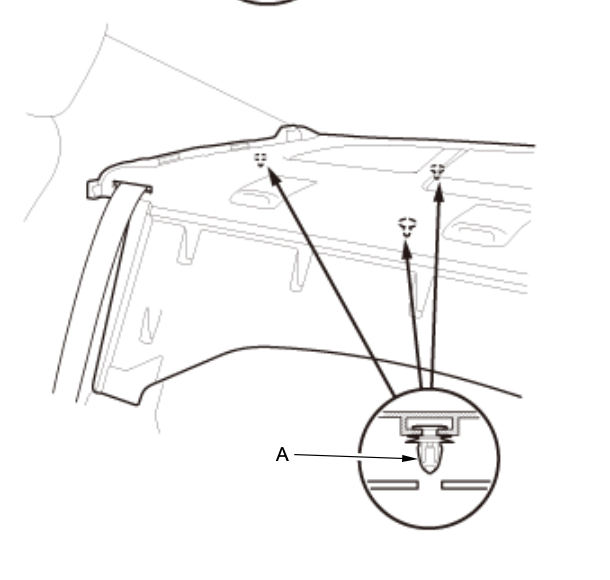
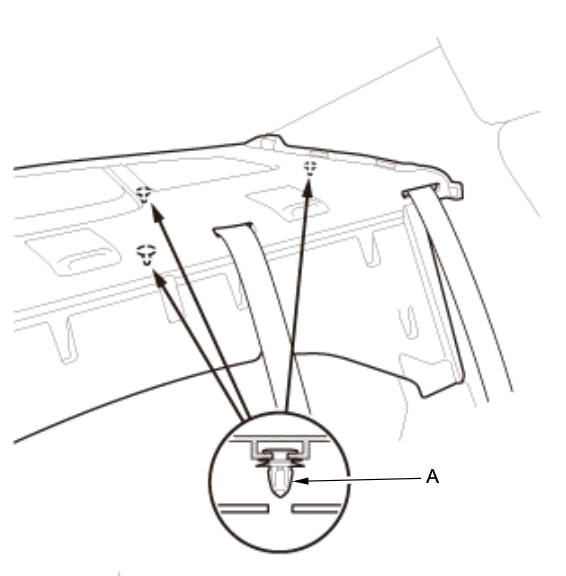
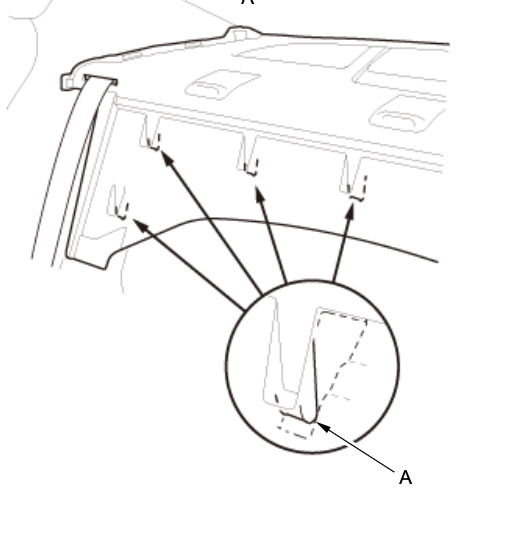
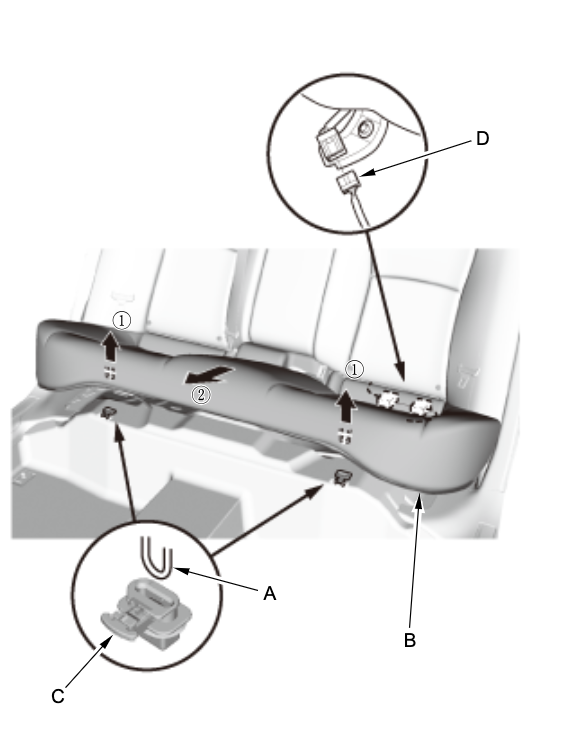
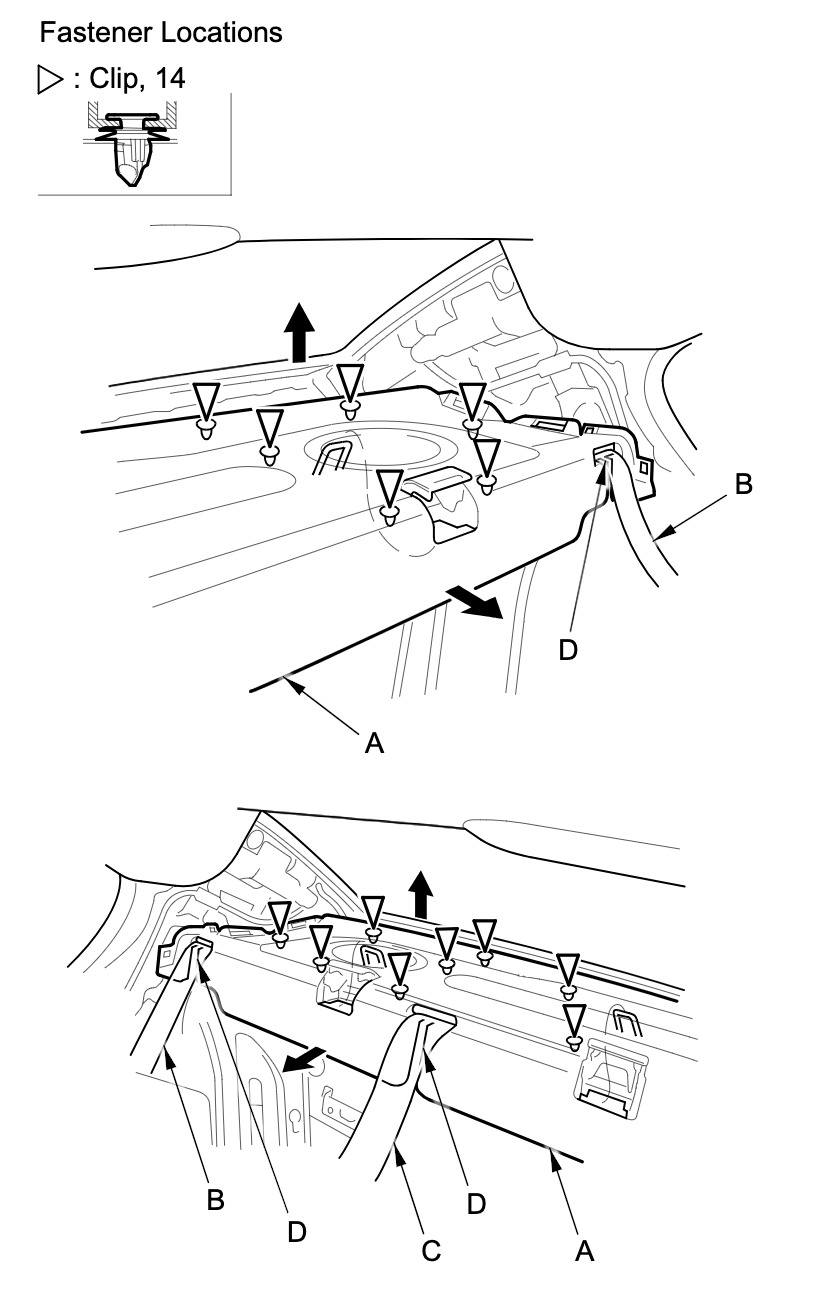
  7. From the trunk compartment, detach the clips (A)
  8. Release the hooks (A).
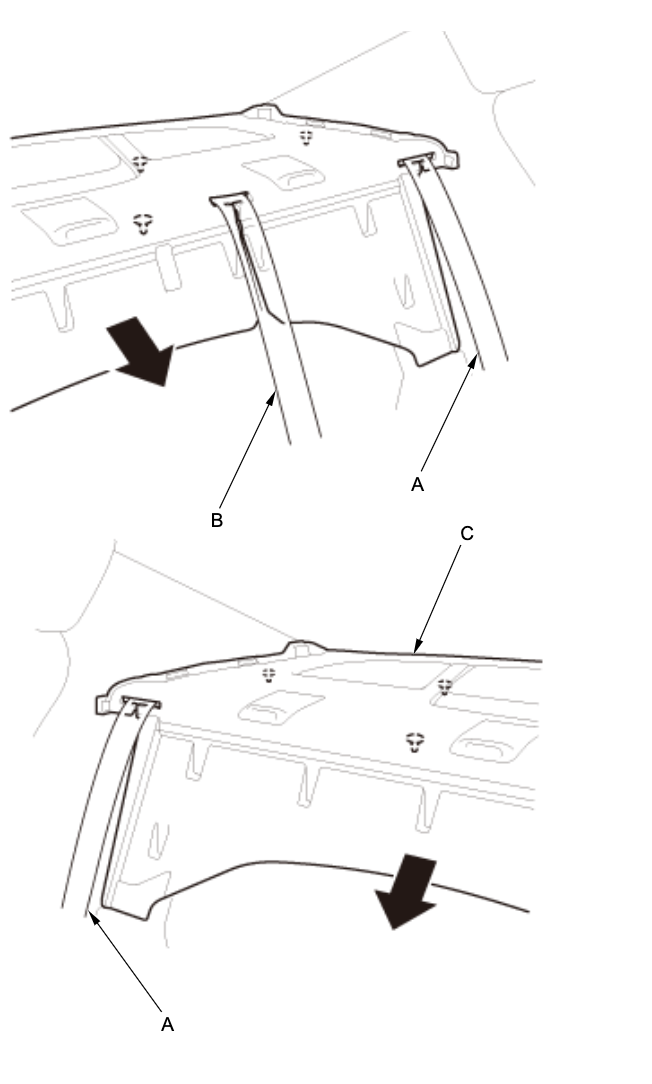
  9. Pull out both rear seat belts (A) and the rear center seat belt (B) through the slits in the rear shelf trim (C), then remove the rear shelf trim.
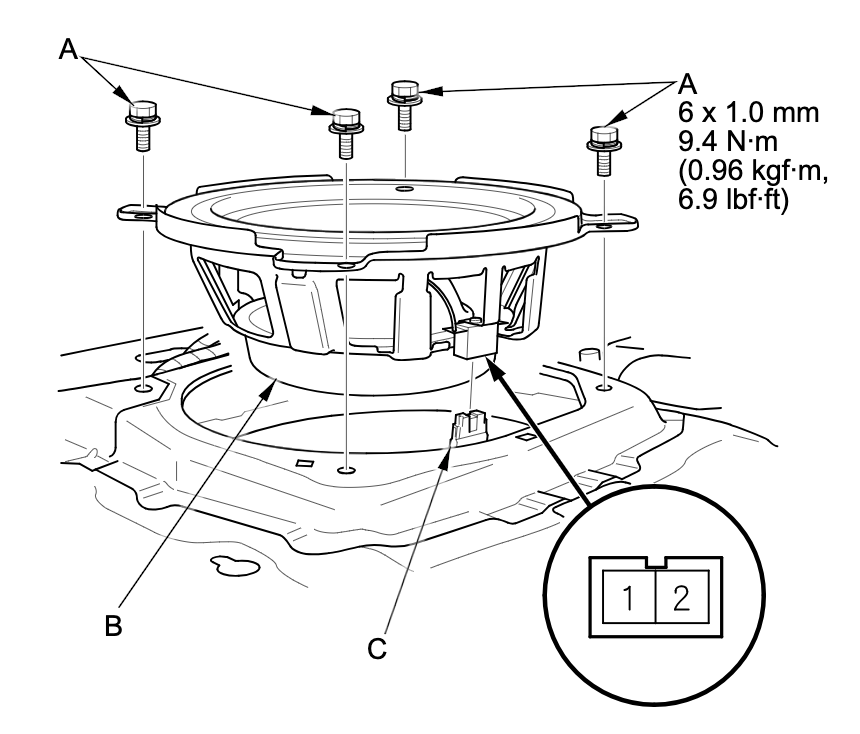
  10. Remove the four bolts securing the subwoofer.
  11. Disconnect the factory subwoofer by pinching the connector at the sides and pulling down until it releases. You will need to pull with moderate force.
  12. Secure the new mounting bracket to the rear deck using the factory screws you just removed.
  13. Connect the new subwoofer to the factory connection using the provided harness.
  14. Mount the new subwoofer to the mounting bracket with the supplied mounting screws.
    NOTE: It is recommended to apply sound treatment material to the rear deck metal and rear deck cover to reduce unwanted rattles and noise
  15. Reinstall the covers you removed in the reverse order.
    NOTE: If the rear deck touches your new subwoofer, trim the rear deck panel so the surround of the subwoofer does not touch or buy longer retaining clips to ensure the rear deck does not touch the subwoofer.
    You can use the ones found at this link. https://www.amazon.com/Rexka-Panel-Retainer-Chrysler-6503709/dp/B07CJP3X5H/

2009 2010 2011 2012 2013 2014 Acura TL Subwoofer Upgrade Instructions

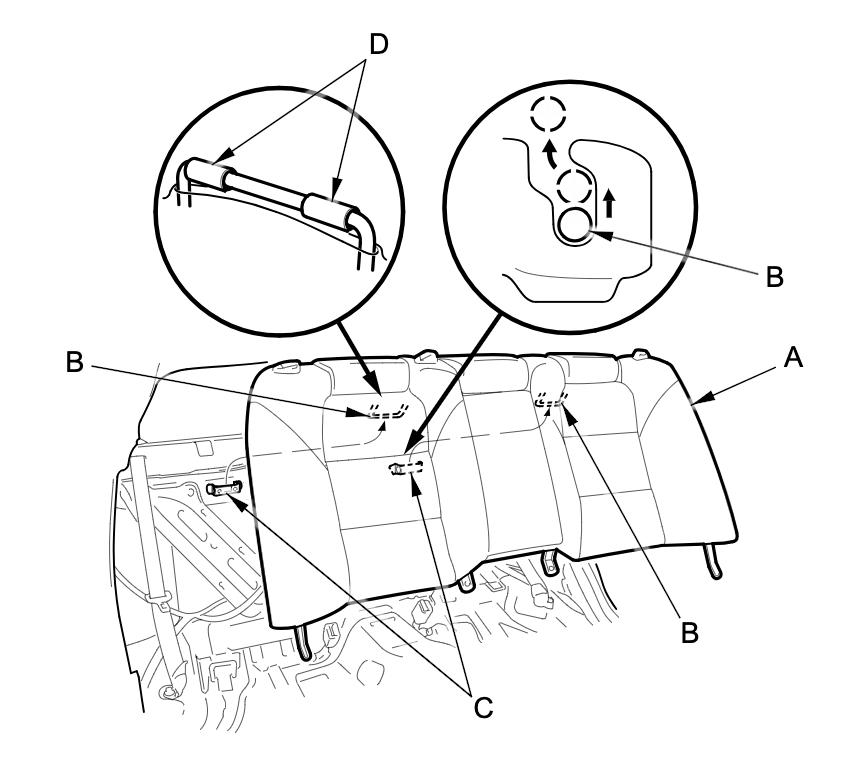
  1. Have an assistant help you when removing and installing the rear seat-back.

    Take care not to scratch the body or tear the seat covers.

    While pushing down on the rear seat cushion (A), pull the seat hook handles (B) to release the hooks (C).

  2. Remove the seat cushion (A), and release the center seat belt buckles (B) from the slits (C)

  3. Release the seat belts (A) from their guides (B).
  4. Remove the bolts from the base of the seat-back (A)
  5. Remove the rear seat-back (A).

    Lift up the bottom of the seat-back.

    Push on the seat-back while lifting it up to release the wire loops (B) from the hooks (C) on the body.

  6. Remove rear door weather stripping as needed

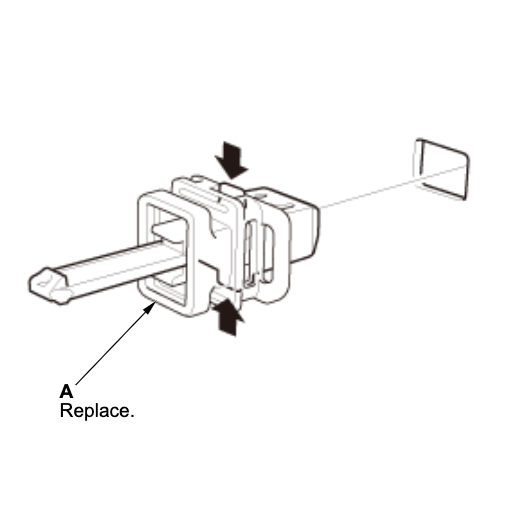
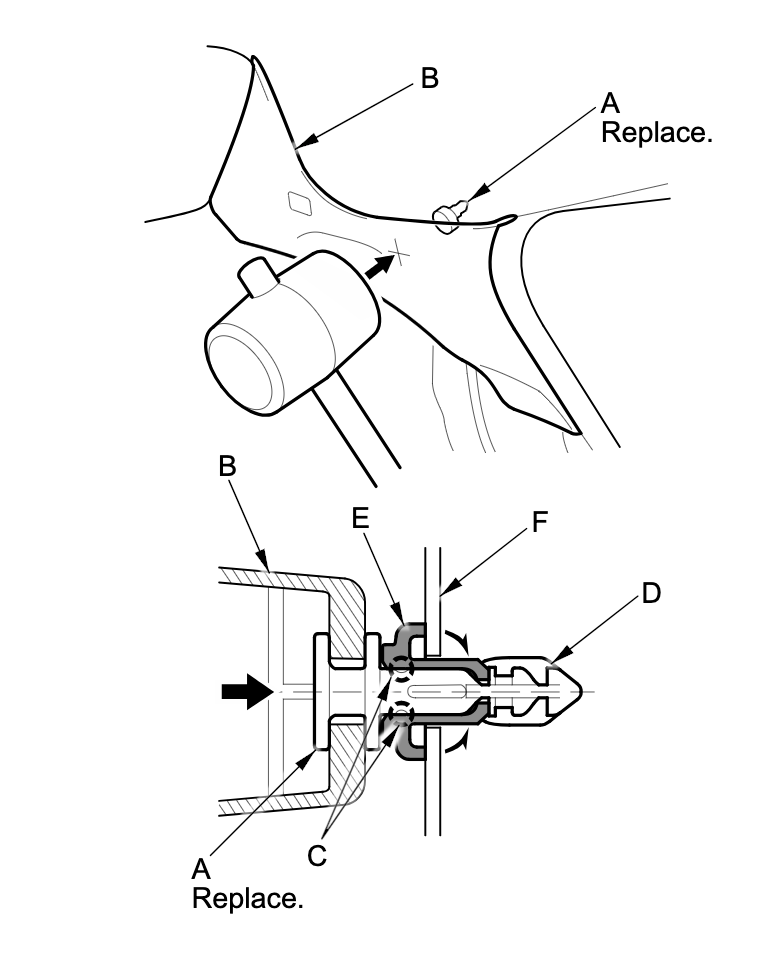
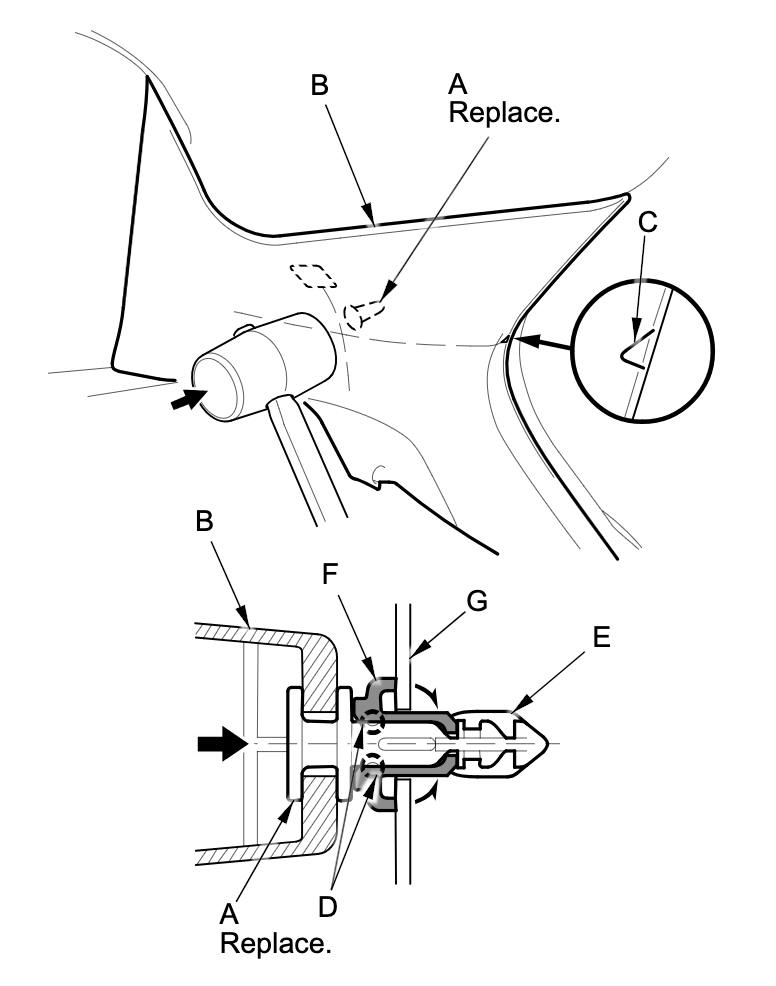
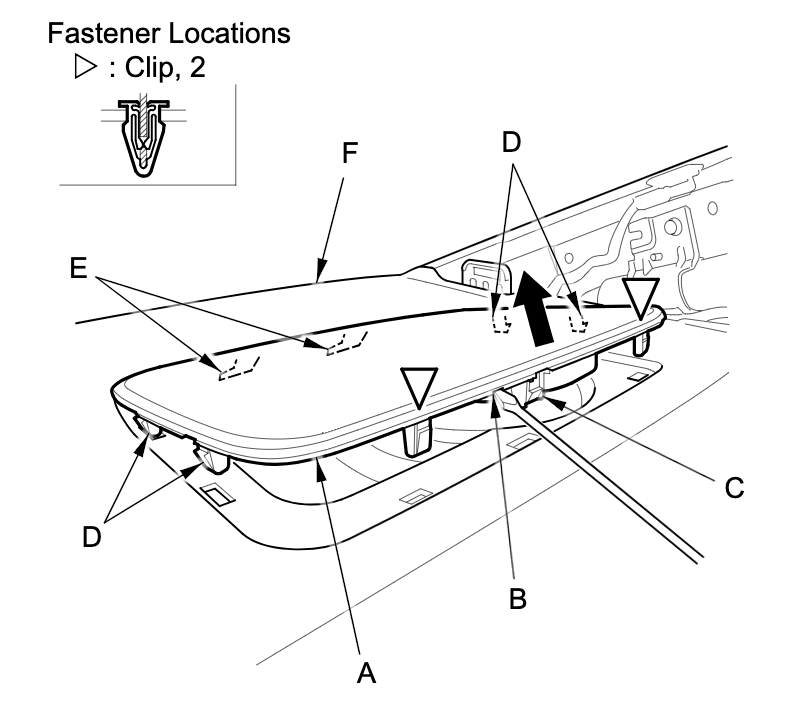
  7. Hit the upper clip (A) in the C-pillar trim (B) with a rubber mallet. Hitting the clip breaks the projections (C) on the pin (D) and pushes it into the grommet (E) on the body (F).

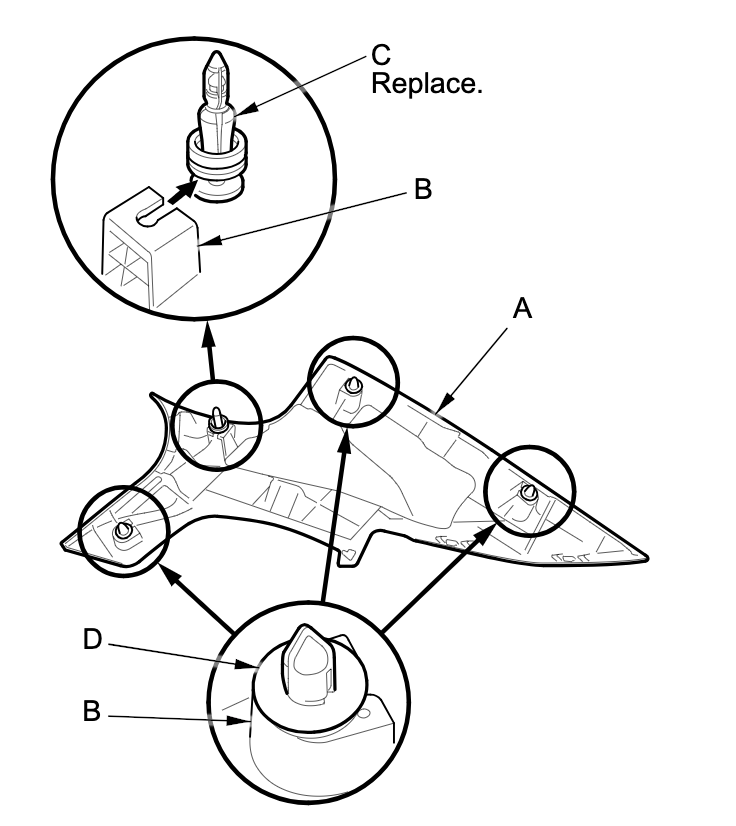
    NOTE: The upper clip must be replaced with a new one when the C-pillar trim is reinstalled.


    NOTE: The upper clip must be replaced with a new one when the A-pillar trim is reinstalled. If you don’t replace the clip the C-Pillar will still lock in place. Also you can repair the existing clip by heating it and then separating it from each other.
    Link to clips if you rather replace them – https://www.amazon.com/dp/B0B4B9FCKK

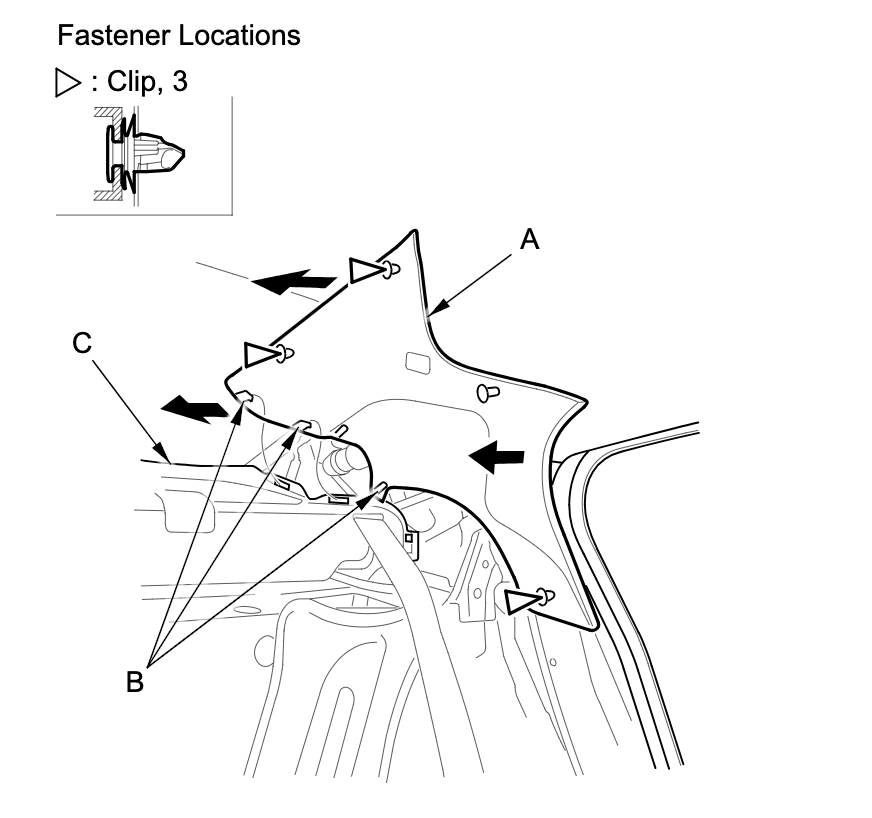
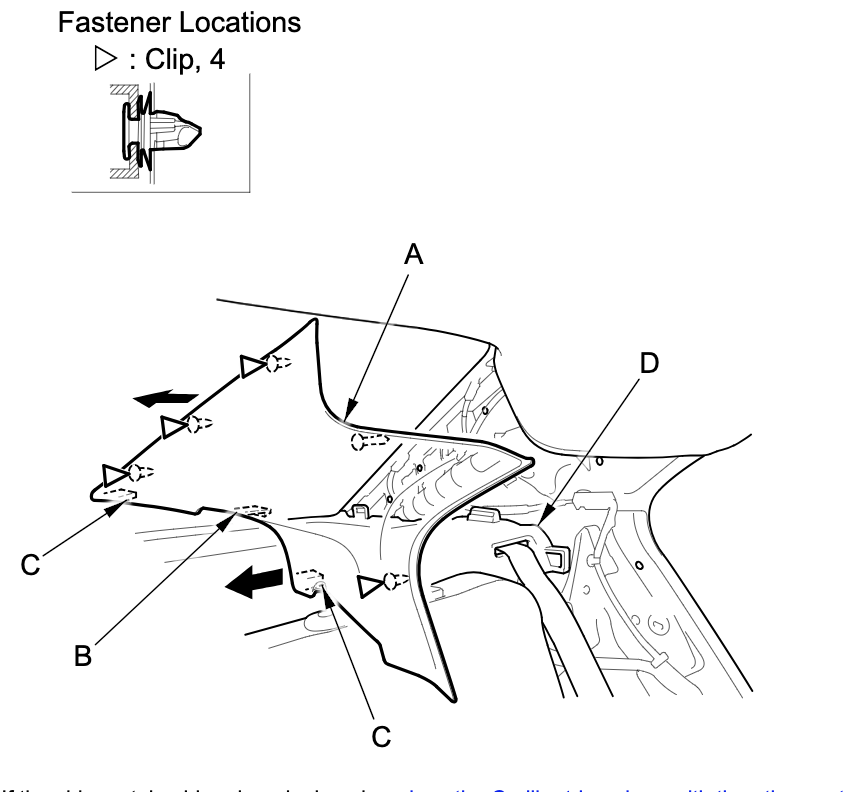
  8. Pull back the top of the C-pillar trim (A) by hand to remove the upper clip (B) from the body (C).

  9. Remove the rear bulkhead cover (A).
    Detach the clips with a clip remover.
    Lift the rear shelf upward and forward to release the rear hook (B).
    Slightly warp the rear shelf to release both side edges from the side curtain airbag inflators, then pull it forward.
    NOTE: Be careful not to damage the speakers.

  10. Remove the four bolts securing the subwoofer.
  11. Disconnect the factory subwoofer by pinching the connector at the sides and pulling down until it releases. You will need to pull with moderate force.

  12. Secure the new mounting bracket to the rear deck using the factory screws you just removed.

  13. Connect the new subwoofer to the factory connection using the provided harness.

  14. Mount the new subwoofer to the mounting bracket with the supplied mounting screws.
    NOTE: It is recommended to apply sound treatment material to the rear deck metal and rear deck cover to reduce unwanted rattles and noise

  15. Reinstall the covers you removed in the reverse order.
    NOTE: If the rear deck touches your new subwoofer, trim the rear deck panel so the surround of the subwoofer does not touch or buy longer retaining clips to ensure the rear deck does not touch the subwoofer.
    You can use the ones found at this link. https://www.amazon.com/Rexka-Panel-Retainer-Chrysler-6503709/dp/B07CJP3X5H/

2009 2010 2011 2012 2013 2014 Acura TSX Subwoofer Upgrade Instructions

  1. Remove these items:
    -Rear door opening seal, as needed
  2. Hit the upper clip (A) in the C-pillar trim (B) with a rubber mallet. The clip is located under the point where the triangle mark (C) on the edge of the trim indicates. Hitting the clip breaks the projections (D) on the pin (E) and pushes it into the grommet (F) and against the body (G).

    NOTE: The upper clip must be replaced with a new one when the C-pillar trim is reinstalled.


    NOTE: The upper clip must be replaced with a new one when the A-pillar trim is reinstalled. If you don’t replace the clip the C-Pillar will still lock in place. Also you can repair the existing clip by heating it and then separating it from each other.
    Link to clips if you rather replace them – https://www.amazon.com/dp/B0B4B9FCKK
  3. Pull back the top of the C-pillar trim (A) by hand to remove the upper clip (B) from the body (C)


  4. Fold down the rear seat-backs.

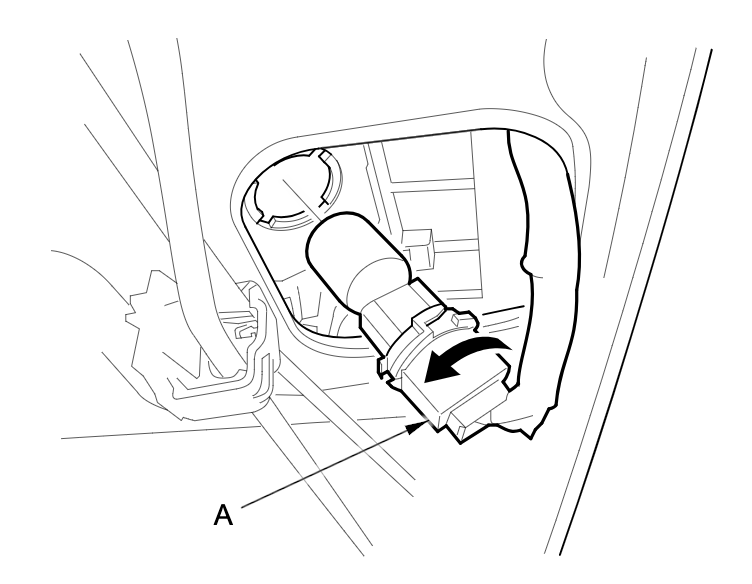
  5. If the rear bulkhead cover and the rear shelf are to be removed, turn the high mount brake light socket (A) 45 ° counterclockwise to remove the socket from the trunk compartment.


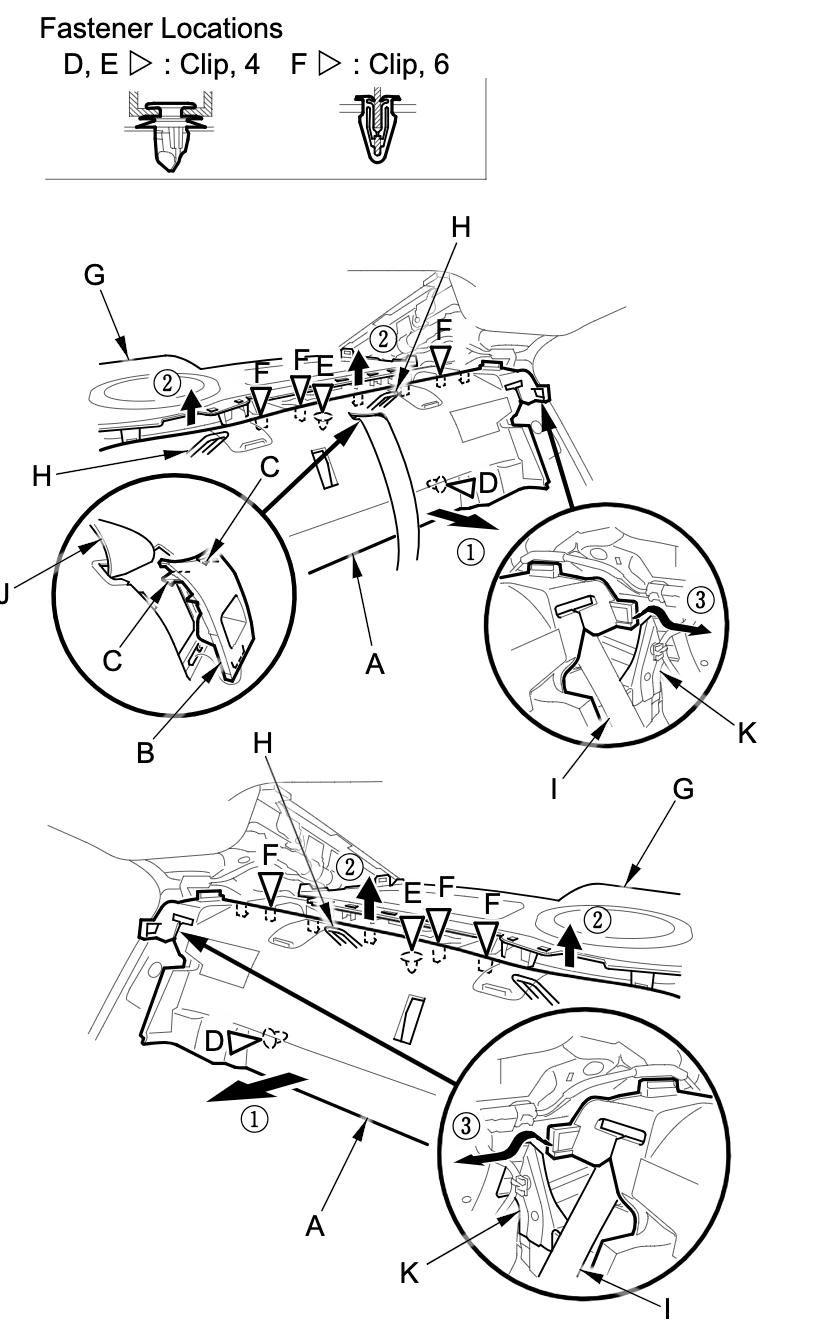
  6. Remove the rear bulkhead cover (A).
    1. Remove the belt hole cover (B) by releasing the hooks (C).
    2. Gently pull back the front edge of the cover to detach the clips (D).
    3. Pull up the cover to detach the clips (E) fastening it to the body, and the clips (F) fastening it to the rear shelf (G).
    4. Lift the cover upward and forward to release each anchor rod (H) out through the holes in the cover.
    5. Pull out both rear seat belts (I) and rear center seat belt (J) through the slits and the hole in the cover.
    6. Carefully move the cover above the rear wheelhouse gussets (K), then remove it.

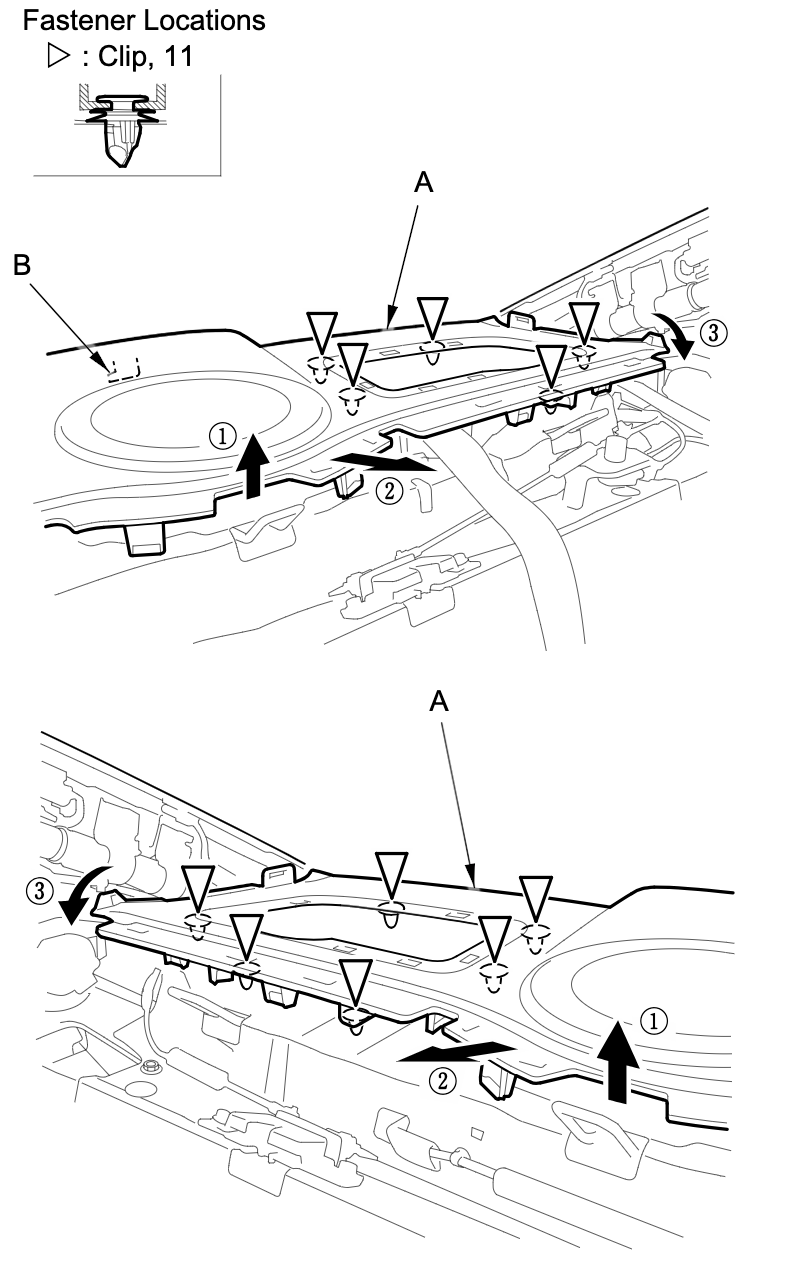
    7. Remove the rear speaker grille (A).
      Pry up at the notch (B) with a flat-tip screwdriver, of the grille to release the hook (C).
      Pull up along the edge of the grille to detach the clips and release the hooks (D).
      Pull back the grille to release the hooks (E) from the rear shelf (F).

    8. Remove the rear shelf (A).
      Detach the clips with a clip remover.
      Lift the rear shelf upward and forward to release the rear hook (B).
      Slightly warp the rear shelf to release both side edges from the side curtain airbag inflators, then pull it forward.
      NOTE: Be careful not to damage the speakers.

    9. Remove the four bolts securing the subwoofer.
    10. Disconnect the factory subwoofer by pinching the connector at the sides and pulling down until it releases. You will need to pull with moderate force.
    11. Secure the new mounting bracket to the rear deck using the factory screws you just removed.
    12. Connect the new subwoofer to the factory connection using the provided harness.
    13. Mount the new subwoofer to the mounting bracket with the supplied mounting screws.
      NOTE: It is recommended to apply sound treatment material to the rear deck metal and rear deck cover to reduce unwanted rattles and noise.
    14. Reinstall the covers you removed in the reverse order.
      NOTE: If the rear deck touches your new subwoofer, trim the rear deck panel so the surround of the subwoofer does not touch or buy longer retaining clips to ensure the rear deck does not touch the subwoofer.
      You can use the ones found at this link. https://www.amazon.com/Rexka-Panel-Retainer-Chrysler-6503709/dp/B07CJP3X5H/

2009 2010 2011 2012 2013 2014 Acura TSX Factory Radio Removal | Aftermarket Radio Installation Procedure

Your Base Acura TSX has a total of 7 speakers that are powered by the factory amplifier. When replacing the factory radio using our complete kit you are able to keep all of the speakers. The front door speakers, tweeters, rear deck speakers and the factory subwoofer will all continue to work. Our harness integrates with the factory amplifier to keep all your speakers working. If your factory amplifier does not work this kit will not work.

Your Tech Package or Navigation equipped TSX has a total of 10 speakers that are powered by the factory amplifier. When replacing the factory radio using our complete kit you are able to keep all the speakers. The way the ELS Amplifier Interface retains the factory amplifier is by feeding left and right audio from the aftermarket radio to the factory amplifier and the factory amplifier up-mixes the audio from stereo to 5.1 surround.

You will lose Sirius XM, AUX Input and the factory handsfree link functionality. The steering wheel controls including volume up, volume down, next, previous and mode will work. The call control buttons are not retained. The navigation control buttons are not retained.

FAQ.

  1. In my premium audio system, will the display above the radio continue to show climate control information.
    – Yes your climate control will continue to function as normal.
  2. In my tech package, will I lose the climate control information?
    – Yes the climate information will be lost unless you convert your navigation screen to the audio HVAC display with our harness.
  3. In my tech package, will I lose the factory backup camera?
    – Yes the factory backup camera is lost. You can use our camera retention harness to keep it on your aftermarket radio.
  4. Can I use this complete kit on a TSX with navigation?
    – Yes. But you will need additional parts to convert the climate control display and to keep the factory backup camera.
  5. Can I add an amplifier and subwoofers with your harness?
    – Yes you can. You will just need run your RCAs to the back of the radio and wire tap the blue or blue/white wire of the harness.
  6. Can I add a backup camera with your harness?
    – Yes just follow the instructions provided in the radios owners manual or the cameras manual to complete the installation.
  7. Can I use a random radio I found on Amazon or eBay that has an unknown brand?
    – Most likely not. If the radio you purchased on Amazon is less than $100 it most likely won’t have all the features and ports needed for you to complete the installation.
  8. Do I get to keep all my speakers?
    – Yes all speakers are retained.
  9. Do I get to keep my steering wheel controls?
    – Yes but an additional part is required. The AXSWC in included in this kit. You will get to keep volume up, volume down, next, previous and mode. The call control buttons will not be retained. The navigation control buttons are not retained.
2004 2005 2006 2007 2008 Acura TSX Factory Radio Removal | Aftermarket Radio Installation Procedure

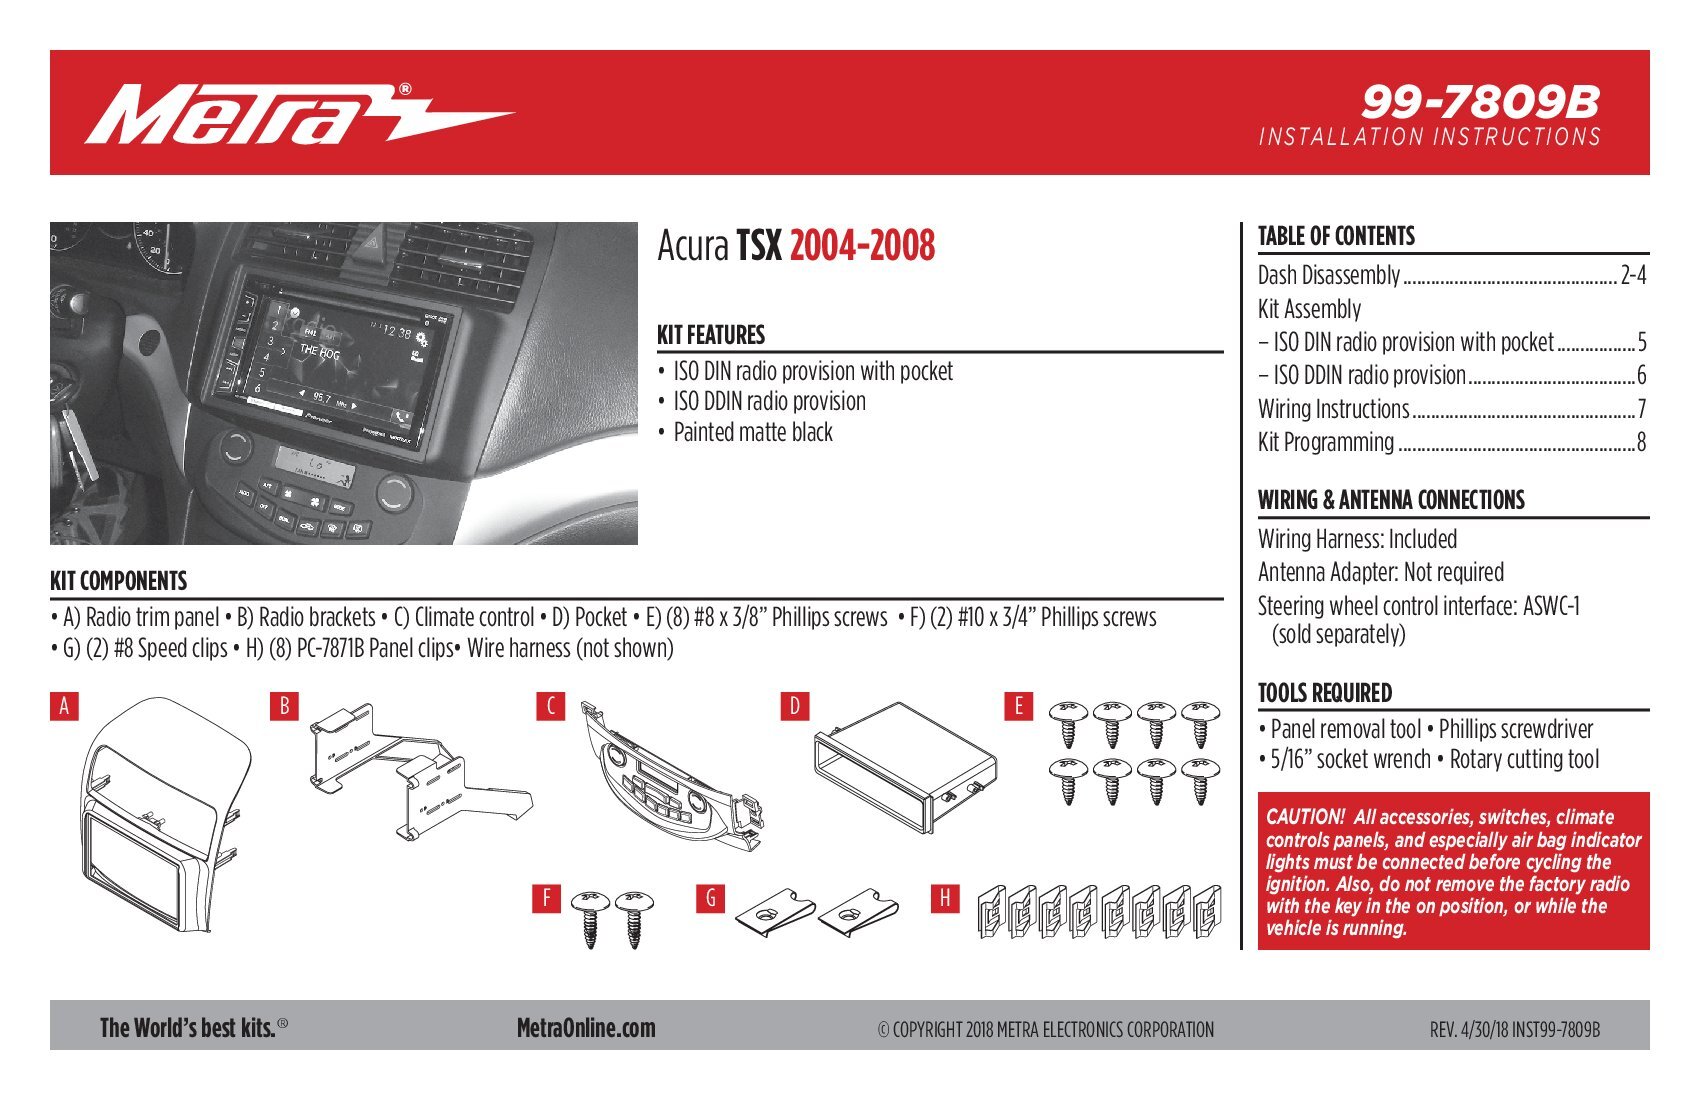
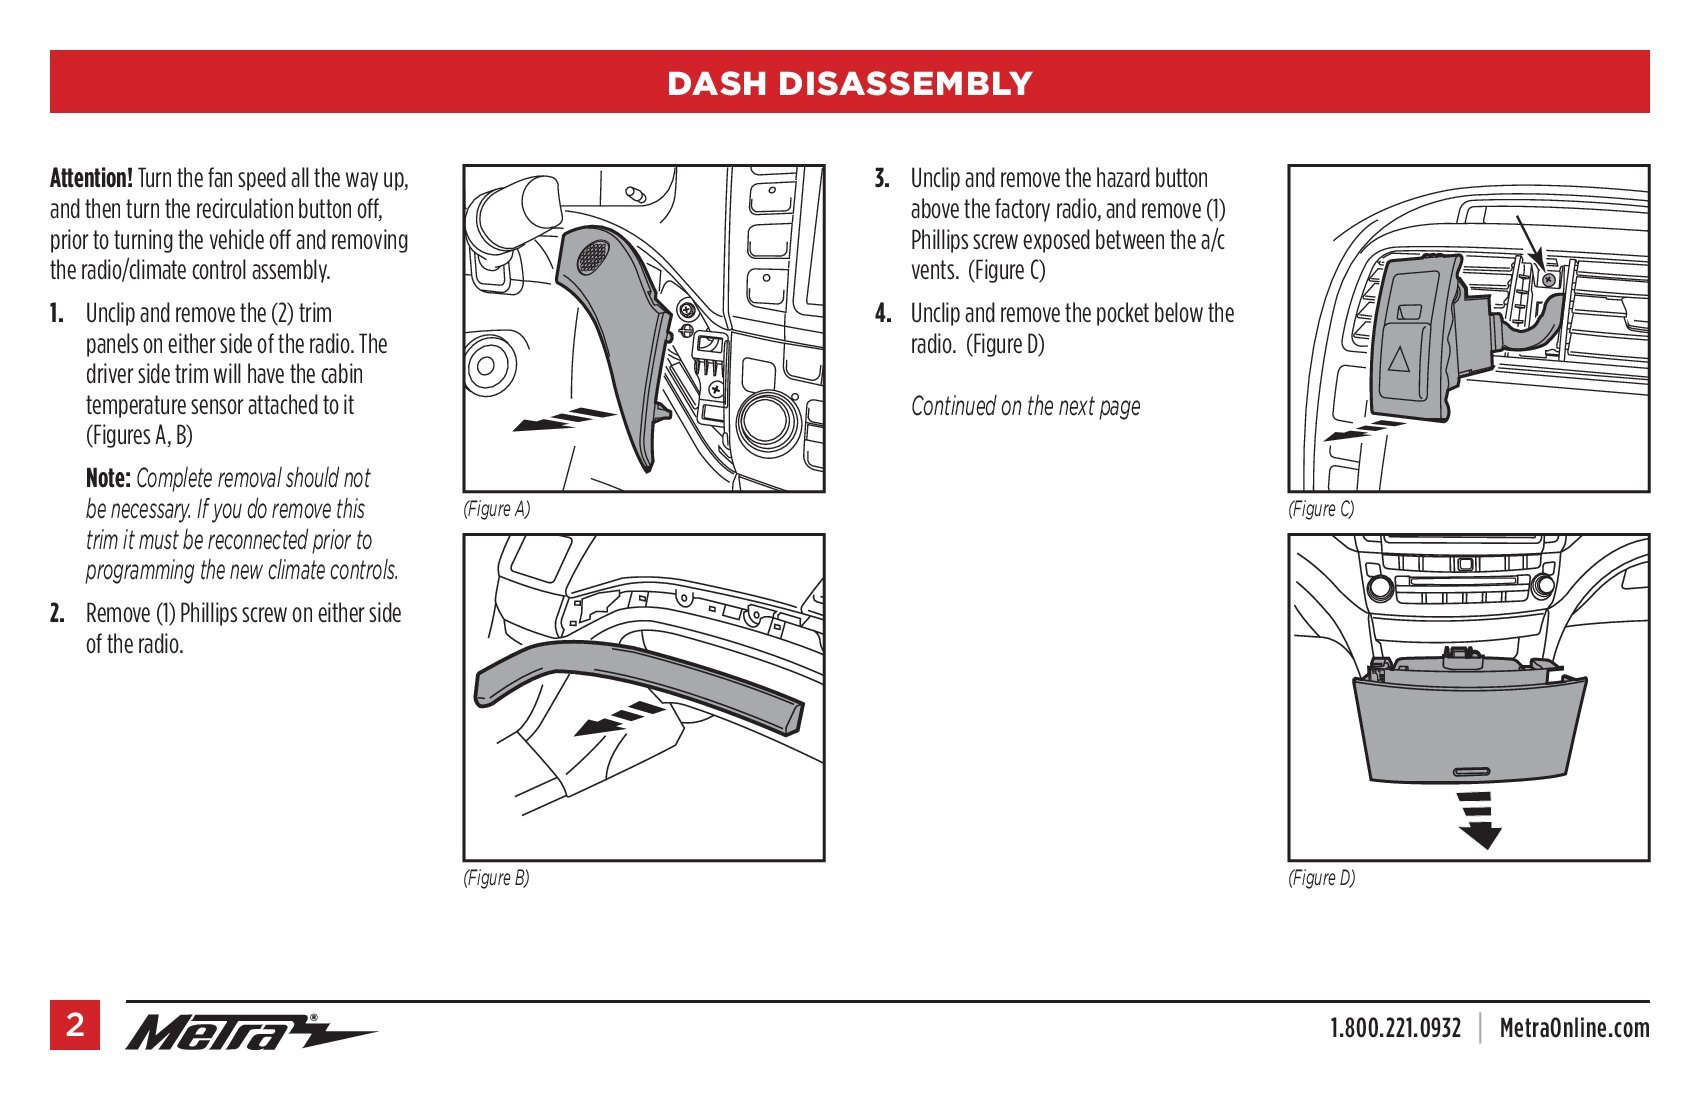
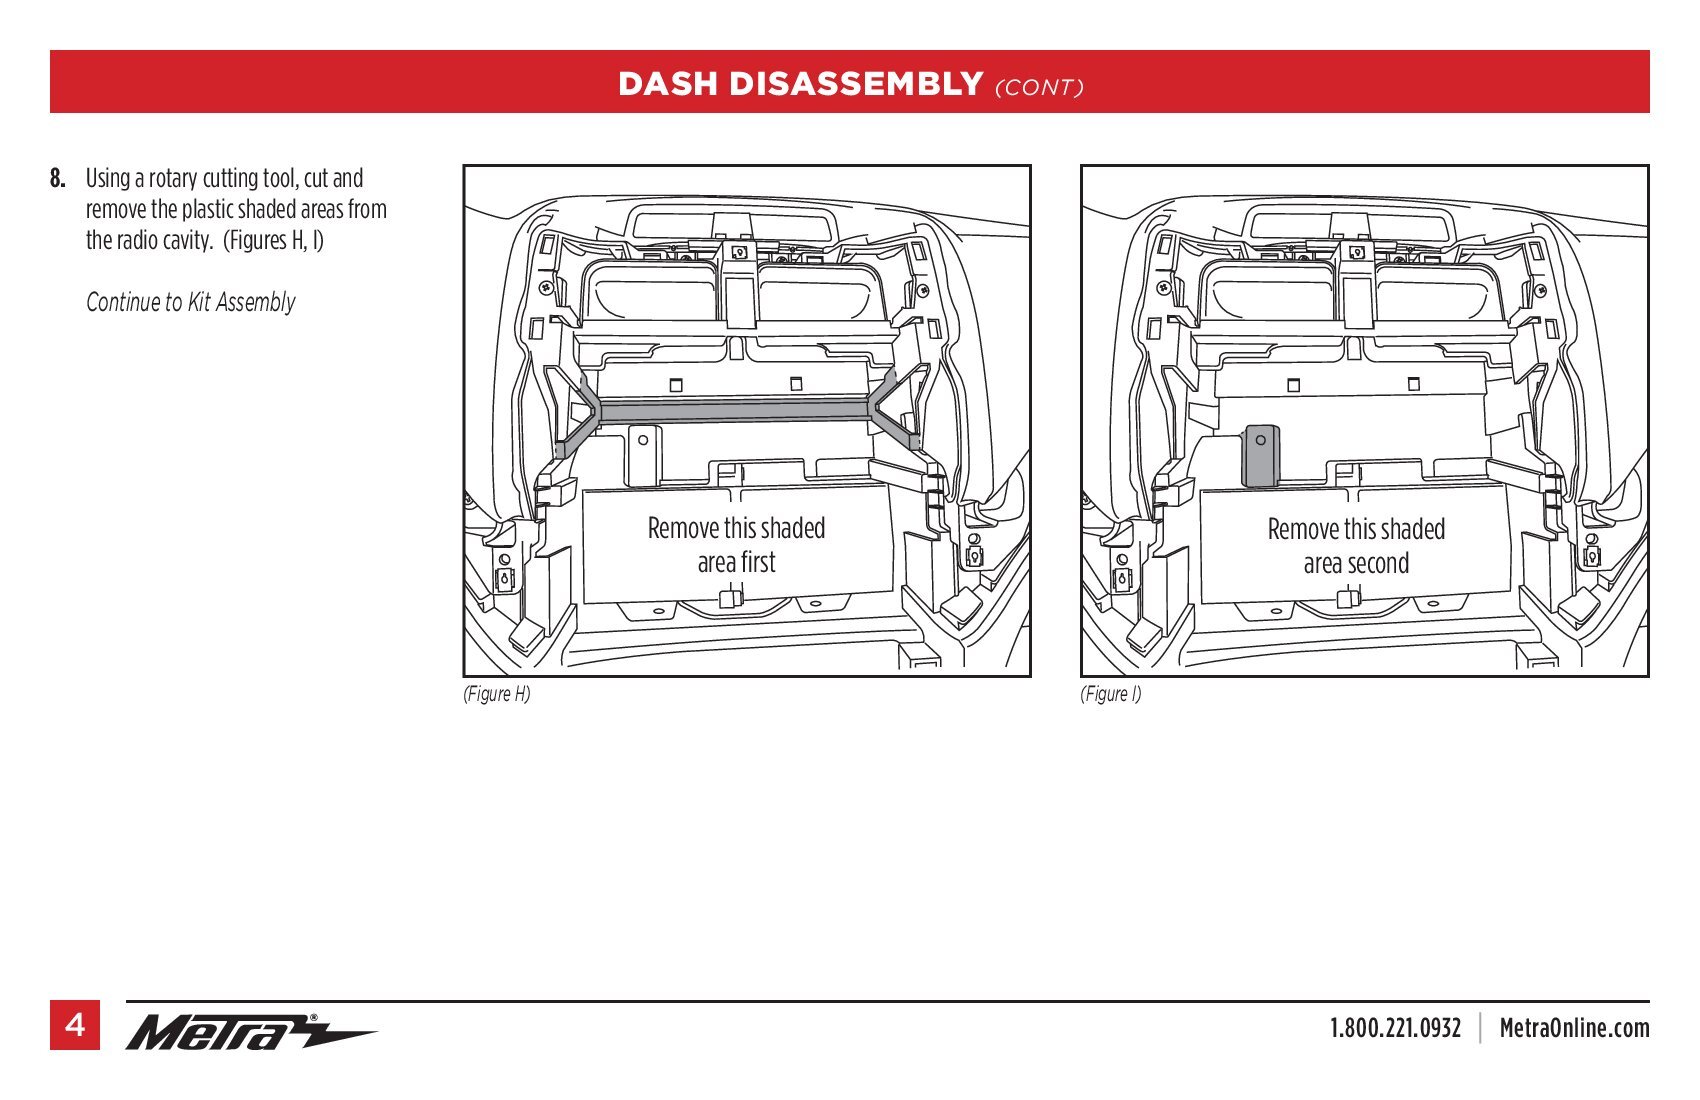
When replacing the radio in your Acura TSX you will need to modify the plastic behind the factory radio to fit the new radio in place. This modification while permanent does not affect the ability to install the factory radio or any factory components. If you replace the radio in your Acura TSX the new aftermarket radio will utilize the factory amplifier to keep all of your speakers including the front door speakers, tweeters, rear deck speakers and rear deck subwoofers. You will also get to keep the steering wheel control buttons including volume up, volume down, next, prev and mode. The Navigation and HFL control buttons will not work. The factory navigation will keep working but you will have no sound from it. The factory backup camera will still work if equipped through the factory navigation. This radio kit is meant to be installed below the factory radio please check the pictures. The factory radio and climate control will remain functional.

A. driver inner dashboard trim

graphic


B. passenger trim


graphic


C. center console panel

graphic


D. center upper pocket

graphic


E. center lower pocket

graphic

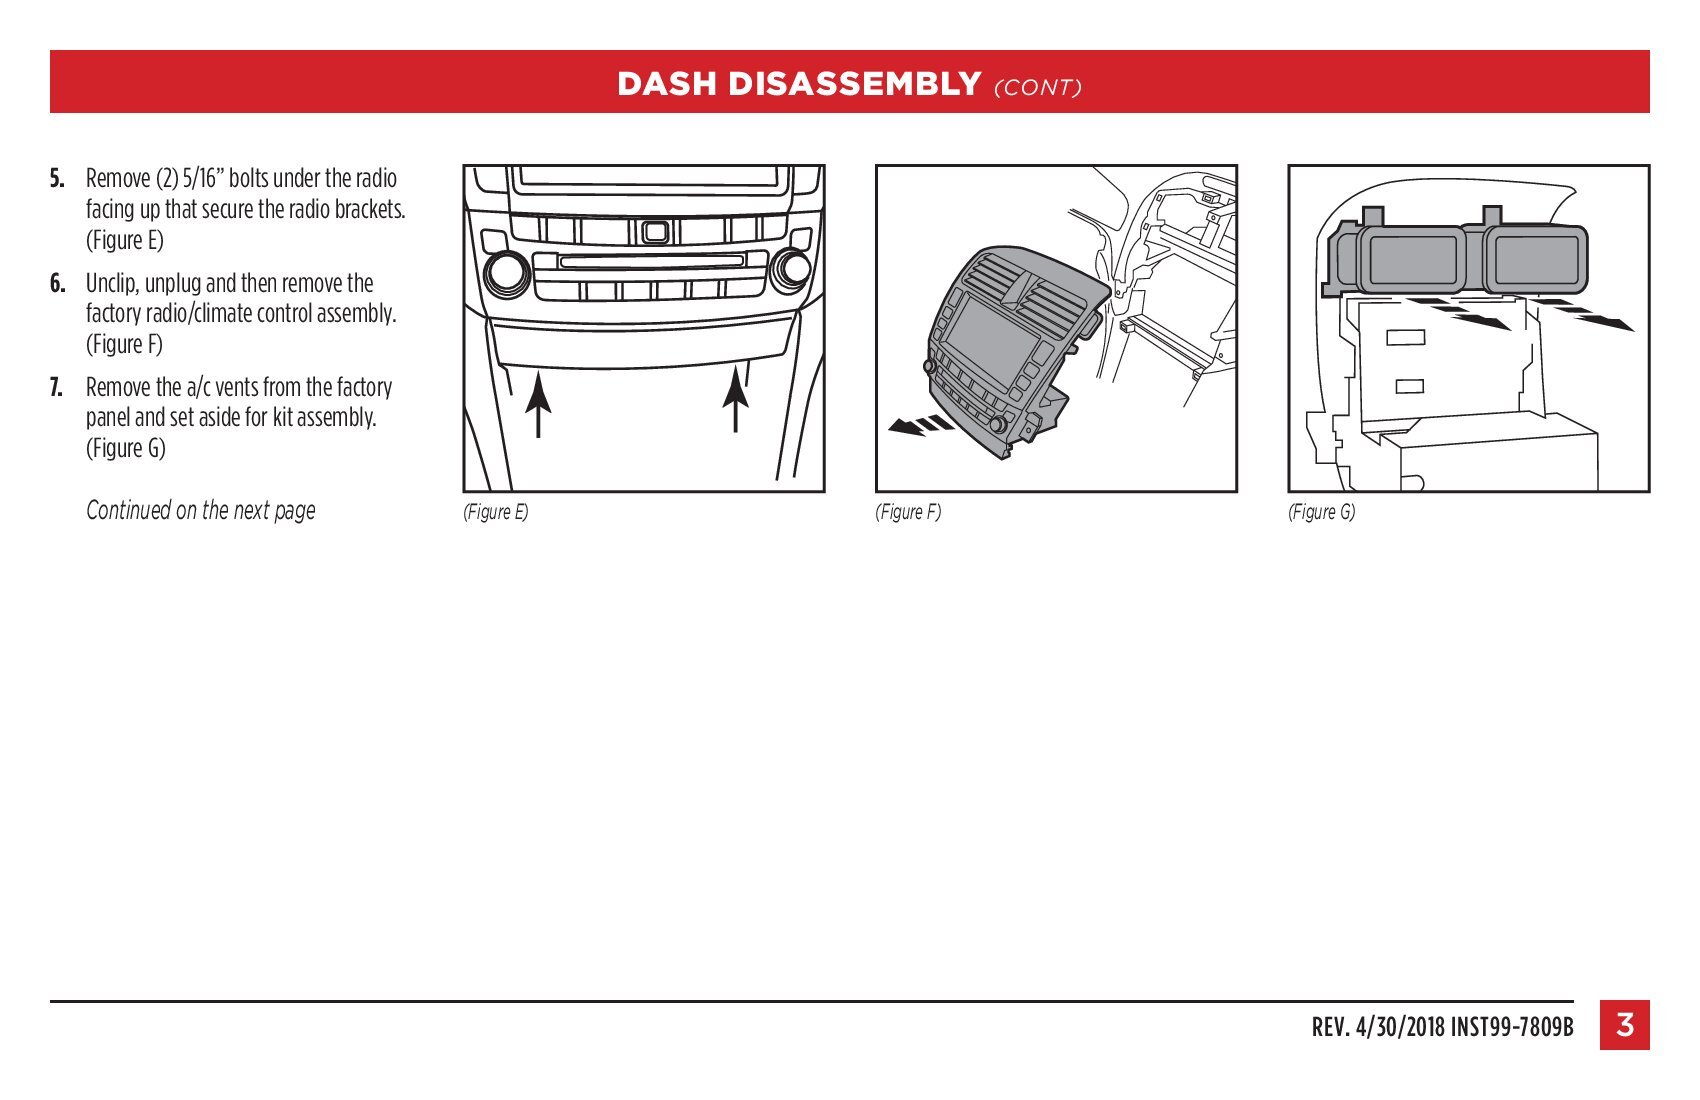
You need to remove the hazard switch as well, this will pop out, is also held in by clips. Remove five 8mm screws from the face and below the radio, and the radio will pop out -note- is also held in with clips.

graphic


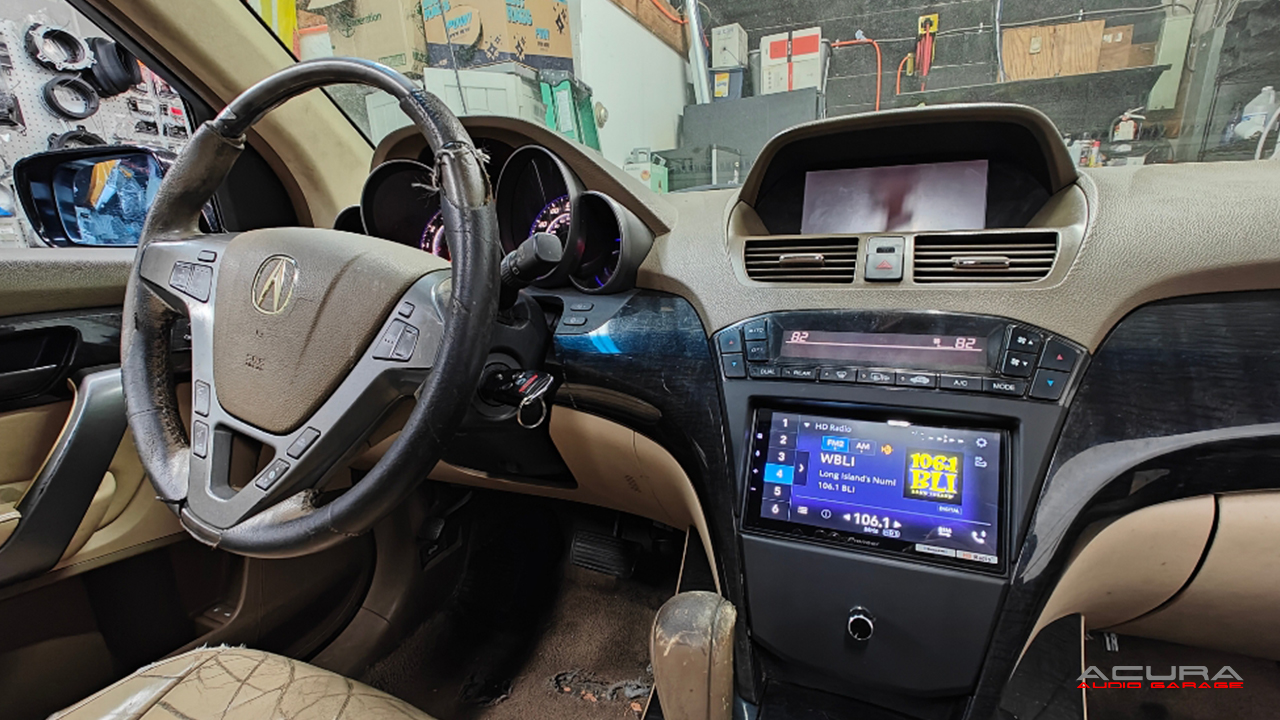
2007 2008 2009 2010 2011 2012 2013 Acura MDX Factory Radio Removal | Aftermarket Radio Installation Procedure

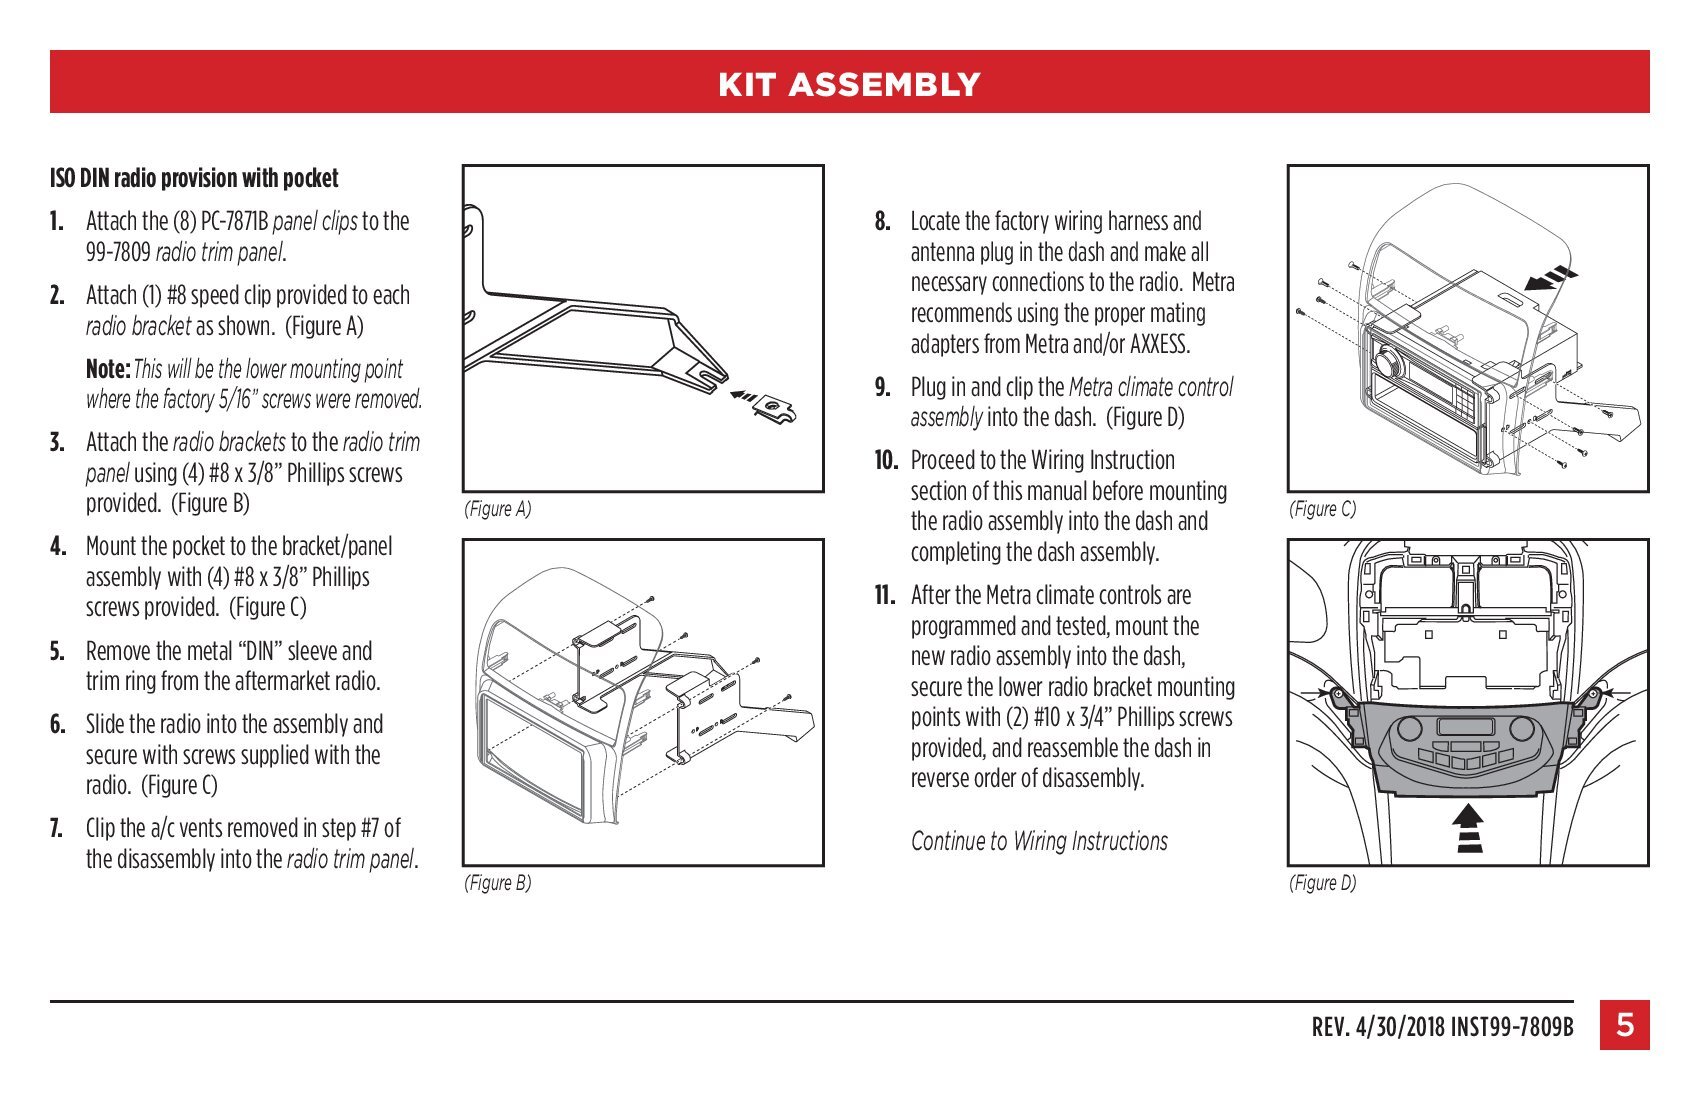
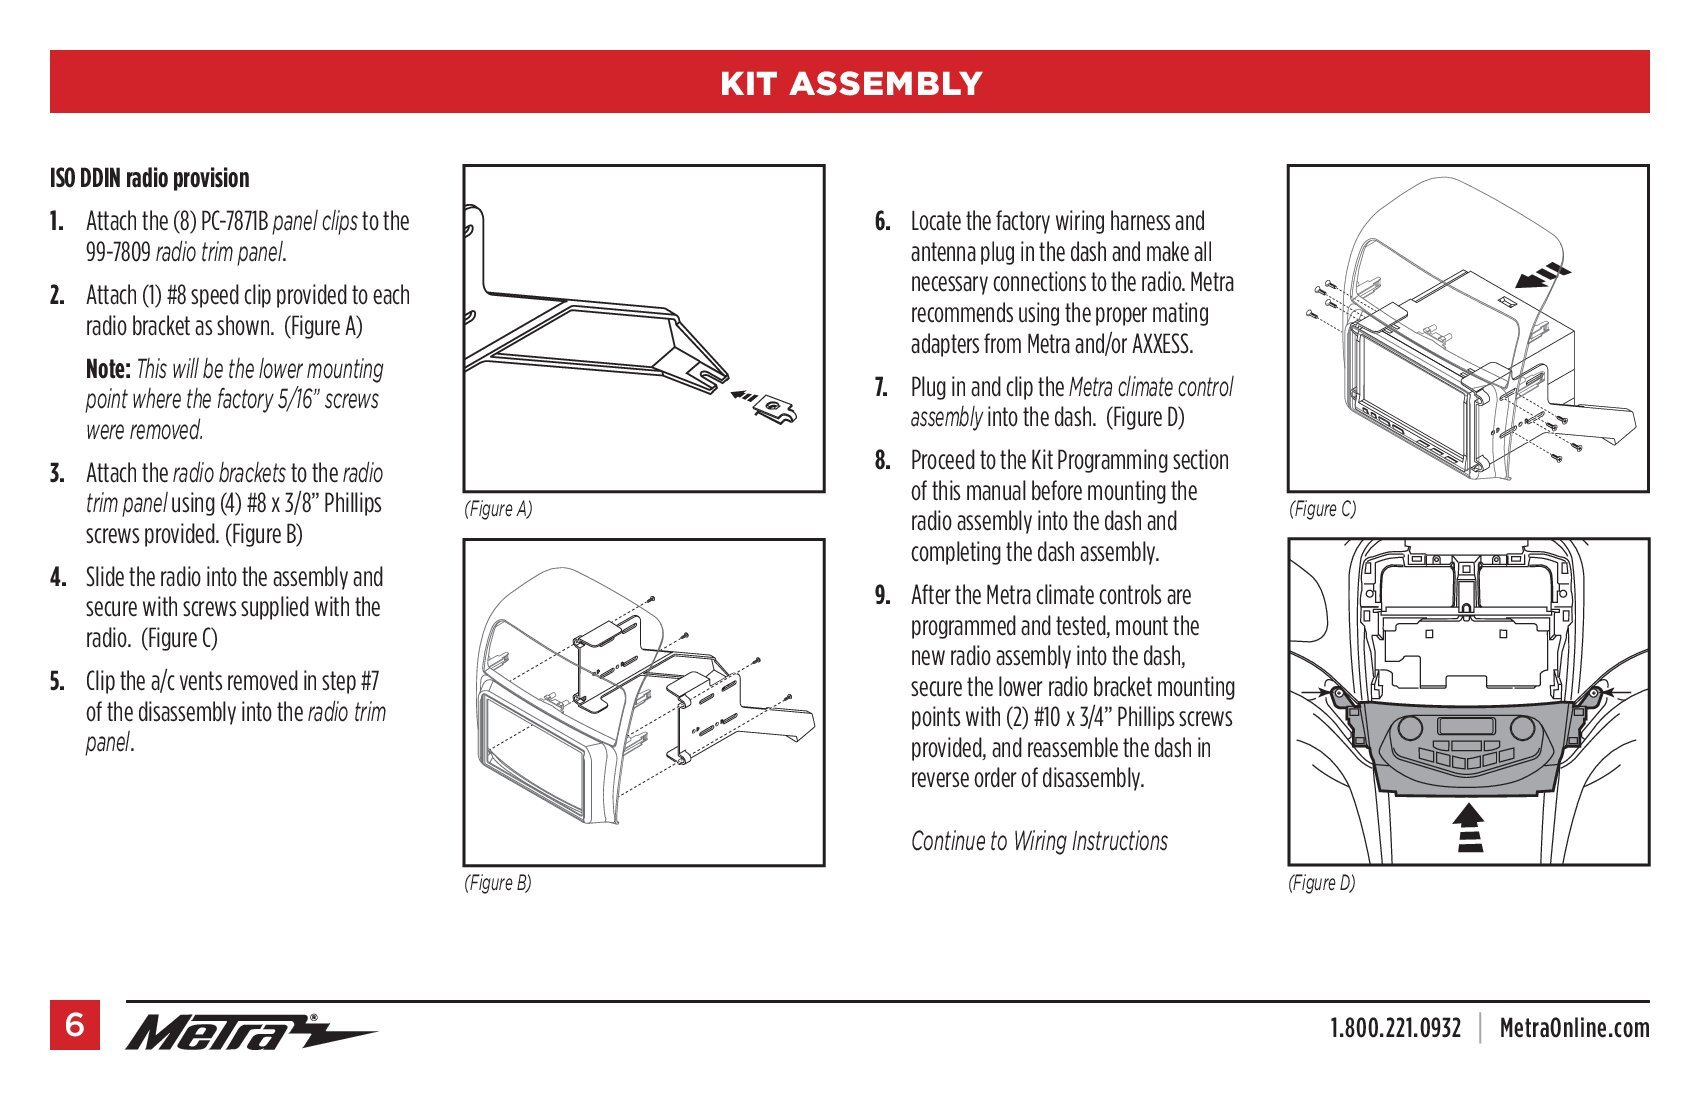
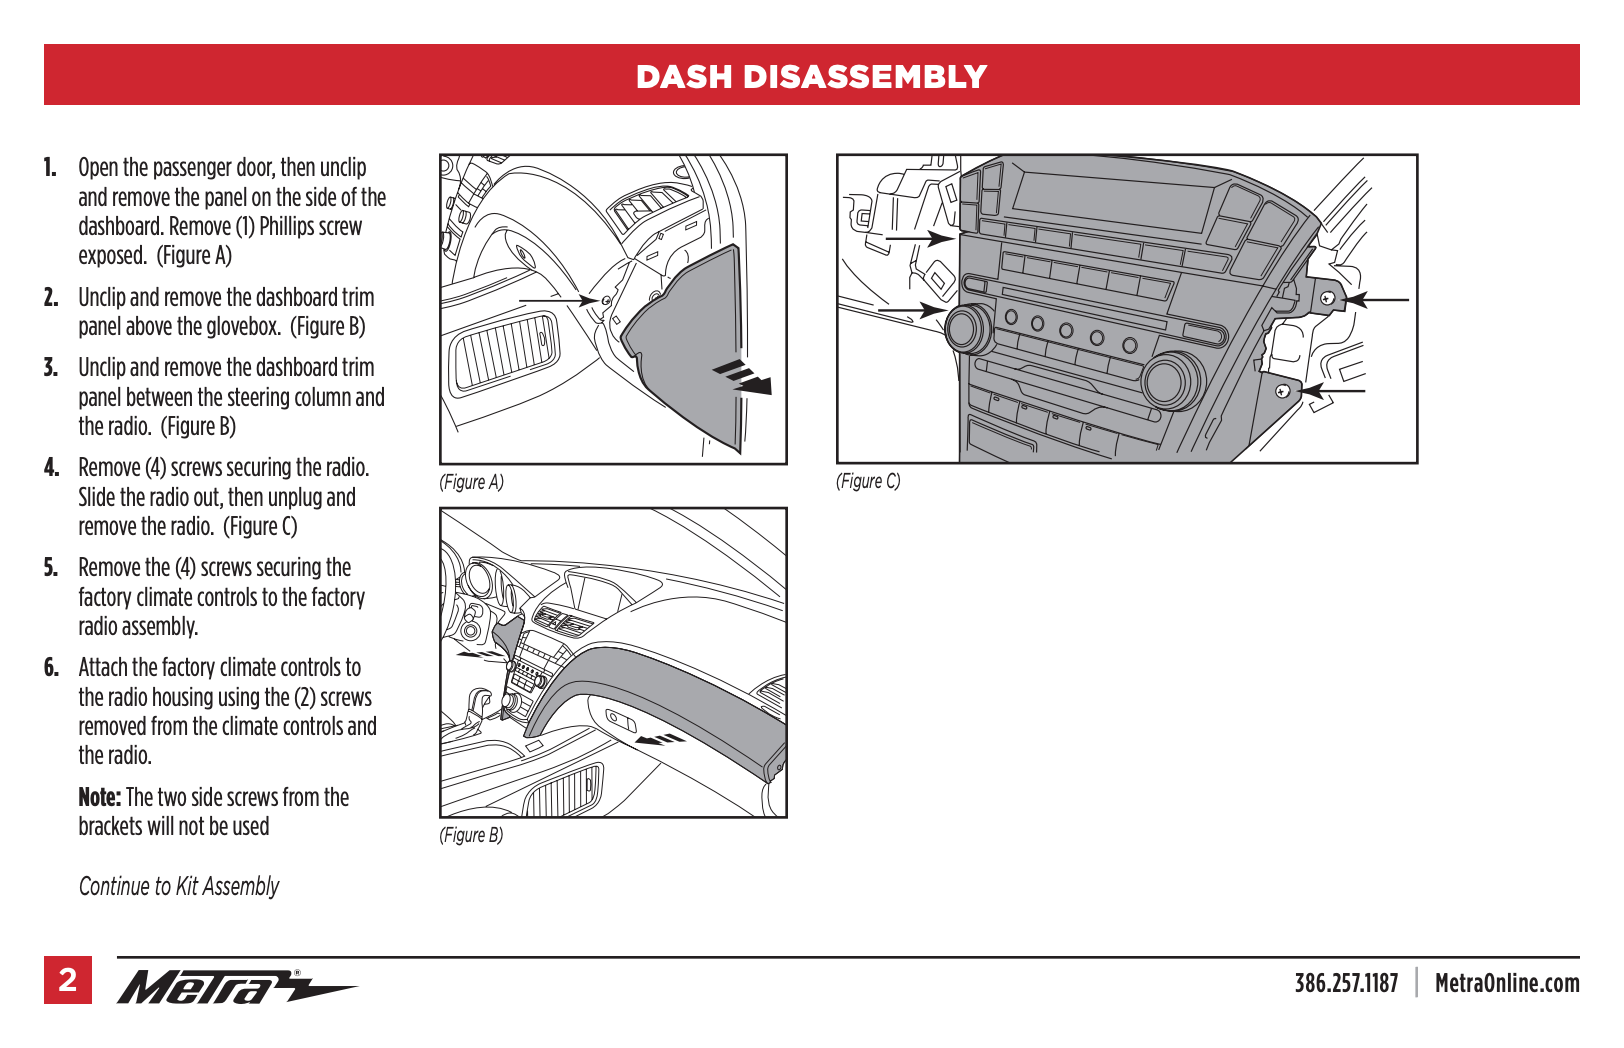
Your Acura MDX without navigation has a total of 6 speakers that are powered by the factory amplifier. When replacing the factory radio using our complete kit you are able to keep all of the speakers except the center channel. The front door speakers, tweeters, rear deck speakers and the factory subwoofer will all continue to work; the center dash speaker will not work. You will also lose the factory hands free functionality and the factory XM functionality. Our harness integrates with the factory amplifier to keep all your speakers working. If your factory amplifier does not work this kit will not work.

Your Acura MDX with navigation has a total of 8 speakers that are powered by factory amplifier. When replacing the factory radio using our complete kit you get to keep all the speakers including the factory subwoofer, door speakers, center speaker and tweeters. Our harness along with the amplifier interface allows you to keep the factory amplifier and keep all your speakers working. Your factory backup camera will continue to work but you will not be able to control the navigation. In the 2007-2009 MDX you will also need the factory navigation to not loose power to keep your camera working. In the 2010-2013 Acura MDX the backup camera is directly wired to the factory screen so it will continue to work. You will also lose the factory hands free functionality and the factory XM functionality. The rear entertainment will also no longer work.

When replacing the factory radio you will lose Sirius XM and the factory handsfree link functionality. The steering wheel controls including volume up, volume down, next, previous and mode will work. The call control buttons are not retained. The navigation control buttons are not retained.

FAQ

  1. Can I add an amplifier and subwoofers with your harness?
    – Yes you can. You will just need run your RCAs to the back of the radio and wire tap the blue or blue/white wire of the harness.
  2. Can I add a backup camera with your harness?
    – Yes just follow the instructions provided in the radios owners manual or the cameras manual to complete the installation.
  3. Can I use a random radio I found on Amazon or eBay that has an unknown brand?
    – Most likely not. If the radio you purchased on Amazon is less than $100 it most likely won’t have all the features and ports needed for you to complete the installation.
  4. Do I get to keep all my speakers?
    – Yes all speakers are retained. On non nav models the center dash speaker is lost.
  5. Do I get to keep my steering wheel controls?
    – Yes but an additional part is required. The AXSWC in included in this kit. You will get to keep volume up, volume down, next, prev and mode. The call control buttons will not be retained.
  6. How do I get the radio to dim when I turn on the headlights?
    -You will need to wire tap the wire show in this picture and attach it to the orange or orange/white wire in your harness.