
All of of radio kits include, the radio shown in the picture, the dash kit for your exact Acura, a wired plug and play harness and the steering wheel control interface. This is one package that includes everything you will need to complete your upgrade. The information below is a summary of the radio features and some of its highlights. If you are looking for specific information regarding your Acura please visit the following pages. Also please read the message that is generated below the selection menus.
Vehicle Specific Information
1999-2003 Acura TL
2004-2008 Acura TL
2004-2008 Acura TSX
2009-2013 Acura TSX
2001-2006 Acura MDX
2007-2013 Acura MDX
2013-2022 Acura ILX Single Screen
NOTICE: Please select your year and model for installation specific information and what factory features will continue working.
Radio Summary:
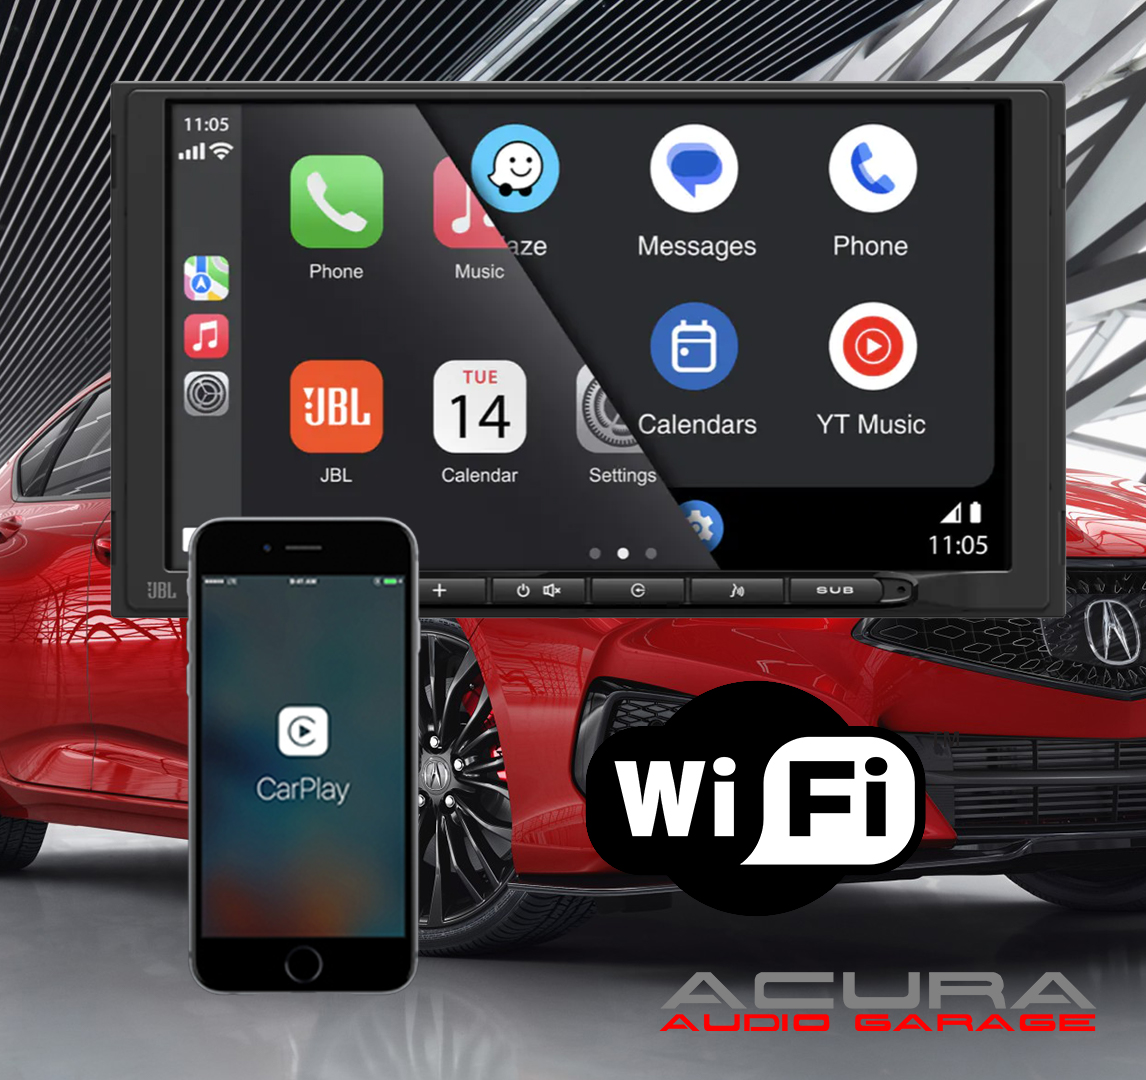
If you are looking to add , Wireless Apple CarPlay and Wireless Android Auto to your Acura this JBL radio is a budget friendly option. It offers a mix of great value, simplicity and features. The capacitive touchscreen is great for controlling your apps on the go including Apple Music, Waze, Spotify and YouTube Music. Along with Bluetooth, Apple CarPlay, Android Auto this radio also has USB Media Playback and a auxiliary input. It also has the option to add a backup camera or an aftermarket amplifier for subwoofers. What this radio doesn’t have is a CD/DVD player, Sirius XM Compatibility, or built in GPS Guidance. The USB port is on the back of the radio so you will need to run the included USB extension into the glovebox or flush mount a USB adapter somewhere on your dash. Our plug and play radio kit removes the need for any wiring so all you have to do is plug everything in. Our radio kit also allows you keep your factory steering wheel controls, amplifier and all your speakers speakers in most Acura’s.
Who should buy this radio:
This radio is a great choice for a first time buyer of aftermarket car audio receivers. The electronics inside this head unit provide a solid audio foundation for integrating with the factory system in your Acura or powering an aftermarket system. This radio has a very simple interface that makes it easy to navigate. It also has a clean audio output and dedicated settings for any of your audio sound goals. JBL uses there own dedicated operating system that is similar to Sony in simplicity. This radio has tactile buttons all along the bottom so you can easily see and tell which button you are pressing. It has a dedicated subwoofer button to get you to the subwoofer settings whenever you want and a dedicated voice activation button for CarPlay or android auto. The 7″ inch touchscreen display is bright and has great viewing angles regardless or how low or how high you have to mount it in your Acura.
Who should look for something else:
If you are looking for built in GPS Guidance that doesn’t require a phone connection or for the ability to play CD/DVDS this is radio is not a good choice. This radio also isn’t recommended for those who want to run a complex aftermarket audio system that are going to use multiple amplifiers. This radio works great with the factory audio system in the Acura TL, MDX, ILX and TSX but with multiple aftermarket amplifiers there are better options than this radio. Installing a subwoofer amplifier is no problem but if you are planning to run a two or three amplifier system then we recommend a higher tier Kenwood or Pioneer with all the audio settings necessary and with 4v-5V Preamp outputs instead.
About the JBL Brand:
JBL is one of the largest speaker manufacturers in the world. They make car speakers, house speakers, portable speakers, arena speakers and a ton of other speakers. But what do they know about making radios? The truth is this is one of the first radios they have made in the recent years and while JBL has a great track records with speakers we don’t know much about what to expect from there radios. What we can say is this radio has a one year warranty and JBL is a partner who does backup there products.